

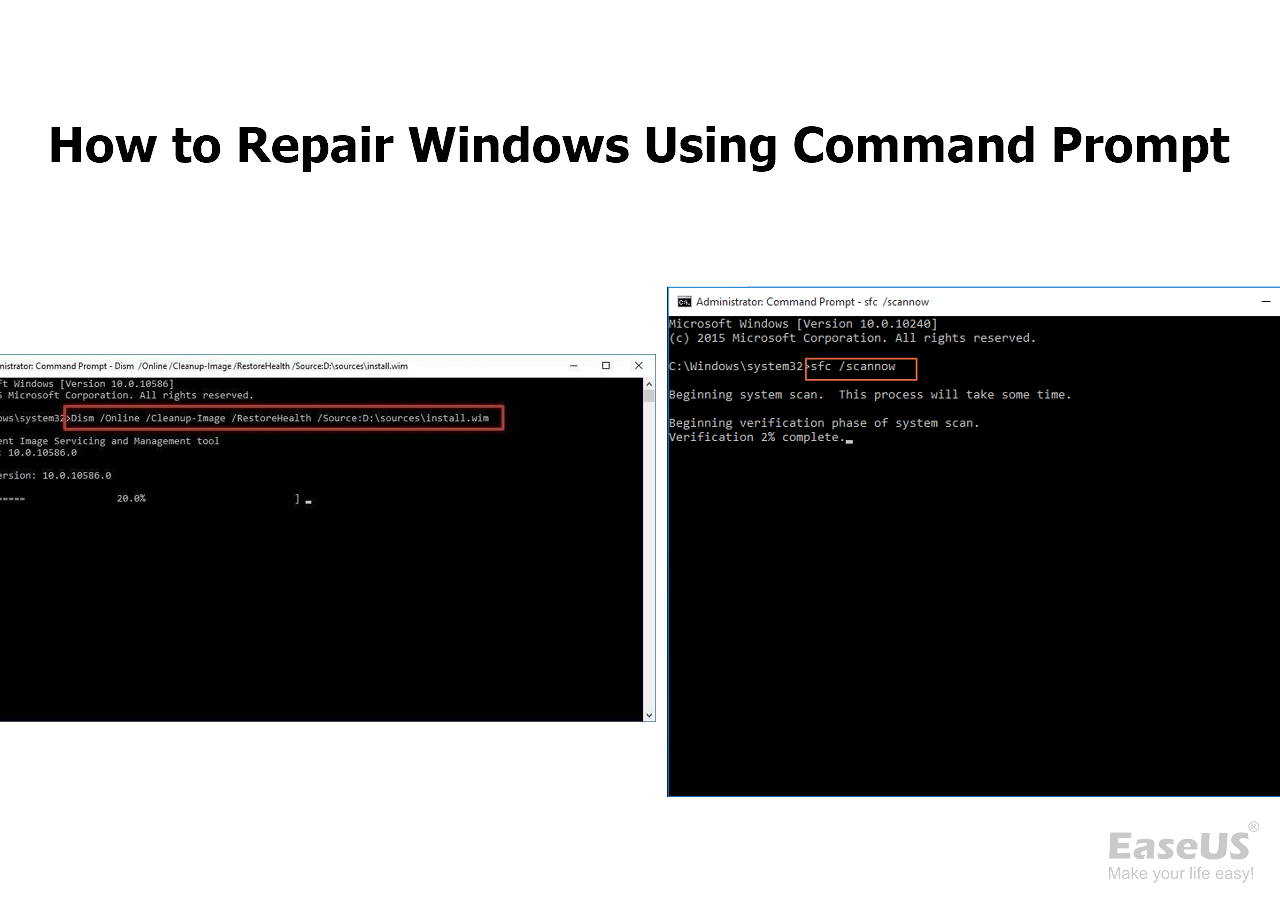
Как проверить целостность файлов в Windows 10 с помощью SFC
Начинать проверку целостности файлов операционной системы рекомендуется с команды SFC. Она позволяет найти ошибки в ключевых файлах и исправить их. Выполнить проверку с помощью SFC можно как в привычном интерфейсе Windows 10 через командную строку, так и через среду восстановления, ниже описаны оба этих способа.
Через командную строку в интерфейсе Windows
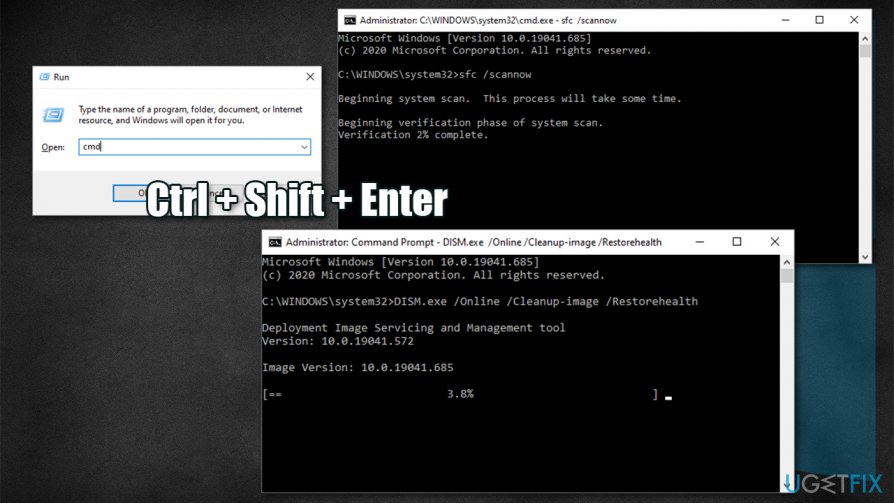
Выполнять проверку с помощью SFC лучше начать через стандартный интерфейс Windows, используя командную строку. Чаще всего этого оказывается достаточно. Чтобы проверить целостность файлов необходимо сделать следующее:
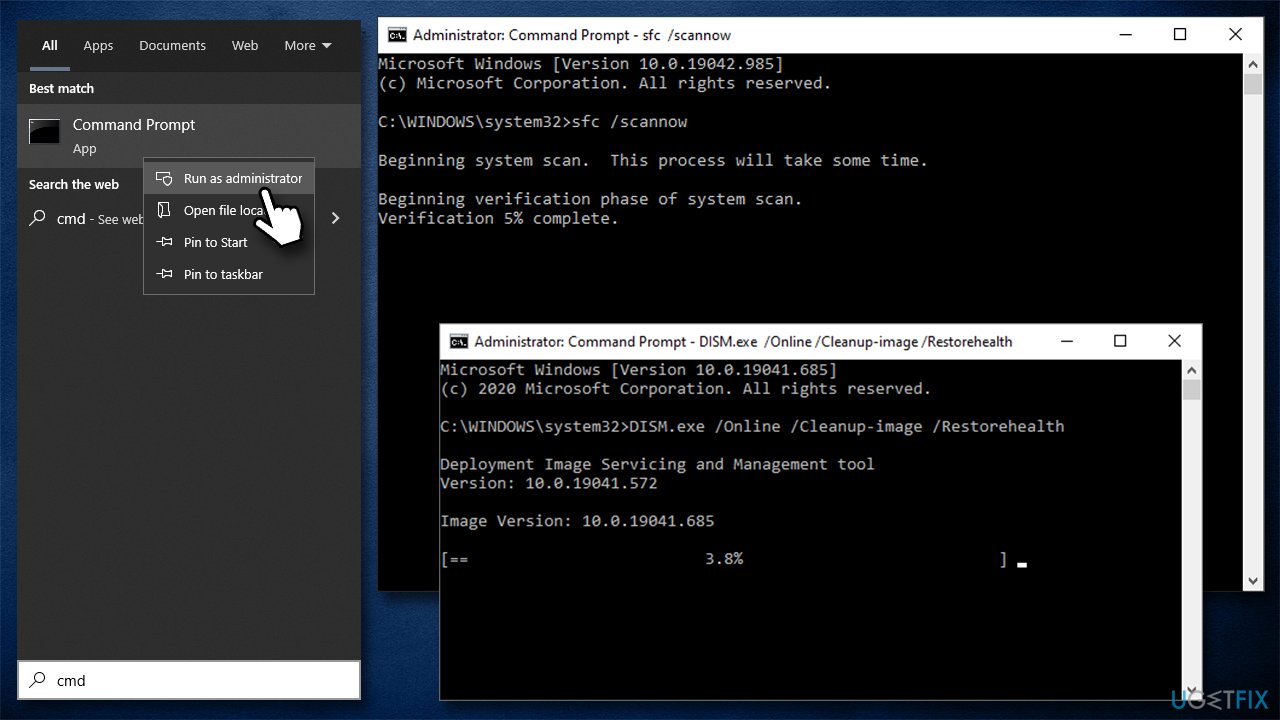
- Запустите командную строку от имени администратора;
- Пропишите команду sfc /scannow и нажмите Enter;
- После этого начнется процесс сканирования системы и замены поврежденных (измененных) элементов.
Если с системными файлами Windows нет никаких проблем, после проверки пользователь увидит сообщение, что «Защита ресурсов Windows не обнаружила нарушение целостности». В такой ситуации можно переходить к проверке файлов с помощью DISM.
Однако в некоторых ситуациях неверно работать могут файлы, которые отвечают за отображение графического интерфейса Windows, и их система исправить не сможет, поскольку они активны. В таких случаях необходимо провести проверку SFC через среду восстановления, которая не требует загрузки графического интерфейса и способна работать с данными файлами, а также изменять их при необходимости.
Обратите внимание, если у вас имеются подозрения, что сбой в работе системы связан с определенным файлом, можно не выполнять полную проверку SFC. Достаточно ввести команду sfc /scanfile=”адрес до файла”, и он будет заменен мгновенно на оригинальную версию, если в него ранее вносились изменения или он работает с ошибкой
Через среду восстановления
Чтобы провести проверку целостности файлов с помощью команды SFC через среду восстановления, потребуется выполнить следующие действия:
Нажмите в левом нижнем углу на кнопку «Пуск» и перейдите в «Параметры»:
- Далее выберите пункт «Обновление и безопасность», в левой части экрана перейдите на вкладку «Восстановление» и в пункте «Особые варианты загрузки» нажмите «Перезагрузить сейчас». В результате данных действий компьютер отправится в перезагрузку;
- После этого потребуется запустить систему с заранее созданного диска (или флешки) восстановления Windows 10. Сперва появится экран выбора языка, а далее предложение установить систему. На данном этапе необходимо нажать в левом нижнем углу на надпись «Восстановление системы»;
- Загрузится среда восстановления, где необходимо запустить командную строку. Для этого нажмите «Поиск и устранение неисправностей», далее пункт «Дополнительные параметры» и выберите вариант «Командная строка»;
- Далее запустится командная строка, в которой последовательно необходимо писать команды, приведенные ниже, а после каждой из них нажимать Enter:
diskpart
list volume
После выполнения второй команды отобразится список доступных томов
Здесь требуется обратить внимание на диск, который зарезервирован системой и на системный раздел с операционной системой. Далее с ними потребуется производить манипуляции. Продолжите вводить команды:
Продолжите вводить команды:
exit
sfc /scannow /offbootdir=C:\ /offwindir=E:\Windows
В последней команде требуется указать диски, которые были отмечены выше. То есть, в приведенном примере команды диск C является разделом с загрузчиком, а диск E – местом, где установлена операционная система Windows 10.
Внимание: Велика вероятность, что буквы дисков у вас будут отличаться от приведенных в примере, поэтому команда будет варьироваться
- После ввода последней из четырех команд начнется сканирование целостности файлов операционной системы.
Преимуществом работы через среду восстановления является возможность инструмента SFC заменять файлы, которые необходимы для загрузки графического интерфейса Windows. Проверка в данном случае продлится чуть дольше, чем при работе через командную строку в интерфейсе операционной системы. При этом графически пользователя командная строка в среде восстановления не будет извещать о скорости выполнения процесса. Определить, что компьютер работает исправно и проверка целостности файлов не зависла можно по мигающему значку подчеркивания.
По окончанию проверки пользователь увидит информацию о том, что нарушения целостности не были обнаружены или были успешно устранены. После этого можно перейти ко второму способу проверки – при помощи инструмента DISM.
Бэкап Windows в WIM-образ
Создание системного бэкапа путём захвата её текущего состояния в файл формата WIM — это, по сути, создание собственной модифицированной сборки Windows с установленным софтом и заданными системными настройками. Только такая сборка будет с пользовательским профилем и драйверами на конкретное железо. В чём преимущества такого бэкапа?
Захват Windows в WIM-образ:
— Не так быстро делается, как создаётся точка отката, но это в разы надёжнее средство восстановления системы;
— Является более удобной альтернативой полноценной штатной функции бэкапа — архивации Windows;
— Является полностью бесплатной возможностью на фоне реализации бэкап-функционала программами типа Acronis True Image.
DISM command with RestoreHealth option
If there are problems with the system image, use DISM with the «RestoreHealth» option to automatically scan and repair common issues.
To repair Windows 10 image problems with DISM, use these steps:
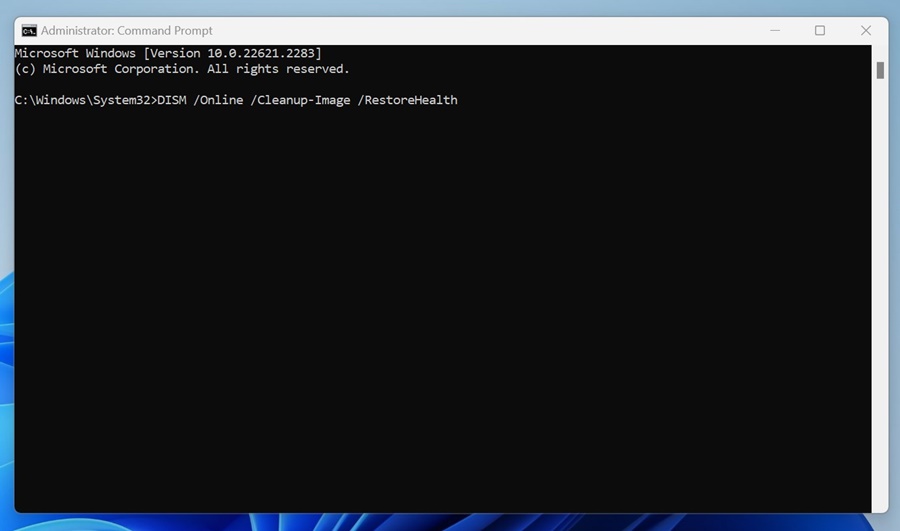
- Open Start.
- Search for Command Prompt, right-click the top result, and select the Run as administrator option.
- Type the following command to repair the Windows 10 image and press Enter: DISM /Online /Cleanup-Image /RestoreHealth
Quick note: It’s a normal behavior if the command appears stuck. After a few moments, the process will be completed successfully.
(Image credit: Mauro Huculak)
Once you complete the steps, DISM will connect to the «Windows Update» servers to download and replace damaged files (as necessary).
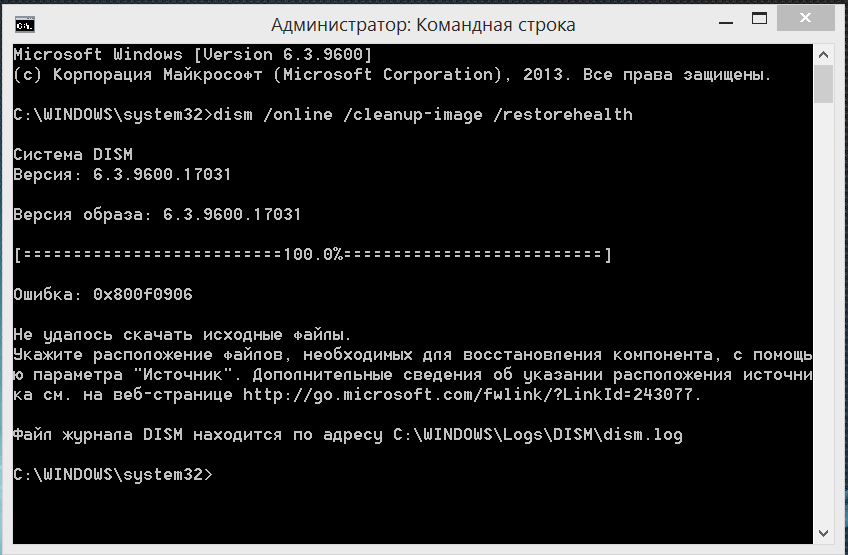
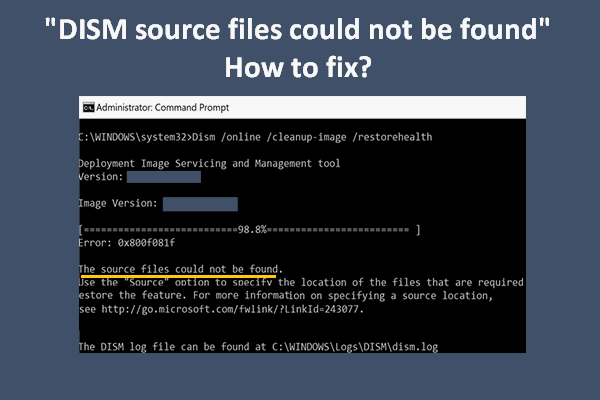
DISM /Source: восстановление образа Windows с установочного диска.
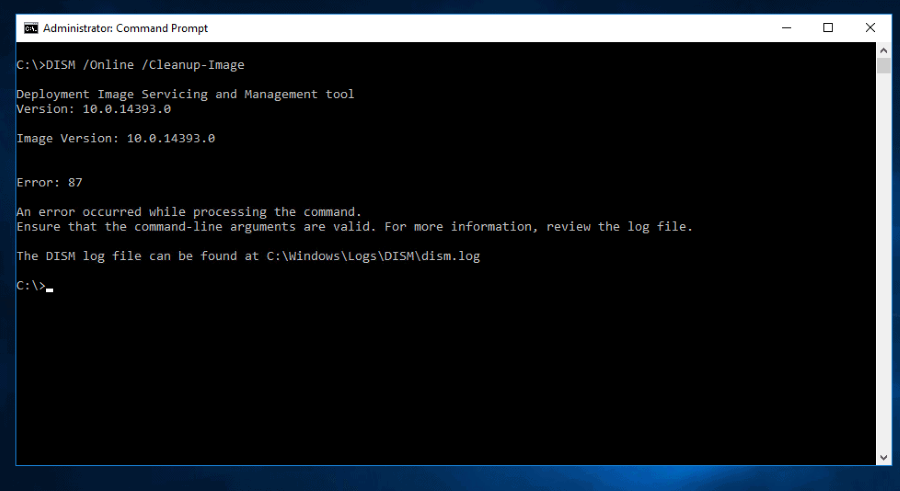
Если на компьютере (сервере) отсутствует доступ в Интернет или отключена/повреждена служба Windows Update, то при восстановлении хранилища компонентов появятся ошибки:
- 0x800f0906 — Не удалось скачать исходные файлы. Укажите расположение файлов, необходимых для восстановления компонента, с помощью параметра Источник (0x800f0906 — The source files could not be downloaded. Use the source option to specify the location of the files that are required to restore the feature);
- Ошибка: 0x800f0950 — Сбой DISM. Операция не выполнена (0x800f0950 — DISM failed. No operation was performed);
- Ошибка:0x800F081F. Не удалось найти исходные файлы. Укажите расположение файлов, необходимых для восстановления компонента, с помощью параметра Источник (Error 0x800f081f, The source files could not be found. Use the «Source» option to specify the location of the files that are required to restore the feature).

Во всех этих случаях вы можете использовать альтернативные средства получения оригинальных файлов хранилища компонентов. Это может быть:
- Установочный диск/флешка/iso образ Windows
- Смонтированный файл wim
- Папка \sources\SxS с установочного диска
- Файл install.wim с установочным образом Windows
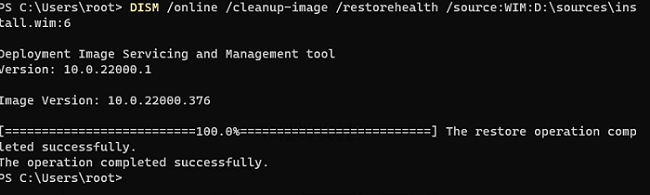
Вы можете указать WIM или ESD файл с оригинальным установочным образом Windows, который нужно использовать в качестве источника для восстановления файлов системы. Предположим, вы смонтировали установочный ISO образ Windows 11 в виртуальный привод D:.
Выведите список доступных версий Windows в установочном образе:

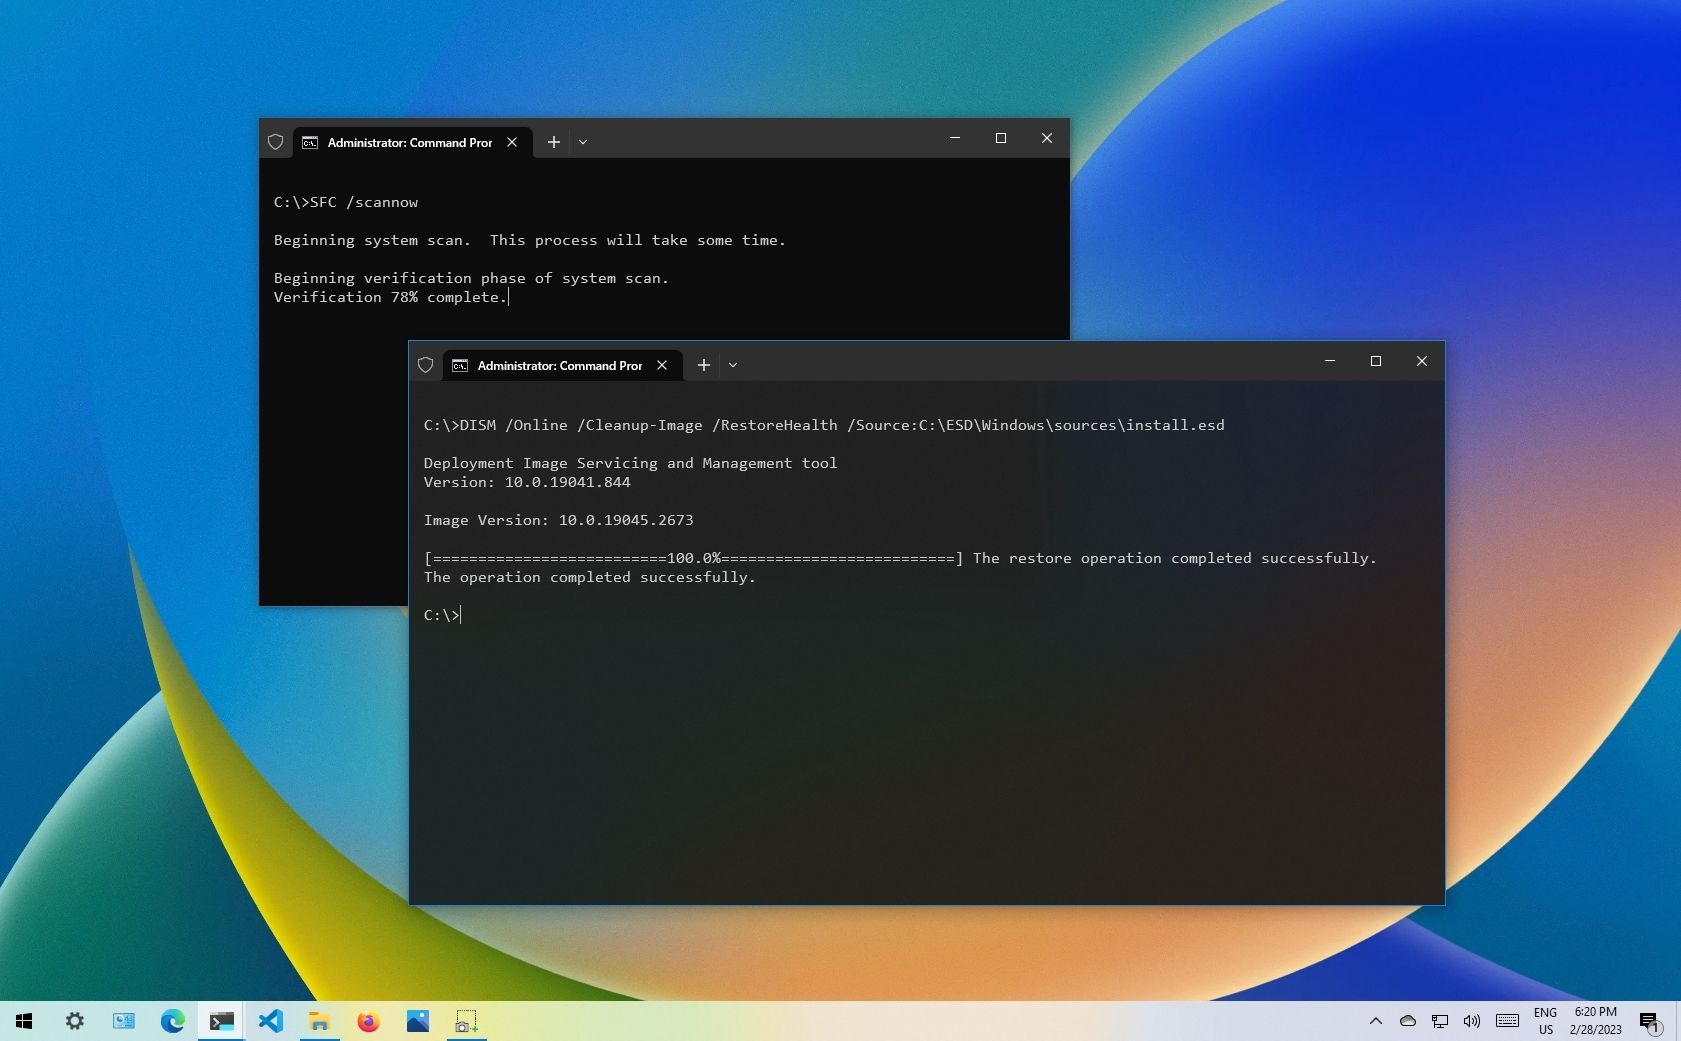
Для восстановления хранилища компонентов из локального WIM/ESD файла с блокированием доступа в интернет, выполните следующую команду (не забудьте указать ваш индекс версии Windows в файле):
Утилита DISM пишет подробный журнал сканирования и восстановления системных файлов в файл C:\Windows\Logs\DISM\dism.log.
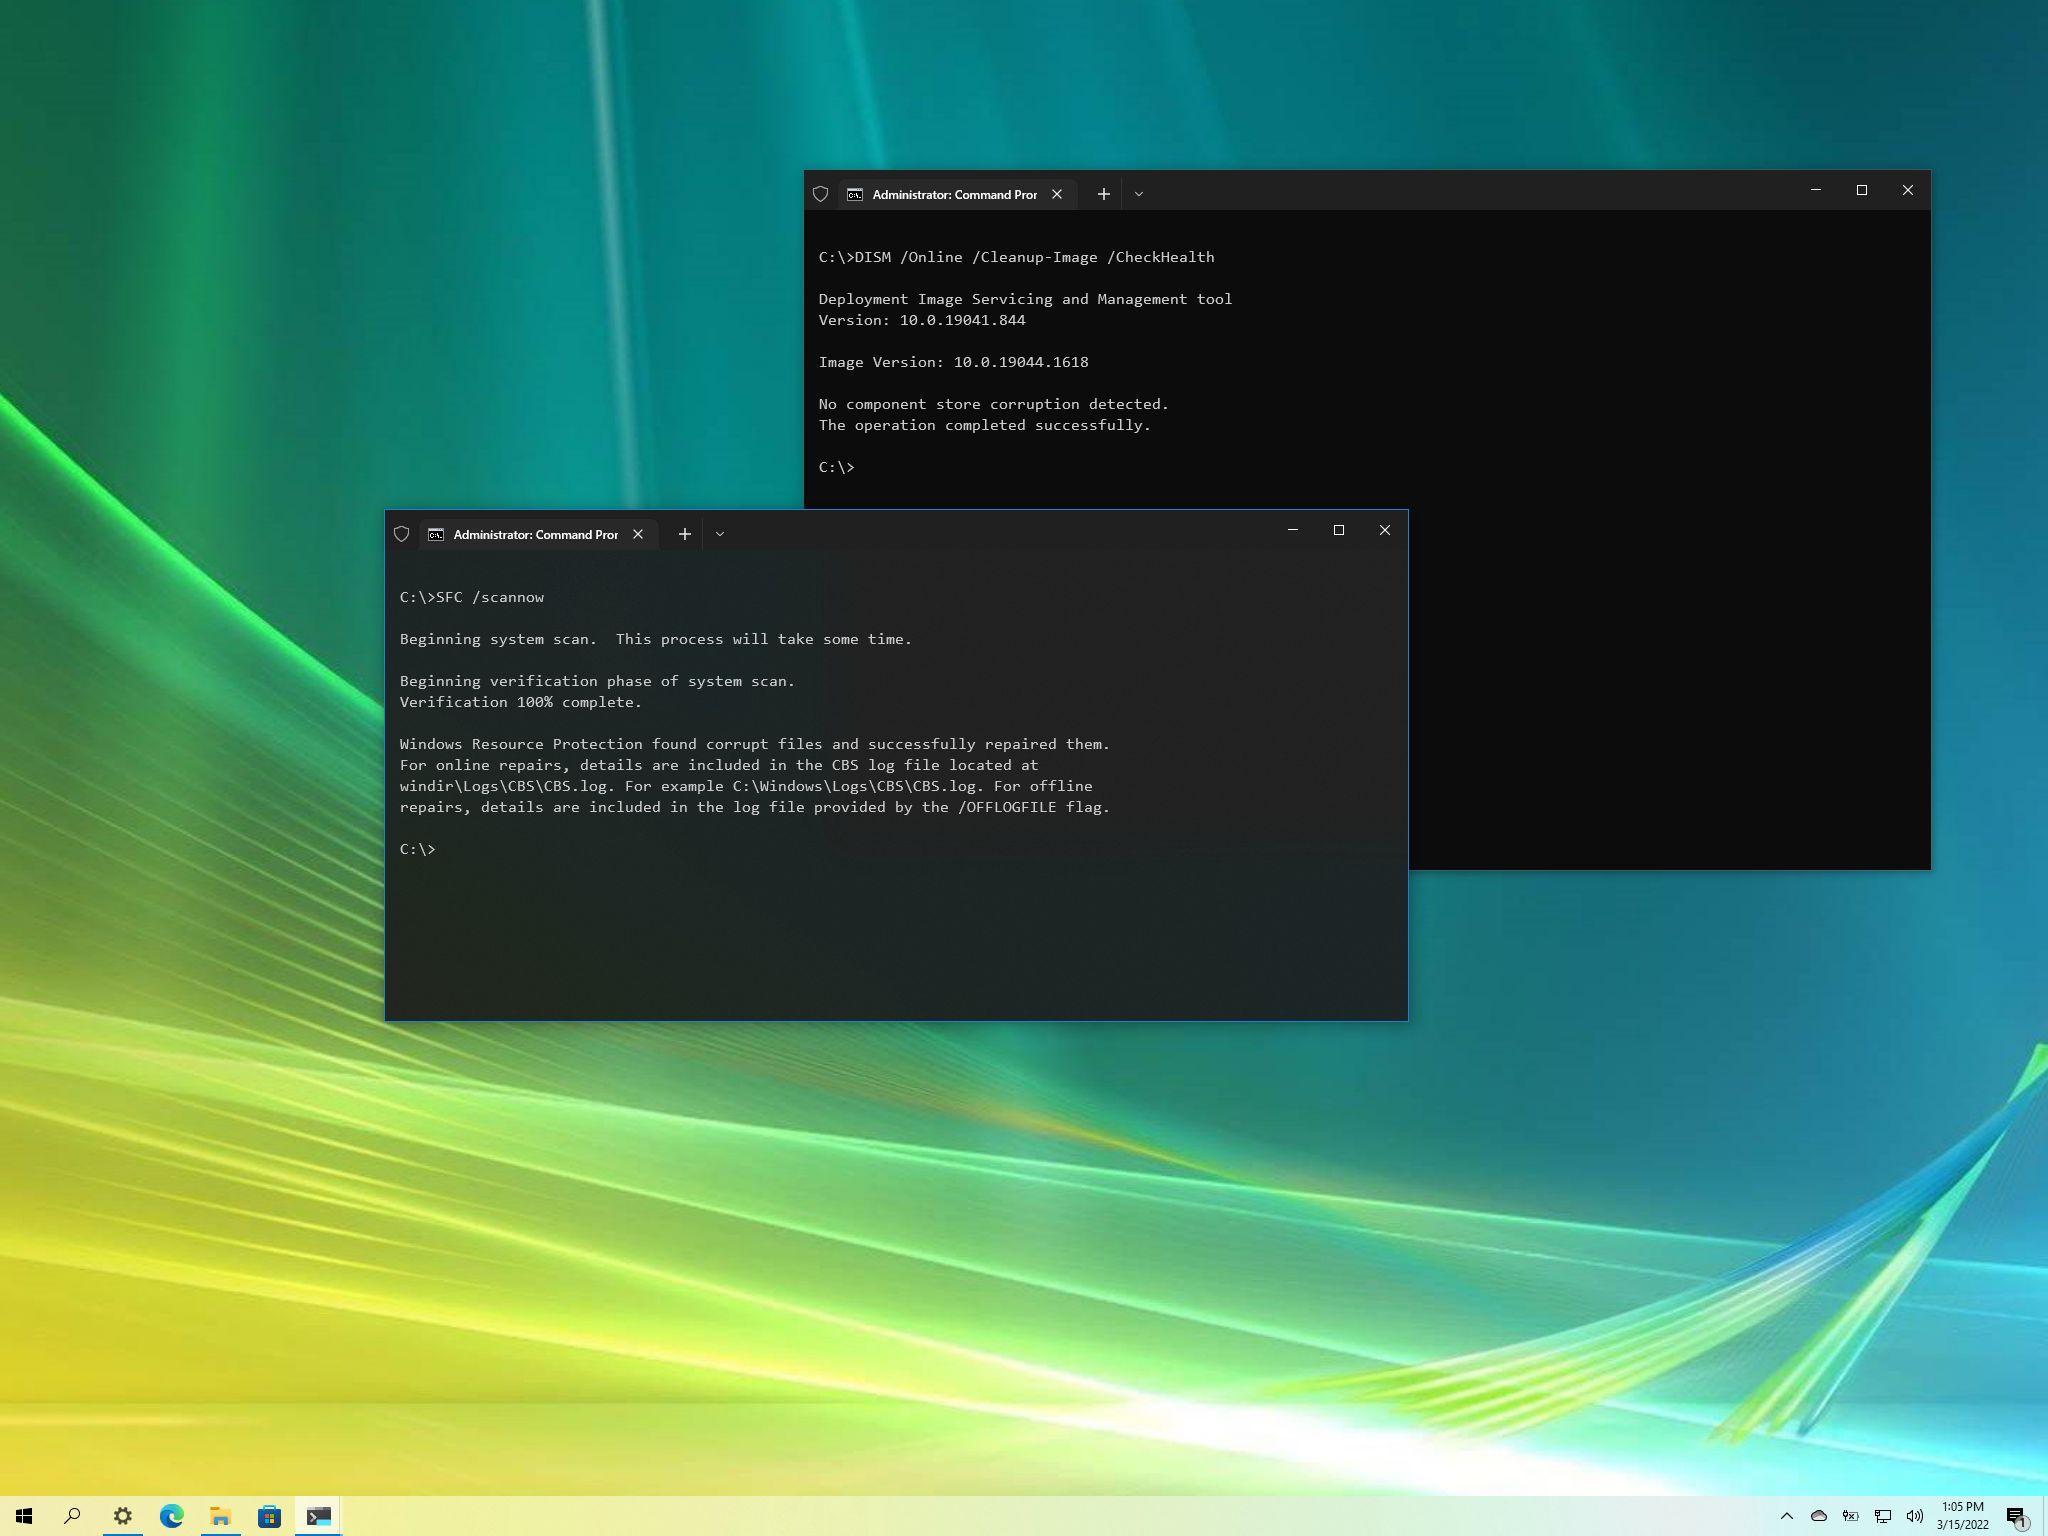
После восстановления хранилища компонентов вы можете запустить утилиту проверки системных файлов sfc /scannow . Скорее всего она успешно восстановит поврежденные файлы:
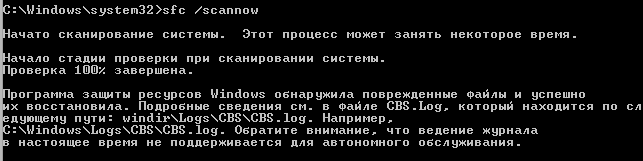
Если все системные файлы целы, появится сообщение:
DISM /RestoreHealth: Восстановление хранилища компонентов образа Windows
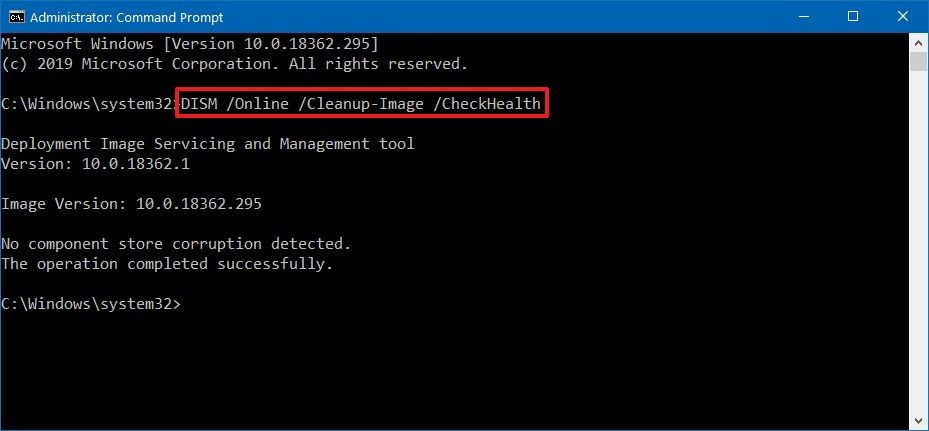
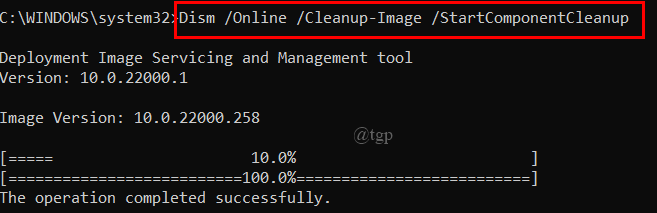
Для сканирования образа Windows на наличие ошибок и их исправления используется параметр DISM /Cleanup-image . Рассмотренные ниже команды выполняются в командной строке, запущенной с правами администратора.
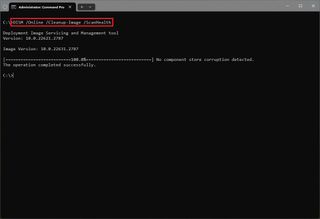
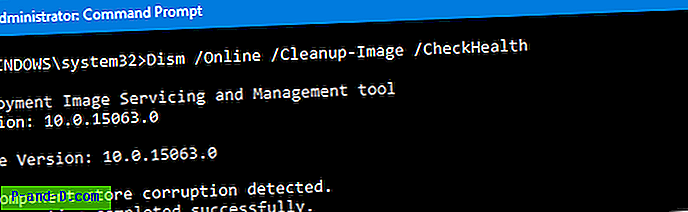
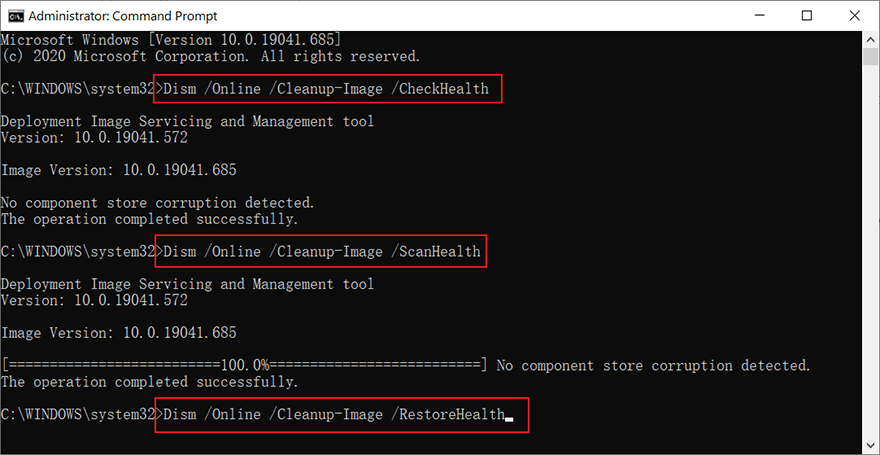
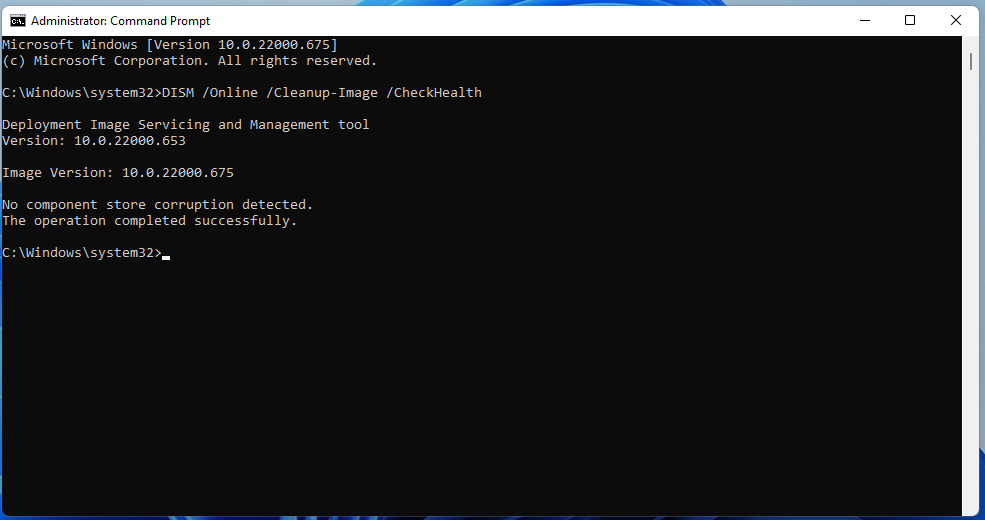
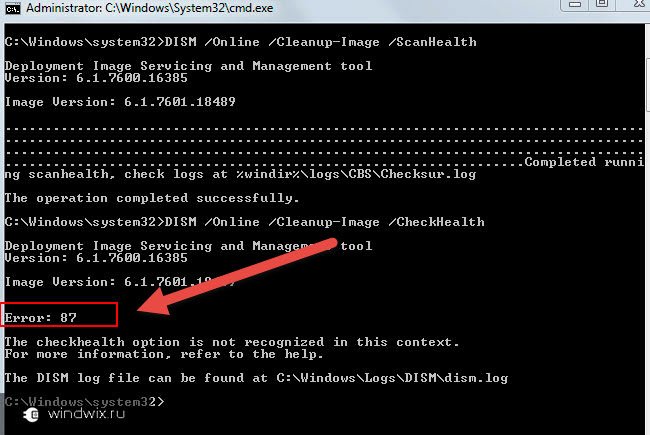
Чтобы проверить наличие признака повреждения хранилища компонентов образа Windows (флага CBS) , который выставил один из системных процессов, выполните следующую команду (не применимо к Windows 7/Server 2008R2):
DISM /Online /Cleanup-Image /CheckHealth
При запуске этой команды не выполняется сканирование хранилища, проверяются лишь записанные ранее значения и события в журнале Windows. Изменения не вносятся. Команда проверит, не помечен ли образ как поврежденный и возможно ли устранить данное повреждение.
В этом примере команда вернула, что с образом все хорошо:
No component store corruption detected. The operation completed successfully.
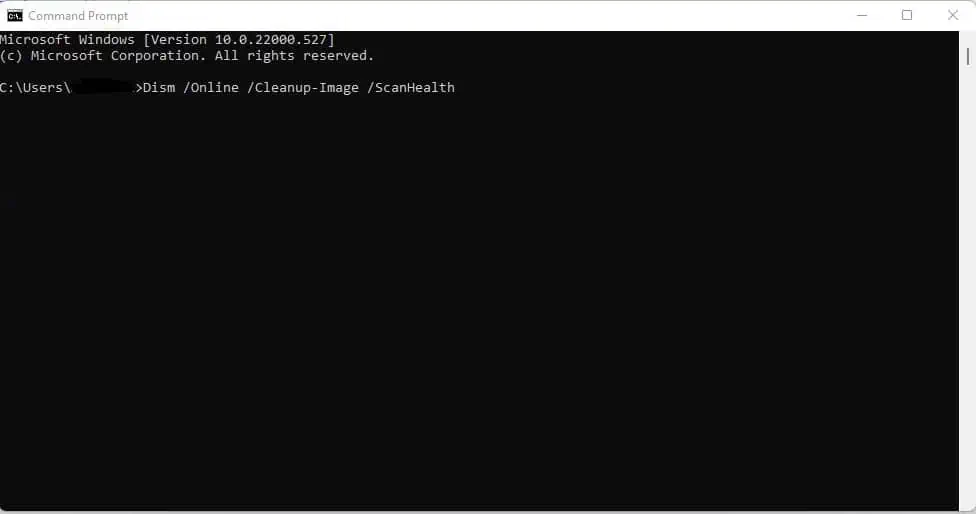
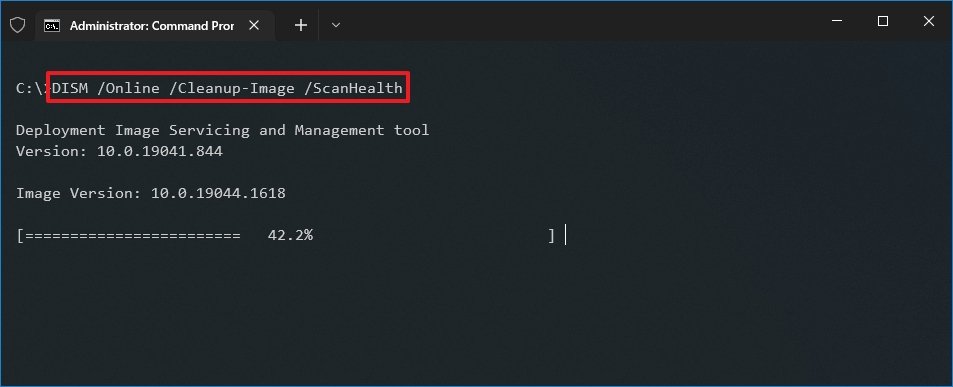
DISM /Online /Cleanup-Image /ScanHealth – выполнить полное сканирование хранилища компонентов на наличие повреждений в системных образа Windows (выполняется довольно долго от 10 до 30 минут).
Если команда /ScanHealth возвращает ошибки:
- Хранилище компонентов подлежит восстановлению (The component sore is repairable);
- Ошибка: 1726. Сбой при удалённом вызове процедуры;
- Ошибка: 1910. Не найден указанный источник экспорта объекта.
Это однозначно говорит о том, что ваш образ Windows 10 поврежден и его нужно восстановить.
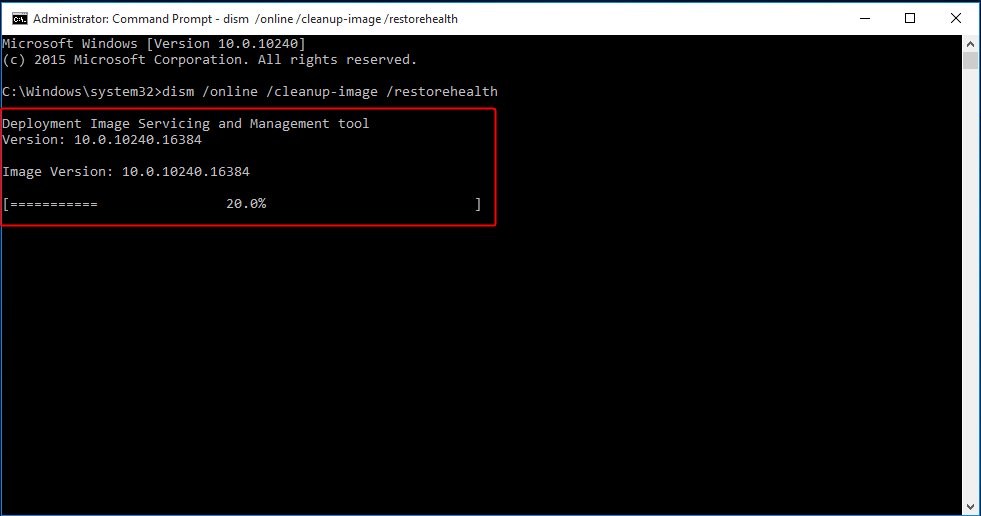
Чтобы исправить ошибки, автоматически скачать и заменить файлы повреждённых или отсутствующих компонентов эталонными версиями файлов (библиотек) из центра обновлений Windows (на компьютере должен быть доступ в Интернет), выполните:
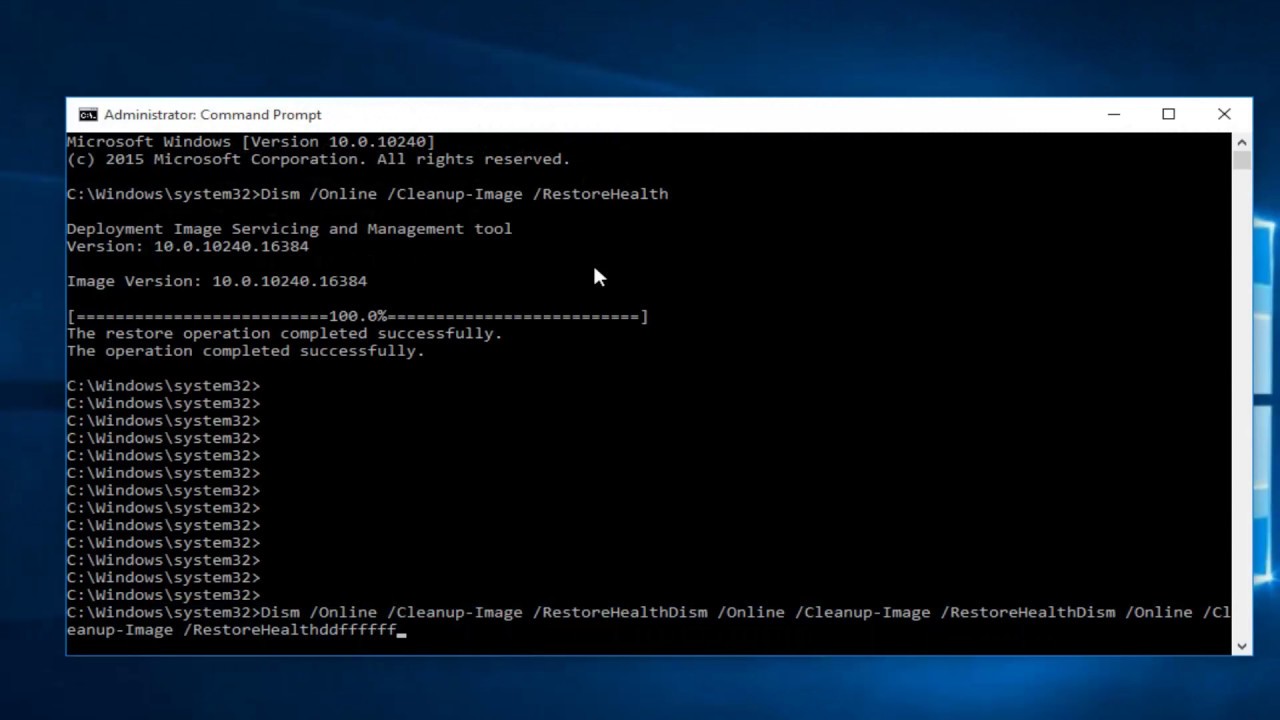
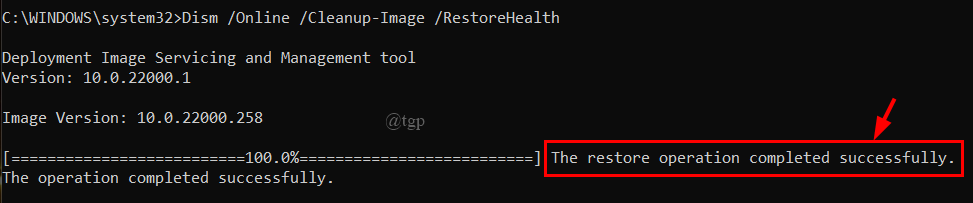
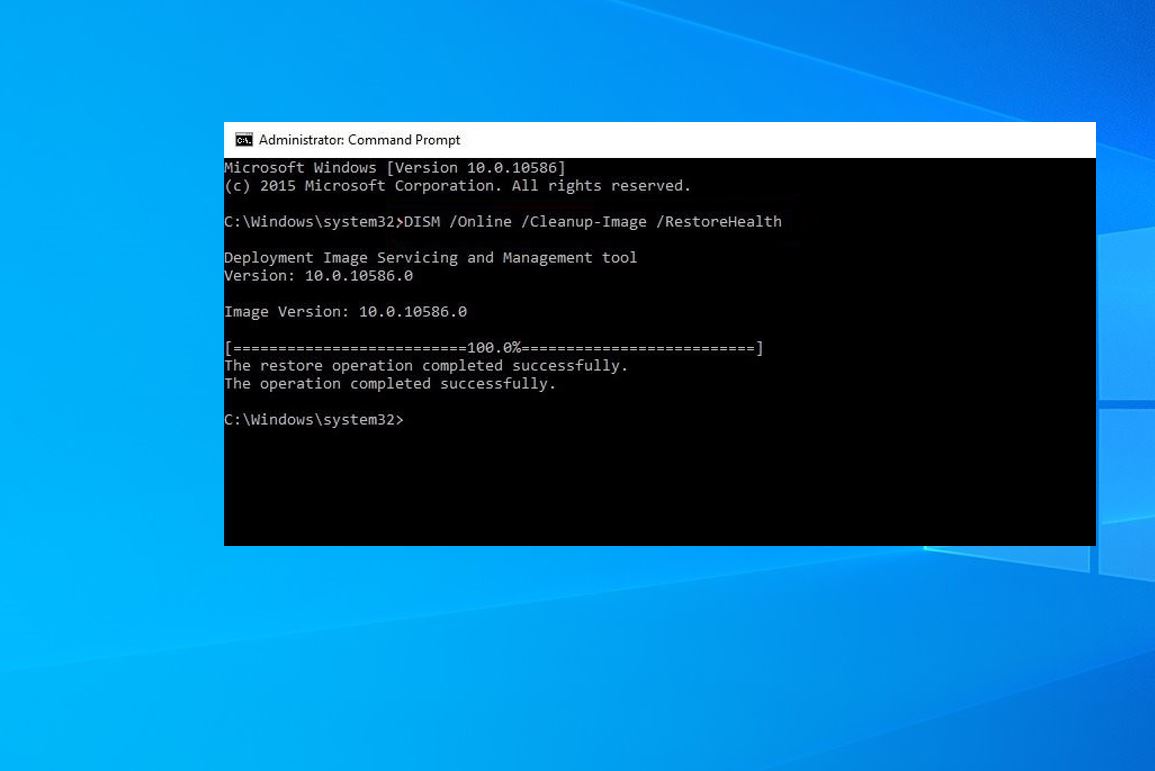
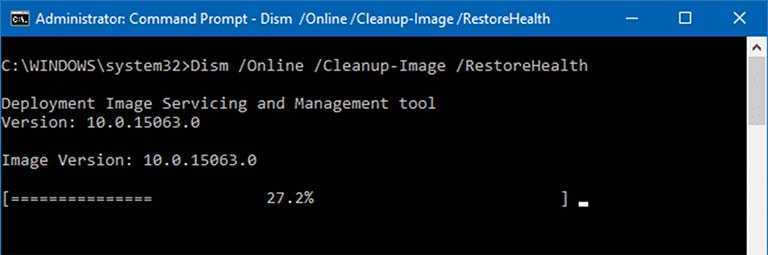
DISM /Online /Cleanup-Image /RestoreHealth
Процесс сканирования и восстановления компонентов может быть довольно длительным (30 минут или более).
Если восстановление выполнится успешно, появится сообщение:
Восстановление выполнено успешно. Операция успешно завершена. The restore operation completed successfully. The operation completed successfully.
Если на компьютере (сервере) отсутствует доступ в Интернет или отключена служба Windows Update, то при восстановлении хранилища компонентов появляются ошибки вида:
- 0x800f0906 — Не удалось скачать исходные файлы. Укажите расположение файлов, необходимых для восстановления компонента, с помощью параметра Источник (0x800f0906 — The source files could not be downloaded. Use the source option to specify the location of the files that are required to restore the feature);
- Ошибка: 0x800f0950 — Сбой DISM. Операция не выполнена (0x800f0950 — DISM failed. No operation was performed);
- Ошибка: 0x800F081F. Не удалось найти исходные файлы. Укажите расположение файлов, необходимых для восстановления компонента, с помощью параметра Источник (Error 0x800f081f, The source files could not be found. Use the «Source» option to specify the location of the files that are required to restore the feature).
Вы можете указать WIM или ESD файл с оригинальным установочным образом Windows, который нужно использовать в качестве источника для восстановления файлов компонентов системы. Предположим, вы смонтировали установочный ISO образ Windows 10 в виртуальный привод E:. Для восстановления хранилища компонентов из образа используйте одну из команд:
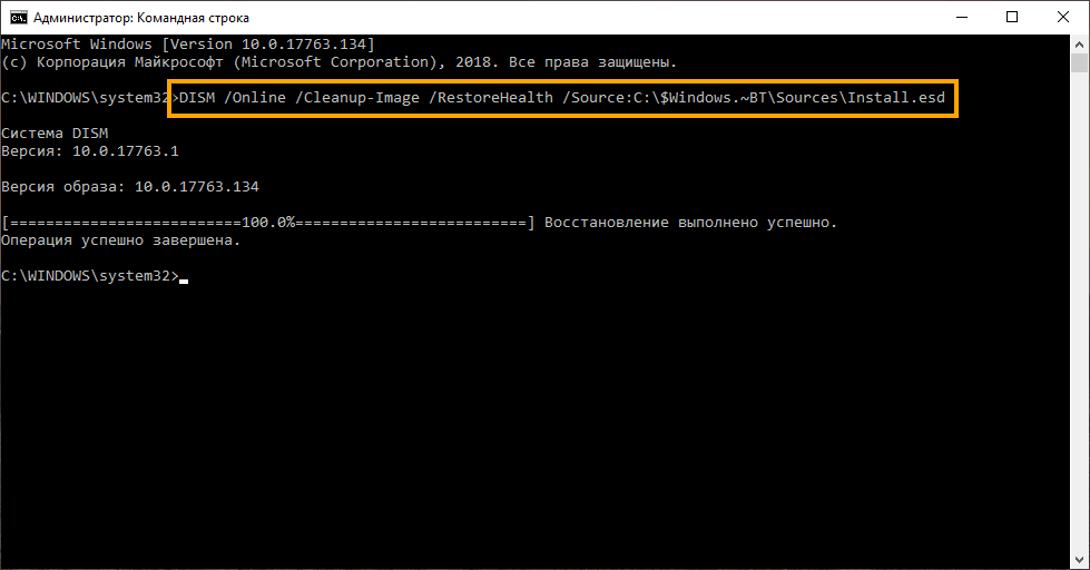

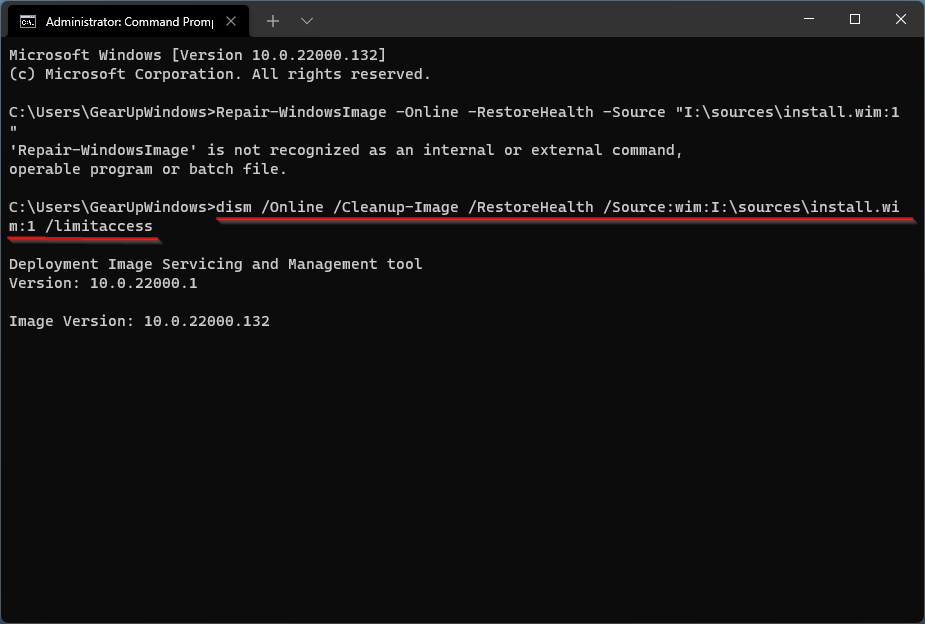
DISM /online /cleanup-image /restorehealth /source:E:sourcesinstall.wim Или: DISM /online /cleanup-image /restorehealth /source:E:sourcesinstall.esd
Чтобы запретить использовать центр обновлений Windows в Интернете, и выполнять сканирование и восстановление образа Windows только из локального WIM/ESD файла:
DISM /online /cleanup-image /restorehealth /source:E:sourcesinstall.wim /limitaccess Или: DISM /online /cleanup-image /restorehealth /source:E:sourcesinstall.esd /limitaccess
dism /online /cleanup-image /restorehealth /limitaccess
Журнал сканирования и восстановления системных файлов утилиты DISM можно найти здесь: C:WindowsLogsCBS.log .
После восстановления хранилища компонентов вы можете запустить утилиту проверки системных файлов sfc /scannow . Скорее всего она успешно восстановит поврежденные файлы (Программа защиты ресурсов Windows обнаружила поврежденные файлы и успешно их восстановила).
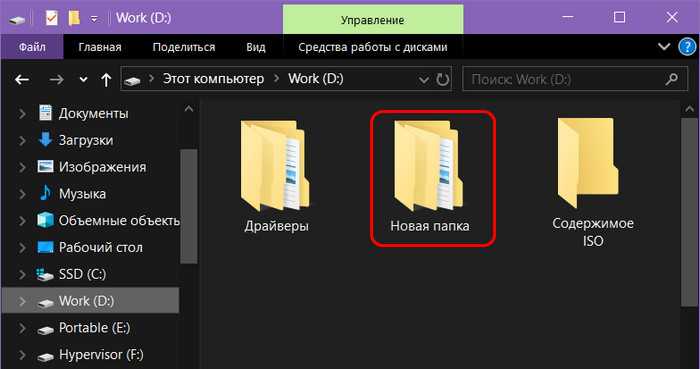
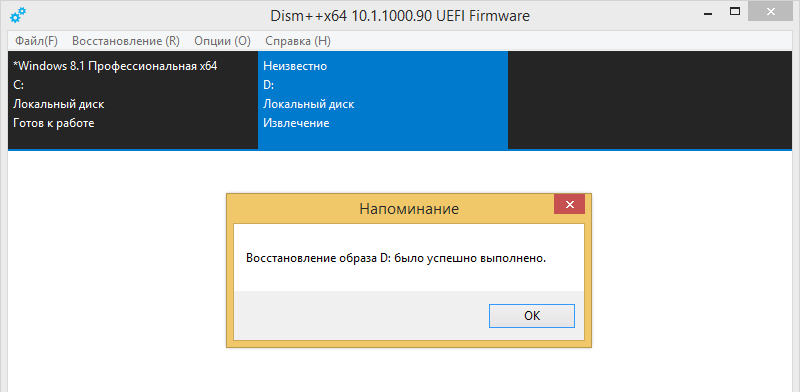
Извлечение образа WIM/ESD
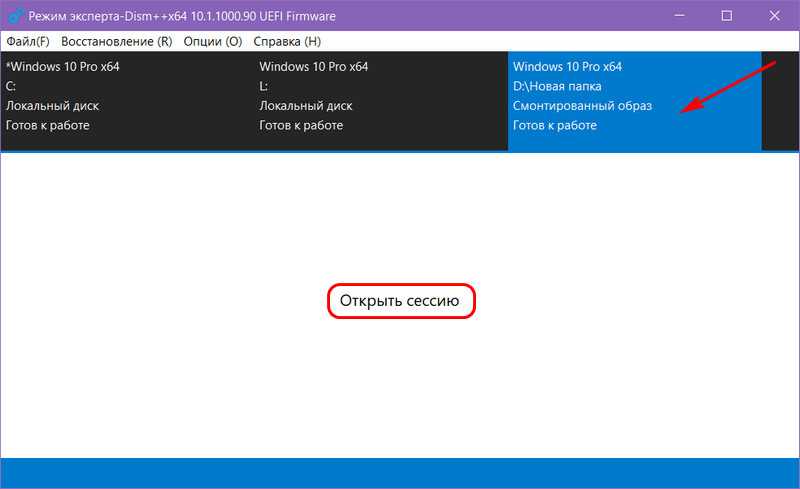
Создаём ещё одну папку, в неё мы извлечём содержимое файла install.wim или install.esd – непосредственно файла-образа дистрибутива Windows. В нашем случае это папка с дефолтным названием «Новая папка».
Теперь в окне Dism++ идём в меню «Файл», выбираем «Монтировать образ».
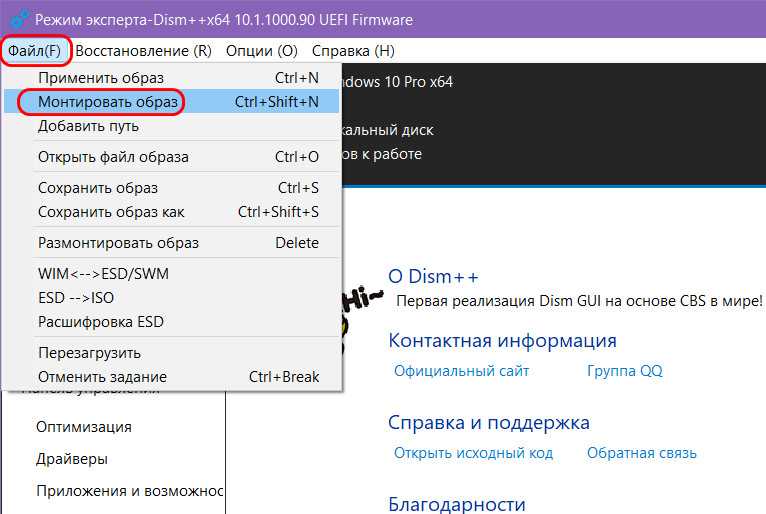
В окошке параметров монтирования указываем, соответственно:
• Редакцию Windows;• Путь к образу WIM/ESD – путь к файлу install.wim или install.esd, который находится в папке с извлечённым установочным ISO, в подпапке «sources»;• Путь к созданной на предыдущем этапе папке.
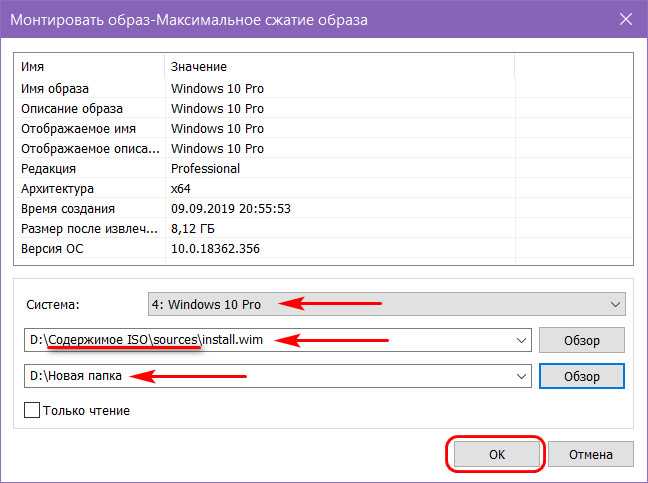
Как только смонтированный образ дистрибутива будет готов, жмём «Открыть сессию».
To enable or disable Windows features by using DISM and an answer file
-
In Windows SIM, open an existing catalog by clicking Select a Windows Image on the File menu and specifying the catalog file type (.clg) in the drop-down list, or create a new catalog by clicking Create Catalog on the Tools menu.
-
Expand the catalog in the Windows Image pane, and then expand Packages.
-
Expand Foundation, and right-click Microsoft-Windows-Foundation-Package.
-
Click Add to Answer File.
-
Click Enabled or Disabled next to the features that you intend to enable or disable. Click the arrow to select the opposite choice.
You might have to expand an item to see all its children. You must enable the parent if any one of its children are enabled.
Note
You can’t restore or remove a Windows feature for features on demand with an unattended answer file. -
Click Tools on the main menu, and then click Validate Answer File.
-
Correct any errors that appear in the Messages pane, and save the answer file.
-
At the command prompt, type the following command to apply the unattended answer file to the image.
To service an offline image, specify the location of the mounted image directory. For example, type:
What is the SFC Command
System File Checker (SFC) is another built-in tool for Windows to repair missing and corrupted system files. It’s used to scan Windows and restore those files. You can troubleshoot many defections using this command.
Repair System Files With the SFC Command
You can use many options with the SFC command depending on what you want to do with the file(s). For example
- /scannow → Scans and repairs all protected operating system files
- /verifyonly → Only scans files and doesn’t repair them
- /scanfile=file → Scans and repairs only a specific file
For this tutorial, we’ll use the /scannow option.
First, you need to open the Command Prompt with administrator privilege. Go to search and start typing Command Prompt. Right-click on it and choose Run as administrator. You will get a prompt. Just select Yes so the Command Prompt starts running
Now type in the following command
Running the sfc /scannow command
It will start scanning your PC for any corrupted files. Usually, it takes a couple of minutes to scan everything so wait a bit.
If everything goes smoothly and it doesn’t find anything fishy, you’ll get the message “Windows Resource Protection did not find any integrity violations.”
If you get a “Windows Resource Protection found corrupt files but was unable to fix some of them” message instead, try using the command in Safe Mode.
Once this command repairs the corrupted files using local images, you can find the log files here.
%windir%/Logs/CBS/CBS.log
How to Use the CheckHealth Option
You can use the DISM’s CheckHealth option to quickly find out if there are any damages or corruptions inside the local image, but the tool won’t perform any repairs.
To check for problems within the recovery image using DISM, use these instructions:
- Click Start.
- Search for Command Prompt using the search bar beside the Start button.
- Right-click on the top result, then select Run as administrator.
- Type in the following command in the command prompt windows to do a quick health check: DISM /Online /Cleanup-Image /CheckHealth
- Press Enter.
Windows 11 CheckHealth
Once you have completed the steps, the command will be executed and it will verify if there is any data corruption that needs to be fixed.
Bonus: create a system image to prevent errors🔥
Windows image is essential for a computer to boot properly, if there is any error, your computer may fail to boot and you will lose all the data on it. You may not want to see this, and the repair process is quite complicated for many users, especially novices.
To prevent system failure or other serious problems, it’s suggested to create a system image after DISM offline repair Windows 10. The best backup freeware beforehand — AOMEI Backupper Standard helps you create a system image including the operating system, system files, drivers, custom settings, personal data, etc.
AOMEI Backupper
Best Windows Backup Software
- Auto-backup utility: It allows you to schedule backup system in daily, weekly, monthly, event triggers and USB plug-in mode.
- Flexible backup mode: By default, it will enable incremental backup to backup only changed files after the first full backup.
- Various backup destinations: You can choose to backup Windows 10 to external hard drive, USB disk, cloud drive, network share/NAS, etc.
Download FreewareWindows 11/10/8.1/8/7
100% Secure
(PS: The free edition of AOMEI Backupper only supports Windows 10, 11, 8, 7, XP, and Vista. For server users, try AOMEI Backupper Server. )
Step 1. Launch this software. Then, click Backup and System Backup in order.
Step 2. By default, the system partition and all the boot partitions will be selected. You just need to select a backup destination to store everything on the system partition. If you want to backup to external disk or USB drive, please insert it into your computer.
Step 3. Click «Options», «Schedule Backup» and «Backup Scheme» to customize backup settings. Then, confirm everything is ok and click Start Backup to create a system image after DISM offline repair Windows 10.
✎… How to repair Windows 10 image with a backup image:
After creating a system image, you can use it to restore Windows image to new hard drive when something bad happens, for example, the Windows image is corrupted and DISM unluckily fails to repair Windows 10.
Launch this software again, find the backup task on the Home tab or go to Restore tab, locate the system image and follow the wizard to complete the operation.
You can also use it to restore system to a new computer with dissimilar hardware. More supporting, its Technician or Tech Plus edition allows you to create a portable version of this software to a removable device and use it on multiple Windows computers without installing it again.
Установка Windows второй системой на другом разделе
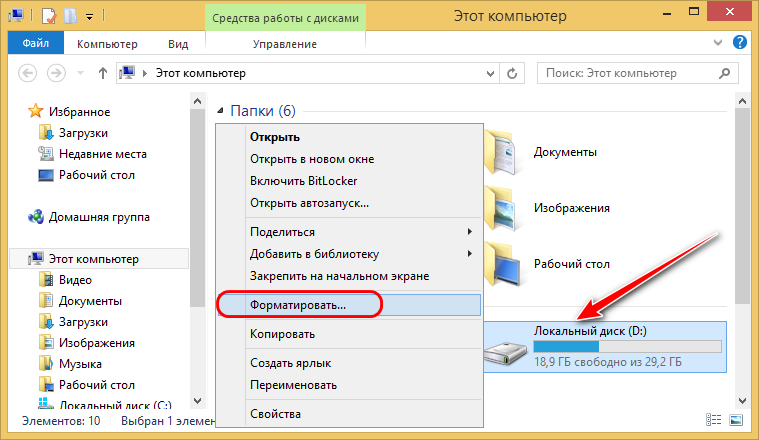
Процесс установки Windows на другой раздел немногим отличается от переустановки системы. В среде первой системы подготавливаем раздел для второй Windows.
Форматируем его.
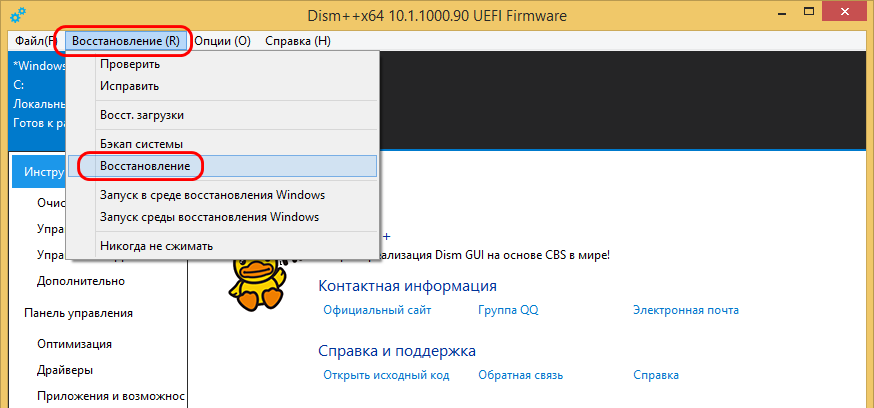
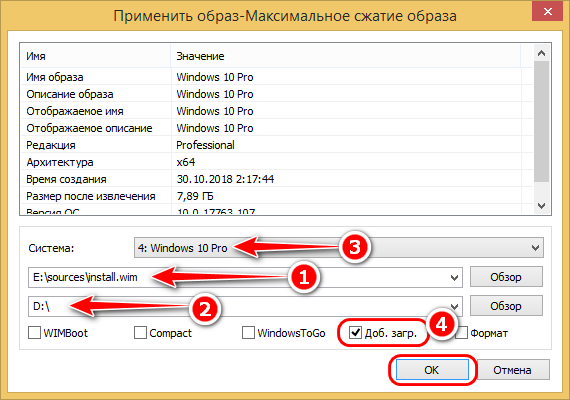
Монтируем установочный ISO-образ. Запускаем Dism++. Как и при переустановке, в меню «Файл» выбираем «Применить образ». Кстати, форму развёртывания образа Windows можно запускать также через меню «Восстановление», пункт «Восстановление». Эта форма идентична и для установки системы с файлов WIM/ESD дистрибутива, и для восстановления из бэкапа в формате этих же файлов.

Указываем путь к файлу install.wim или install.esd. Указываем раздел второй системы. Выбираем редакцию. И вот тут важный момент – ставим галочку опции «Доб.загр.». Она нужна для добавления второй системы в меню загрузки. Жмём «Ок».
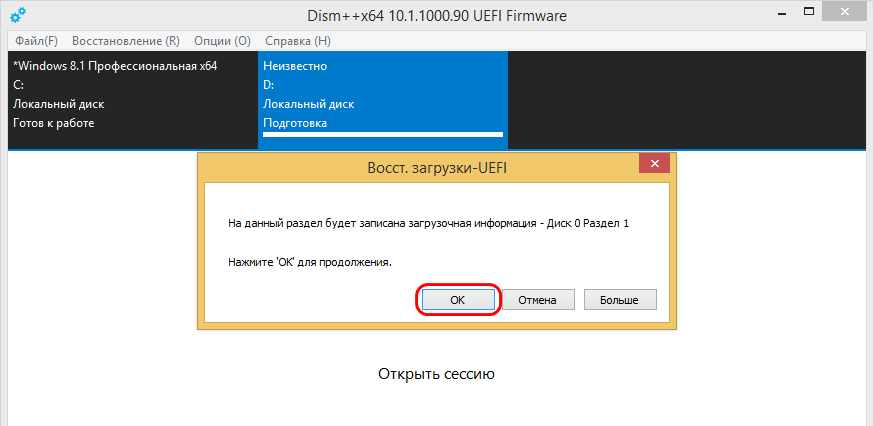
Dism++ выдаст уведомление о добавлении сведений о загрузке новой системы в загрузчик и попросит нажать «Ок» для старта операции.
О завершении развёртывания образа программа уведомит.
Далее можем перезагружаться. При запуске нас уже будет встречать меню загрузчика. Выбираем новую установленную систему.
И продолжаем установку уже внутри неё самой.
Примечание: Dism++ умеет добавлять запись о загрузке новой системы в существующий загрузчик Windows. Но программа не умеет создавать для системы на другом жёстком диске свой автономный загрузчик. Если вопрос стоит в установке Windows на другом диске со своим отдельным загрузчиком, потребуется вручную создать системный загрузочный раздел — «Зарезервировано системой» на MBR-диске или EFI-раздел на GPT-диске. И, соответственно, также вручную создать для второй системы её загрузчик. Но это уже отдельная история.
Get International Settings and Languages
The international servicing commands can be used to query existing international settings in Windows and Windows PE images. For more information about operating system package-servicing commands available in DISM, see DISM Languages and International Servicing Command-Line Options.
Important
International servicing commands cannot be used on a Windows Vista or Windows Server 2008 image.
Use the /online option to display information about international settings and languages in the running operating system. Use /image: <path_to_offline_image_directory> to display information about international settings and languages in the offline image. When used with the /image and /distribution options, information about international settings and languages in the distribution is displayed.
To list all international settings and languages
-
Click Start, and type deployment. Right-click Deployment and Imaging Tools Environment and then select Run as administrator.
-
To list information about all of the international settings in the offline Windows image, type one of the following commands:
For a running operating system, type the following command:
The report generated includes the following information:
| Field | Description | Example |
|---|---|---|
|
Default system UI language |
The language that is currently set as the default system UI language. |
en-US |
|
System locale |
The language for non-Unicode programs (also referred to as system locale) and font settings. |
en-US |
|
Default timezone |
The time zone that is currently set as the default. |
Pacific Standard Time |
|
User locale for default user |
The «standards and formats» language (also referred to as user locale) that is set for the default user. |
en-US |
|
Location |
The geographical location that is currently set for the operating system. For more information about geographical locations, see Table of Geographical Locations. |
United States |
|
Active keyboards |
The value pair for the active keyboard. In the example provided, 0409 is the language identifier and 00000409 is the keyboard identifier. |
0409:00000409 |
|
Default keyboards |
The value pair for the default keyboard. In the example provided, 0409 is the language identifier and 00000409 is the keyboard identifier. |
0409:00000409 |
|
Installed language(s) |
A list of all installed language packs. |
en-US |
|
Type |
The type of each installed language pack. For more information, see Add Language Packs to Windows. |
en-US Type: Fully localized language ar-SA Type: Partially localized language, MUI type Fallback Languages en-US, fr-FR |
|
Distribution languages |
A list of the languages that are available in the distribution share. Note This list includes the name of the folder in the distribution share. The language of the actual LP.cab file in the folder is not validated. For example, if the path to the distribution is …\Langpacks\bg-BG\Lp.cab, the value of bg-BG will be reported as the language in the distribution share even if the LP.cab file is not the correct .cab file for bg-BG. |
The default language in the distribution is: ja-JP The other available languages in the distribution are: bg-BG, nl-NL |
|
Keyboard layered driver |
A list of the keyboard drivers for Japanese or Korean keyboards, if any are installed. |
Japanese Keyboard (106/109 Key) |
What to do if DISM doesn’t work?
If your system problems still persist after running the SFC and DISM commands, there are a few ways you can go.
If you have created a restore point previously, then try a System Restore. Chances are that your PC was in good health when you created the restore point.
Alternatively, you can take a backup and try reinstalling Windows again. You won’t lose files such as pictures or documents. However, you will have to reinstall all the programs.
Why Use the DISM Command
Using the DISM command, you can
- Check for damaged Windows features and system files.
- Identify and fix many Windows Operating System related bugs and issues (BSOD, application crash, system functions not working).
- Repair files that System File Checker or Windows Resource Protection found but failed to repair.
- Restore the system image so you can repair the Windows installation.
What is the DISM Tool?
Deployment Image Servicing and Management (DISM) is a Windows 10/11 tool designed to help network administrators prepare, modify, restore, and repair system images, including the Windows Setup, Windows Recovery Environment, and Windows PE (WinPE). The tool can also be used to fix common issues with the hidden recovery image on your PC.
Expert Tip: For smoother PC performance, consider using a PC optimization tool. It handles junk files, incorrect settings, and harmful apps. Make sure it’s right for your system, and always check the EULA and Privacy Policy.
Free Scan for PC Issues
Compatible with:
Windows 10/11, Windows 7, Windows 8
Special offer. About Outbyte, uninstall instructions, EULA, Privacy Policy.
It is a Windows command line utility that is used to prepare and service images for the operating system. DISM.exe helps deploy the necessary images from the Deployment Imaging Servicing and Management utility, and does not cause any threat to your PC.
When your device encounters performance issues, does not boot up correctly, or when you are troubleshooting errors, the System File Checker tool should be enough to scan, repair, and replace damaged or missing system files by using the recovery image that is locally available.
But, if the replacement copies inside the Windows 10/11 recovery image are also corrupted in any way, the SFC tool will not work. In this case, you need to use the DISM tool to scan and repair the install.wim image where the replacement files are saved, then use SFC to repair your installation. In effect, the DISM tool fixes problems that the SFC tool cannot handle.
DISM uses commands to bring your computer back to its healthy working state. Although these commands are typically non-destructive, they do involve significant system changes. Therefore, it’s crucial to create a full backup of your system before proceeding with these steps.
Устранение проблем
Данный способ устранения необходимой ошибки уже более сложный, но в то же время более действенный и серьезный. Для его реализации следуйте приведенной инструкции:
используя строку поиска, найдите и запустите панель управления;
- здесь проследуйте в раздел системы и безопасности;
- там найдите строку устранения типичных проблем компьютера;
после этого откроется новое окно.
Теперь запустите функцию «Настройка устройства». Появится диалоговое окно. Далее просто следуйте подсказкам, чтобы успешно выполнить проверку на наличие различных ошибок, вызывающих неисправность «вставьте диск в устройство».
Обнаружив их, вы получите код, по которому уже можно будет найти решение проблемы.
What to Do After Solving DISM Error 87?
After you have fixed the DISM restorehealth error 87, what can you do?
It is strongly recommended to create a system image after fixing this issue. In this way, you can restore your computer to the normal state if you encounter the error 87 DISM again in later.
In addition, if you encounter some other OS problems during the using process, you can also restore your computer to a previous state with the system image created before.
Thus, do you know how to back up computer or create system image easily? To easily keep data safe, MiniTool ShadowMaker would be a good choice.
MiniTool ShadowMaker is a piece of professional Windows backup software which is specializing in backing up disks, partitions, files, folders and the operating system.
Besides backup feature, it is also a clone tool which can clone OS from HDD to SSD without data loss.
So, with so many features, download MiniTool ShadowMaker Trial from the following button immediately or choose to purchase an advanced edition.
Now, we will show you how to back up computer with the step-by-step guide.
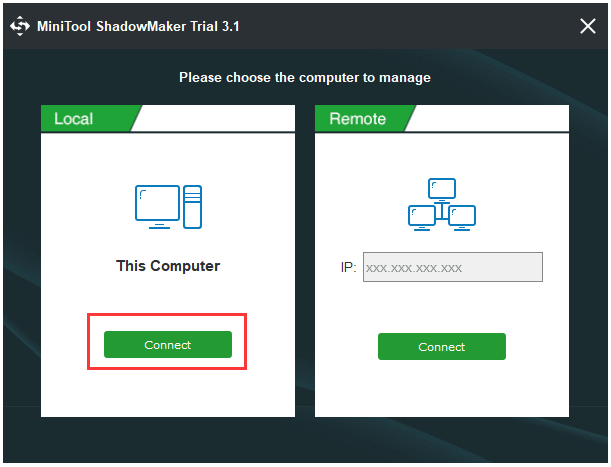
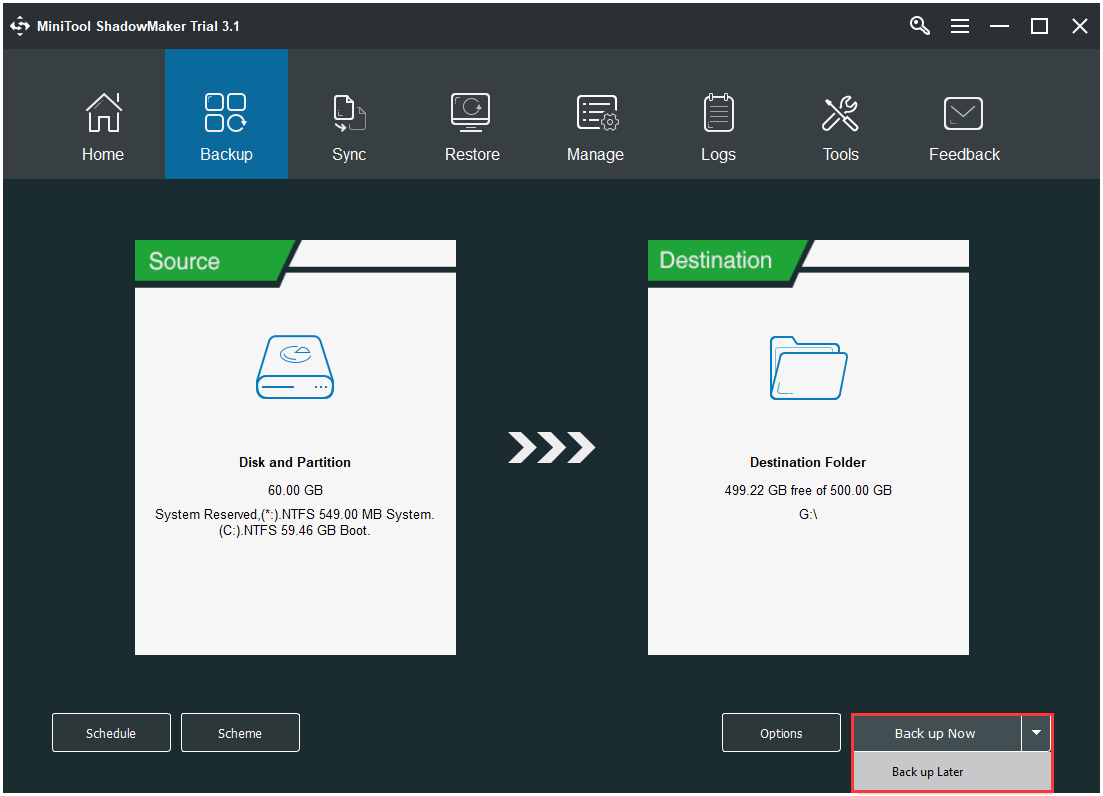
Step 1: Launch MiniTool ShadowMaker
- Download MiniTool ShadowMaker and install it on your computer.
- Launch it.
- Click Keep Trial to continue.
- Choose Connect in This Computer to continue.
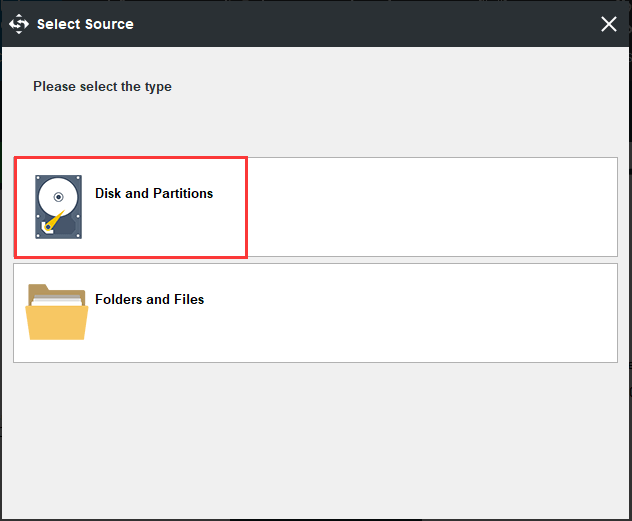
Step 2: Select backup source
- MiniTool ShadowMaker chooses the operating system as the backup source by default. So, there is no need for you to choose it again.
- However, if you want to select backup source by yourself. Please go to the Backup page, click Source module, and choose Disk and Partitions to select the system disk to continue. (If you want to back up files, choose Folders and Files.)
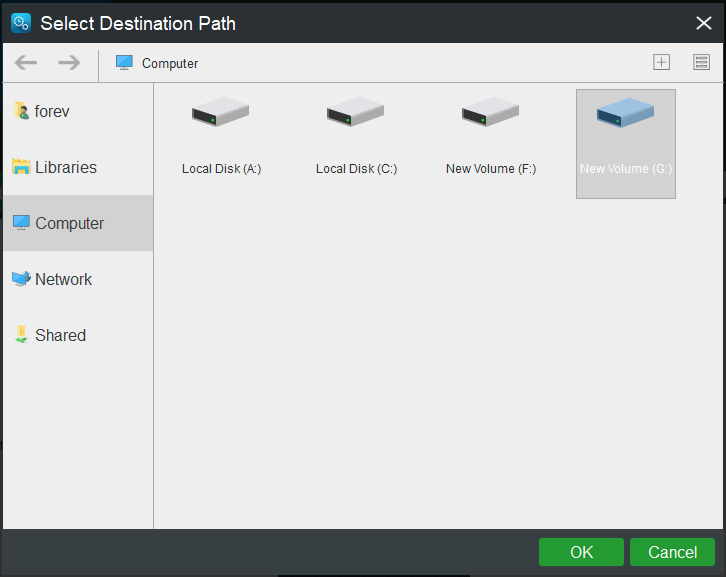
Step 3: Select the backup destination
- After returning the backup page, please click Destination module to choose a backup destination.
- Here are five available paths which are Administrator, Libraries, Computer, Network, and Shared folder. It is suggested to save the backup images in an external hard drive. So, click Computer, choose an external hard drive, and click OK to continue.
Here are three points you should pay attention to.
- MiniTool ShadowMaker enables you to create a regular backup. Just click Schedule button at the bottom of Backup page to continue.
- MiniTool ShadowMaker provides three different backup schemes. Click Scheme to change.
- You can also set some advanced backup parameters during the backup process, such as encrypting backup files, etc.
Step 4: Start to backup
- After selecting the backup source and destination, click Back up Now to perform the backup task immediately.
- Or click Back up Later to postpone the backup task and restart it in the Manage page.
When all steps have been finished, you have successfully created a system image. With this system image, you can feel relax even though you encounter the DISM error 87 again or some other system problems because you can restore computer to a previous state.