
Using Resource Monitor
The first way you can investigate ReadyBoost’s performance is with Resource Monitor. To get started with Resource Monitor, press +R, type Resmon.exe in the Open text box, and press .
In the Resource Monitor user interface, select the Disk tab. Now, select System check box in the Processes With Disk Activity panel to enable the Filtering feature, which will allow you to highlight certain processes or services. When you select a process, all other processes are filtered out so that it is easy to see where and how the selected process is coming into play. Each place where that particular process occurs will be highlighted in orange.
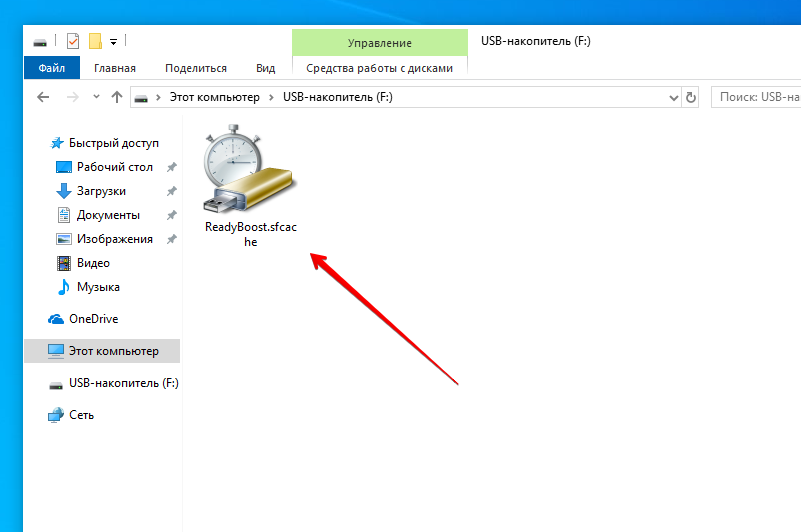
Next, move down to the Disk Activity panel, where you’ll see that the display is showing only files that are running under System–which will make it easy to locate and select the ReadyBoost.sfcache file on your USB flash drive. In my example, this is D:\ ReadyBoost.sfcache.
At this point, launch an application that will perform a lot of disk activity, reading and writing data to and from the hard disk. In my test, I launched Microsoft Edge, which immediately began reading and writing data.
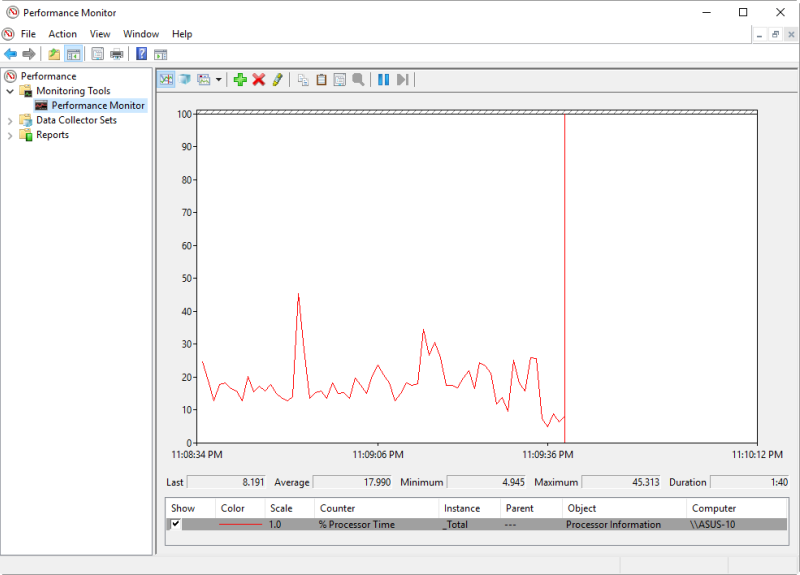
When you load an application that performs a lot of disk activity, your Resource Monitor window will look similar to the one shown in Figure A.
Figure A
Resource Monitor provides a good view of ReadyBoost in action.
Looking at the Read, Write, and Total columns in the Disk Activity panel, you can see that the ReadyBoost.sfcache file is indicating that ReadyBoost is writing and reading a fairly sizable amount of data to and from its cache. If you continue working with your application, you’ll see a lot more ReadyBoost activity.
You’ll also notice that activity shows spikes and dips in the graph for your USB flash drive. In my example, that’s the Disk 1 (D:) graph in the bottom-right of the window.
On the flip side, when you close your application(s) you’ll see the amount of data being handled by ReadyBoost steadily dwindle. You may even notice that the ReadyBoost.sfcache file drop completely off the Disk Activity panel.
However, if you fire up that application again, ReadyBoost will come back to life.
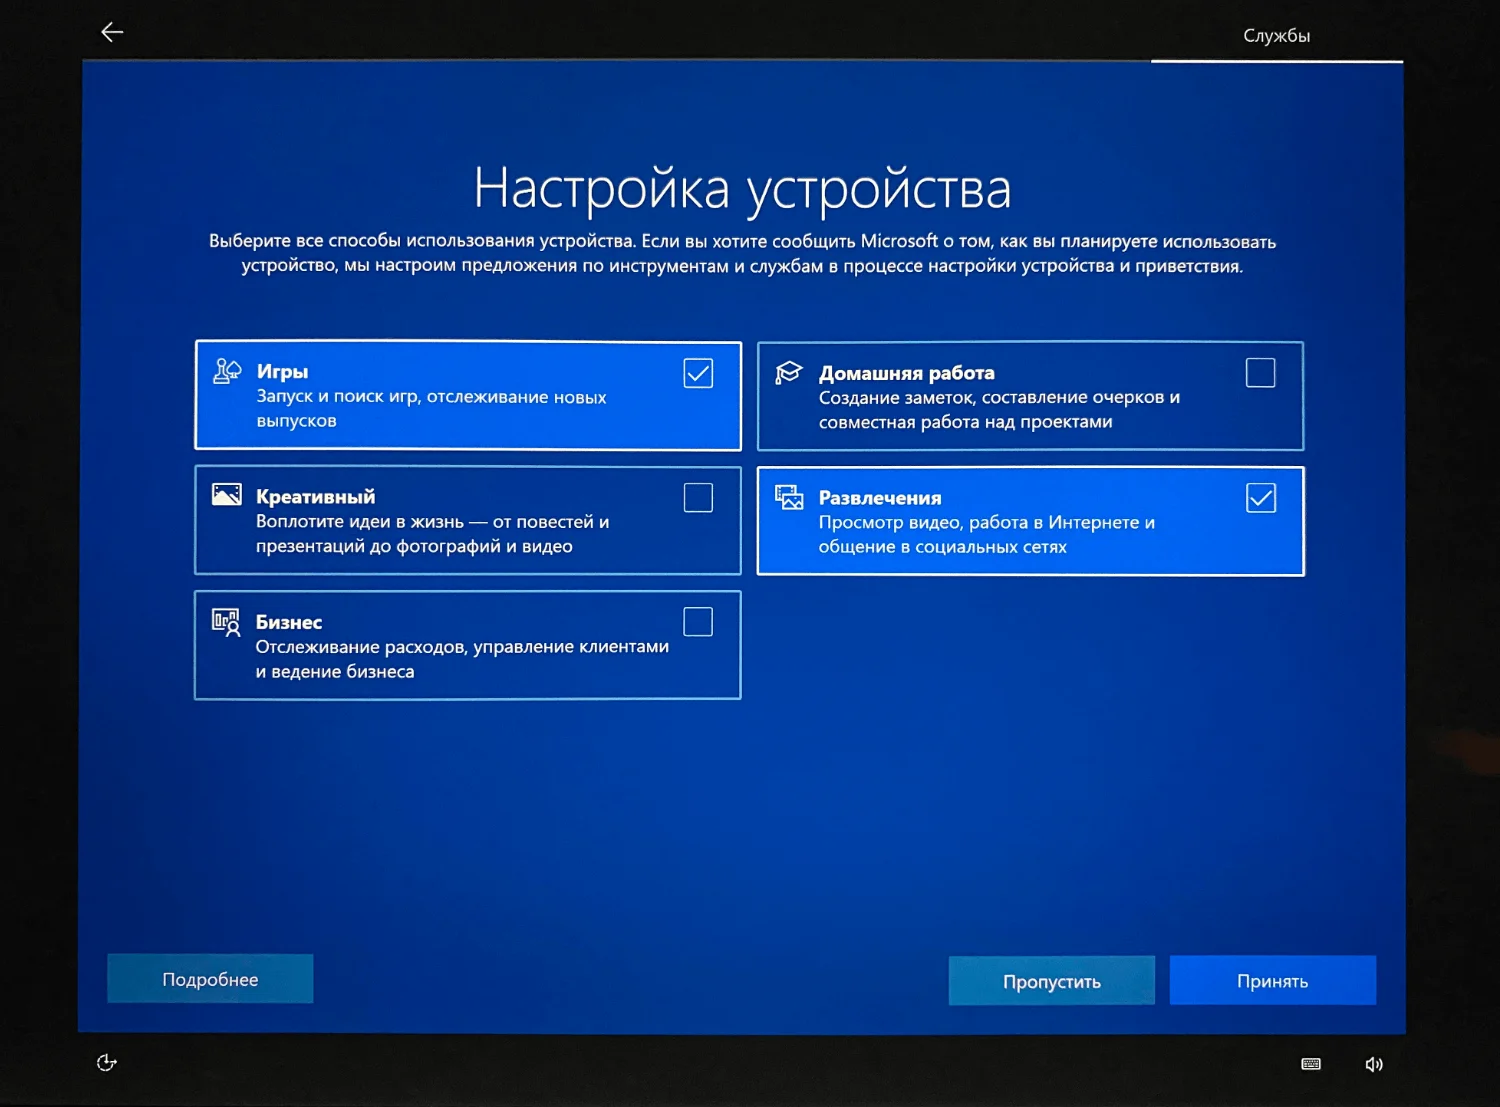
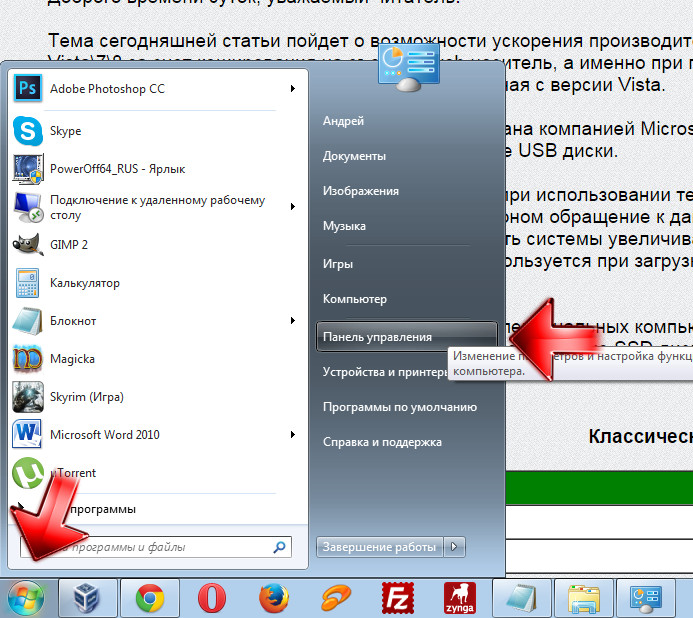
Как включить ReadyBoost Windows 10
Если же приступить к самой настройки и подготовки флешки, то Вы должны убедиться что у Вас включена функция SuperFetch в Windows 10. Так как многие её отключают, потому что она грузит жесткий диск, ну и для пользователей у которых установлен SSD диск рекомендуется её отключать. Ну как не странно это первый случай когда эта функция мне стала нужна.
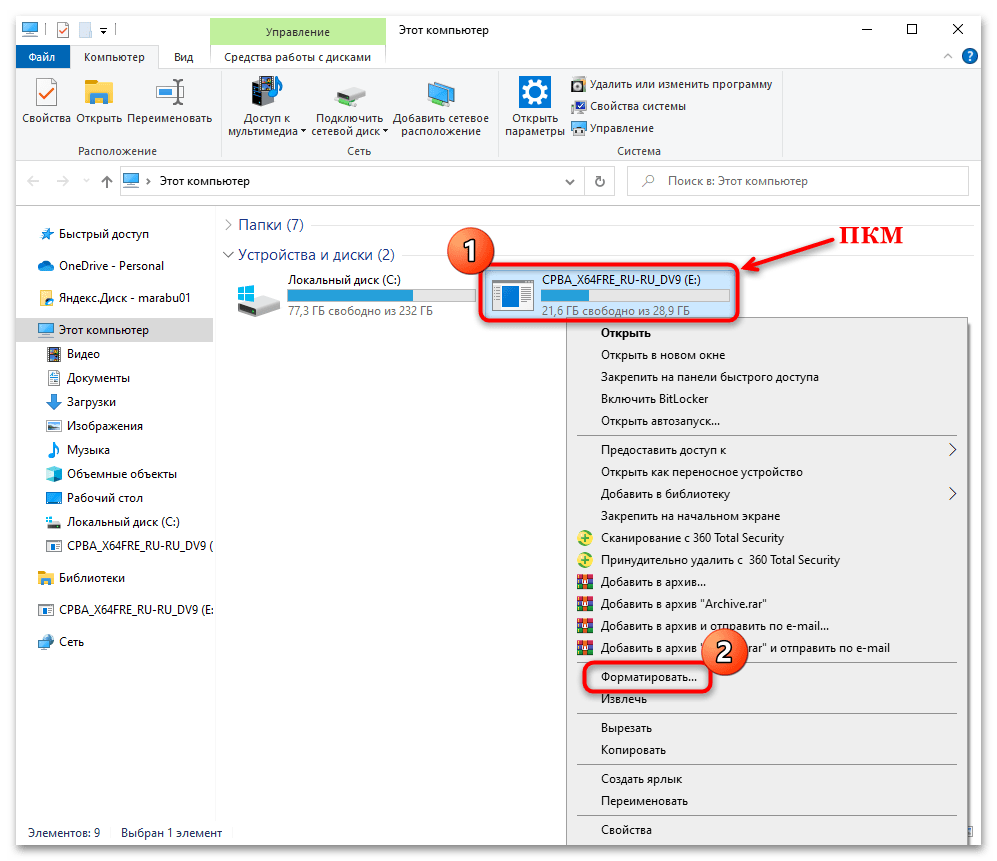
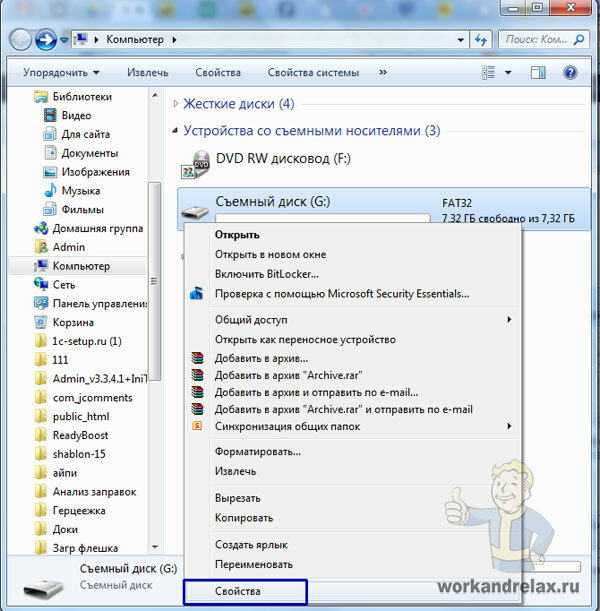
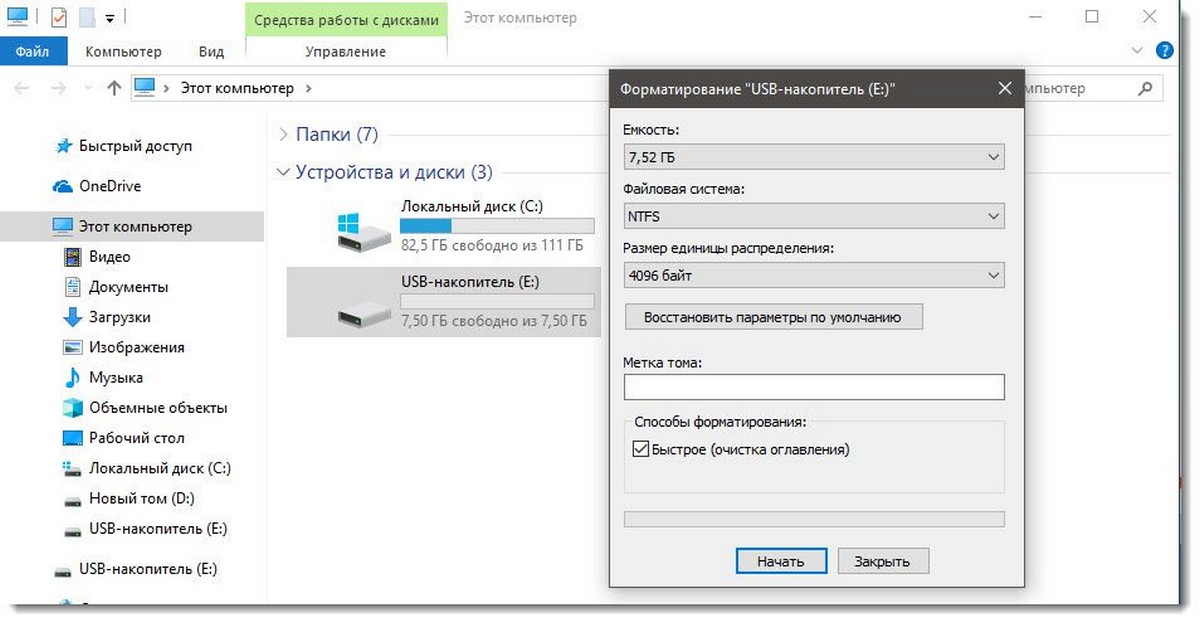
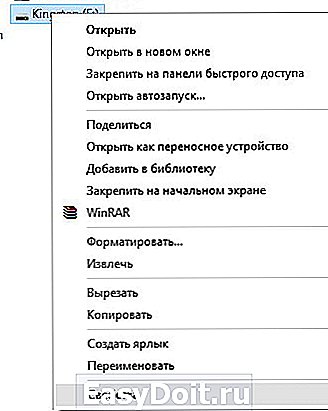
- Вставляем внешний накопитель, то ли флешка или внешний жесткий диск, при необходимости форматируем её.
- В моем компьютере нажимаем правой кнопкой мыши на накопитель и выбираем Свойства.
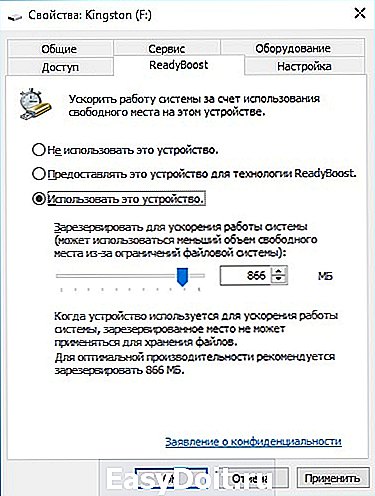
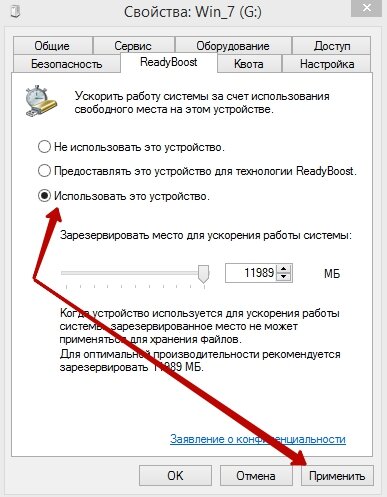
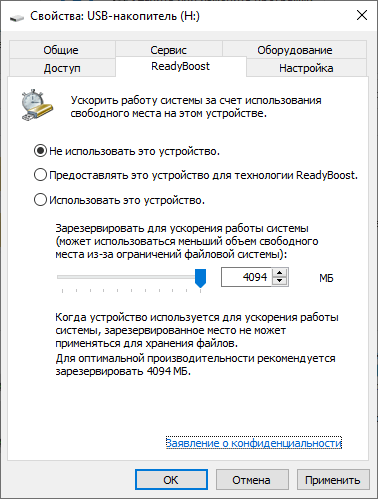
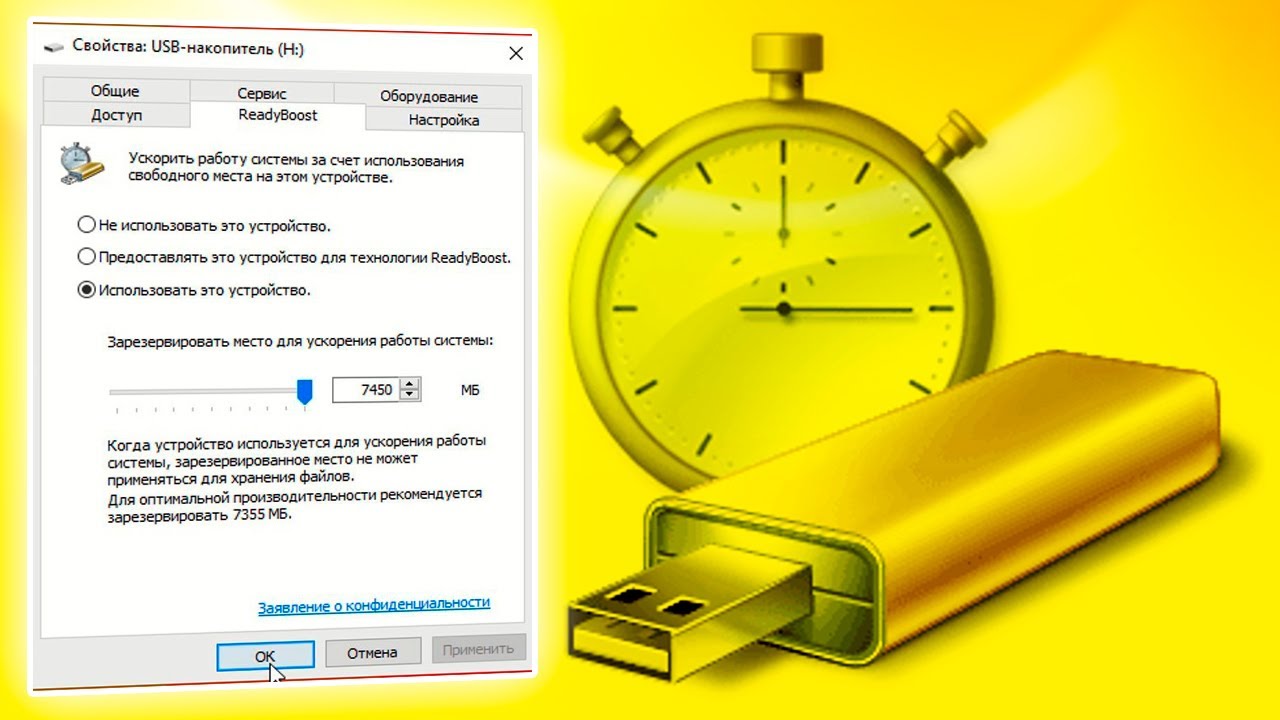
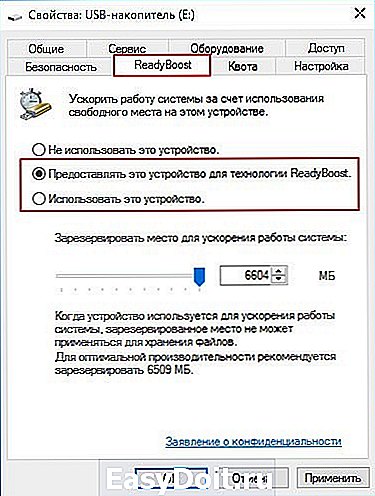
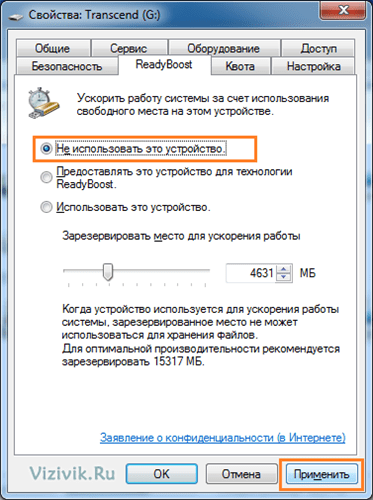
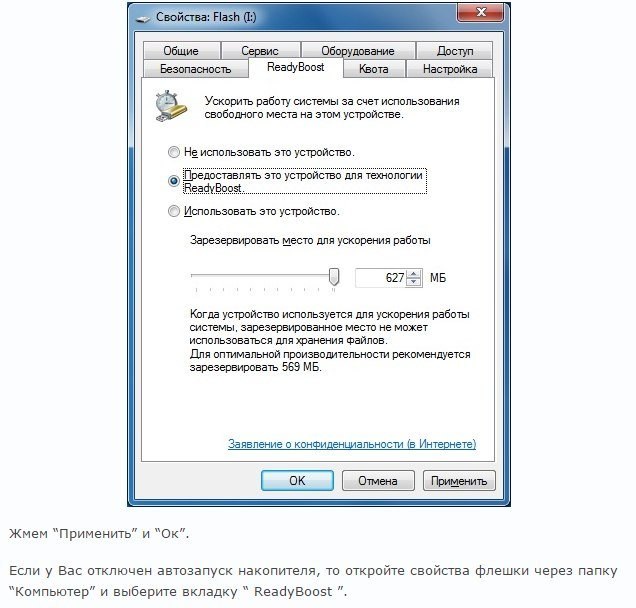
- В открывшимся окне переходим в закладку ReadyBoost.
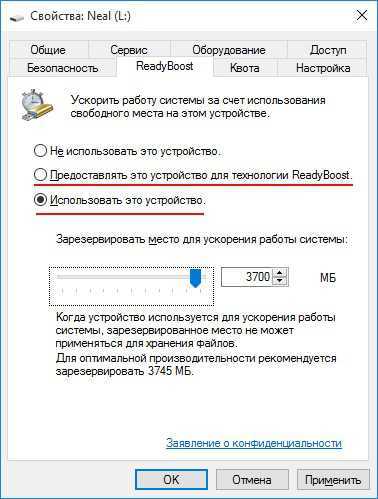
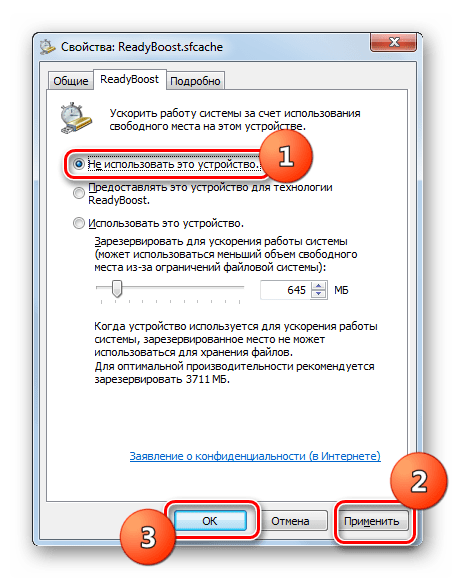
- В этом же разделе Вы можете увидеть активным пункт Не использовать это устройство. Активируем пункт Предоставлять это устройство для технологии ReadyBoost, если же Вы хотите задействовать всю флешку или пункт Использовать это устройство, чтобы выделить часть памяти на флеш карте.
- Дальше Вам стоить выбрать размер который Вы хотите зарезервировать и нажать Применить.
Помните когда устройство используется для ускорения работы системы, зарезервированное место не может применяться для хранения файлов. Но все же если Вы используете накопитель большого объема и задействовали не всю его рабочую область, тогда Вы можете и сохранять на нем необходимые файлы, и использовать его за назначением.
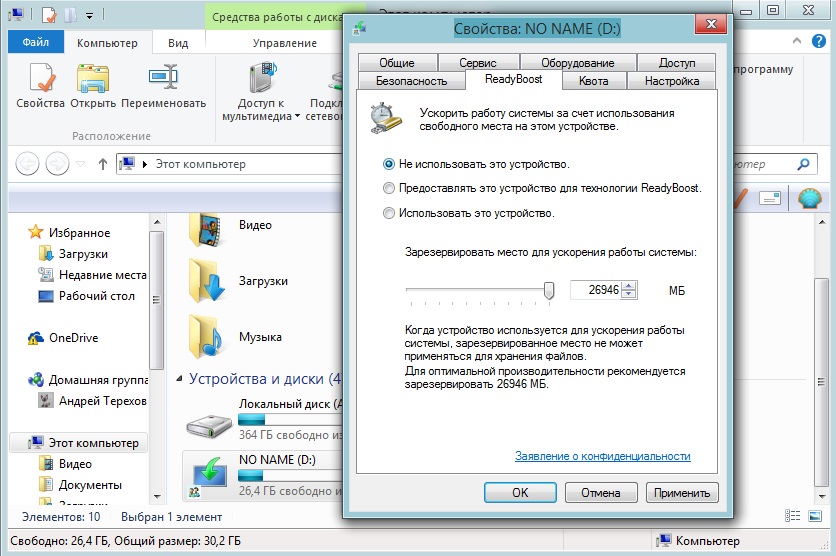
Насчет того сколько памяти доступно для резервирования, то у меня всего 4 ГБ из-за ограничений файловой системы. Если же Вы форматируете накопитель в файловой системе NTFS, то Вы сможете установить размер и побольше чем 4 ГБ.
Как уверяли нас разработчики, технология ReadyBoost позволяет ускорить процесс загрузки программ или других данных в 10 раз. Что звучит потрясающе, но все же на практике все не так гладко. С большими файлами работает медленно, а c маленькими файлами действительно прогресс на лицо. А также много зависит от скорости Вашего внешнего накопителя, чем больше Ваша флешка способна выдавать, тем быстрее всё будет работать, что и не удивительно.
В этой статье мы рассмотрели как включить ReadyBoost в Windows 10, ну и в общем разобрались что это за технология такая ReadyBoost, о которой Вы возможно даже не слышали. Теперь же Вы знаете как увеличить оперативную память с помощью флешки. Все инструкции которые Вы можете найти в интернете для расширения оперативной памяти с помощью флешки описывают технологию ReadyBoost.
Хоть и статья получилась не большой, но думаю пригодится многим, особенно для тех в кого слабое железо. Это действительно хороший способ ускорить роботу Вашего компьютера.
windd.ru
Windows 10: как использовать ReadyBoost?
Что такое ReadyBoost?
Windows ReadyBoost – это технология поддержки повышения производительности операционной системы. Ускорение работы системы осуществляется за счёт использования свободного места (кеширования) на подключаемом к ПК (как правило, через порт USB) съёмном устройстве (карта памяти, флешка, переносный съёмный диск).
Впервые технология ReadyBoost была испробована на Windows Vista .
Как использовать ReadyBoost :
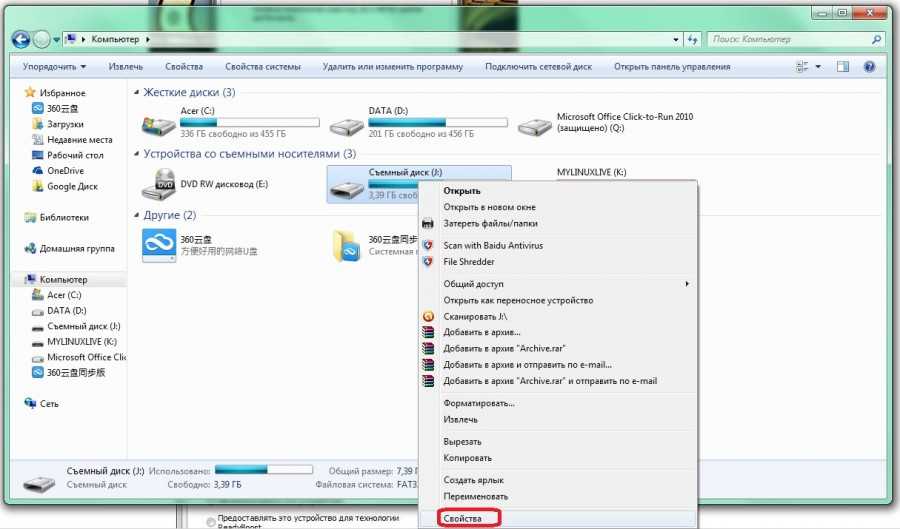
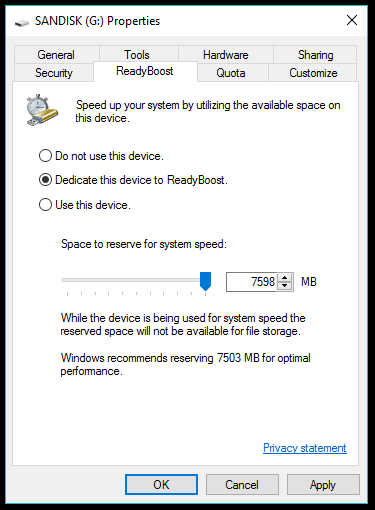
– нажмите значок Этот компьютер, выделите съёмный диск, который вы хотите использовать для ReadyBoost;
– нажмите правую кнопку мыши;
– в открывшемся контекстном меню выберите Свойства;

– в окне Свойства: Съемный диск откройте вкладку ReadyBoost;
– система определит, сколько места можно зарезервировать на этом устройстве (если свободного места меньше, чем требуется системе, задействовать ReadyBoost не удастся, пока вы не освободите место);
– установите переключатель Использовать это устройство –> OK.
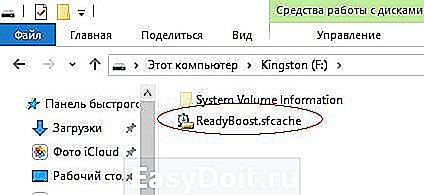
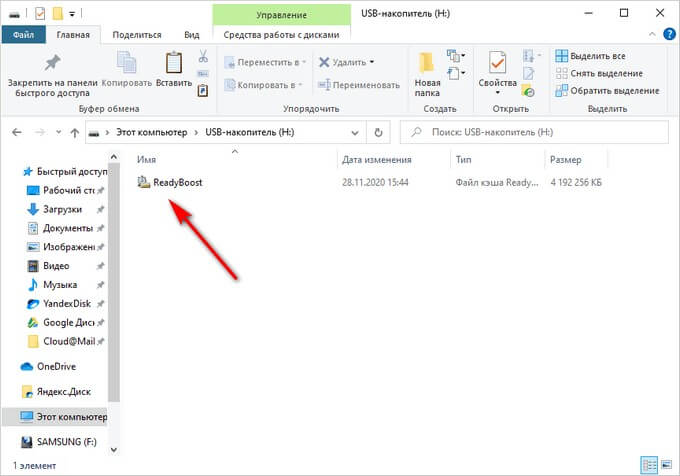
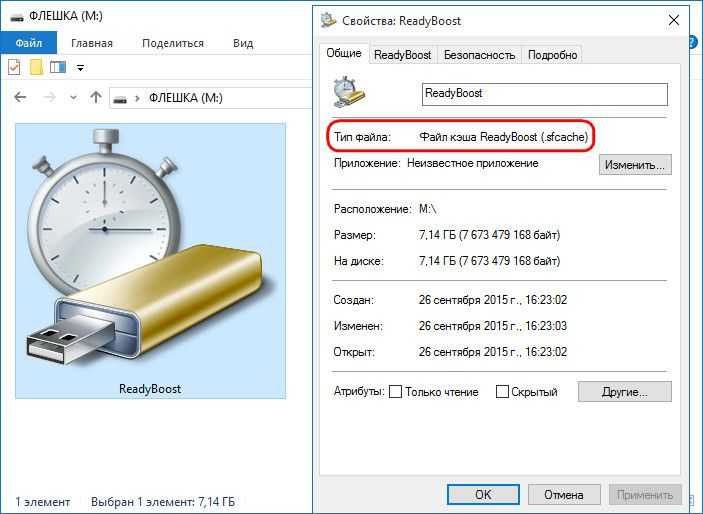
1. Когда съёмное устройство используется для ReadyBoost, зарезервированное место (файл кеша ReadyBoost – ReadyBoost.sfcache) не может использоваться для хранения других файлов.
2. Рекомендуемый объём памяти для ускорения ReadyBoost составляет от одного до трёх объёмов оперативной памяти (RAM), установленной на ПК . Например, если объём памяти ПК составляет 1ГБ и подключено USB-устройство флеш-памяти ёмкостью 4ГБ, выделение от 1ГБ до 1,5ГБ ёмкости этого устройства обеспечит наилучшее ускорение производительности.
3. Если вы хотите отменить использование съёмного устройства для ReadyBoost, в окне Свойства: Съемный диск откройте вкладку ReadyBoost –> установите переключатель Не использовать это устройство –> OK.

4. Фактически ReadyBoost – это тот же файл подкачки, только более быстрый (то есть по быстродействию ОЗУ превосходит ReadyBoost, ReadyBoost превосходит файл подкачки ).
5. Не стоит ожидать ощутимого роста повышения быстродействия ПК при использовании ReadyBoost. Быстродействие увеличивается, но не столь существенно, как хотелось бы.
6. Если есть выбор между увеличением объёма оперативной памяти и использованием ReadyBoost, то лучше увеличить объём ОЗУ.
7. Использование ReadyBoost позволяет оперативно – в походных условиях, в поездке, в командировке, буквально – «на коленке» – повысить быстродействие ноутбука, когда увеличить объём ОЗУ нет возможности.
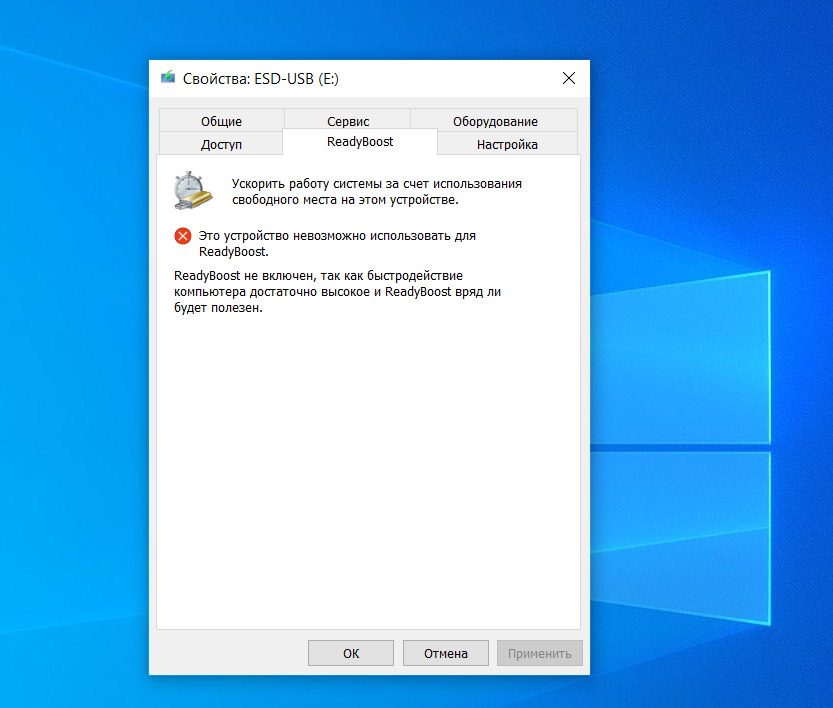
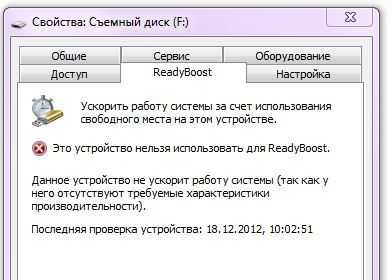
8. При подключении съёмного устройства операционная система проверяет его на «профпригодность». Если оно не соответствует требованиям ReadyBoost, появится сообщение «Это устройство нельзя использовать для ReadyBoost .
9. Очень удобно использовать ReadyBoost на ноутбуках, имеющих слоты для SD -карт. Для ReadyBoost можно использовать и обычные флешки, но это не так удобно, как использование SD-карт.
netler.ru
What Is ReadyBoost?
ReadyBoost is a Windows program that caches frequently used files. It stores this cached data on your removable devices, such as flash drives, CompactFlash memory cards, and Secure Digital. Microsoft first introduced ReadyBoost in 2007 with the promise of accelerating the performance of Windows Vista. But, to be honest, the claims fell flat for most of us. Thankfully, this utility actually does work in Windows 7, 8, and 10.
How Does It Improve Windows 10 Performance?
This program works in conjunction with SuperFetch, a service that uses an algorithm to decide which files should be kept in the cache. For example, the cache could be application files, system files, and user documents. When you launch ReadyBoost, Windows 10 uses your flash drive’s memory as RAM. In any case, RAM is what influences the system speed. So, when your Windows 10 needs to access frequently used files, it fetches it from the disk drive instead of the RAM.
The data stored in the ReadyBoost cache is safe, as it is protected using the 128-bit AES encryption standard by default. But you can deactivate the encryption to simplify its functionality and reduce CPU cycles. Unfortunately, the procedure is complicated, and you should use it at your own risk. In case you’re still interested, here is a link on how to do it: https://www.cleansoft.lv/disable-readyboost-encryption-and-compression/
Important Points to Note
So far, ReadyBoost is a great speed-boosting utility, but there is a catch; RAM is usually faster than USB storage. So, don’t assume ReadyBoost will turn an ages-old Celeron into a brand-new core i7 machine. ReadyBoost makes the system run faster, but it usually depends on the setup. For example, this disk caching feature is beneficial if your system runs a slow hard drive or has a small amount of RAM. Also, if you run Windows 10 on fairly standard hardware, then ReadyBoost will offer a nice performance enhancement.
But, if you are running your Windows 10 on high-end hardware with a top-of-the-range i7 or i9 CPU, then ReadyBoost won’t offer much help. If you have enough RAM, then it is better to store SuperFetch data on your system’s RAM than on a USB flash drive.
What About Using Linux to Improve Speed
If you still have an old PC with performance issues, don’t write it off just yet. You can, of course, enhance its performance with ReadyBoost. But if the idea of disks and changing settings in your system seems too cumbersome, then there is a simpler option. The thing I’m talking about is called Xtra-PC, and it’s a USB drive that has a fast Linux operating system on it. Once plugged in, it bypasses your slow Windows and boots into this fast Linux instead.
This Linux distribution-based system will give your old computer a new lease on life. It is designed with simplicity in mind, so it is ideal for non-techie guys. Xtra PC is also optimized for popular platforms, such as Amazon Prime Video, Facebook, and Netflix. Other web-based products and services, such as Google Docs. It works just like in any other operating system.
Besides simplifying things for non-technical people, extra-pc comes with several popular features. I tried this product on a few XP-era PCs and didn’t need any drivers. The only challenge is that you must stop using Windows and learn the Xtra PC’s way of doing things. Even though they are quite similar, some things are still different.
Creating a Data Collector Set
If you want to log ReadyBoost activity over a period of time, you’ll need to create a Data Collector Set. Fortunately, doing so is pretty easy once you know the steps.
To begin, change the Graph Type to Line. Next, expand the Data Collector Sets branch in the Performance Monitor navigation pane. Then, right-click User Defined, select New, and click Data Collector Set. When the Create New Data Collector Set wizard appears, enter a name for the set and select the Create Manually option button, as shown in Figure G. Then click Next.
Figure G
This wizard will walk you through the steps of creating a Data Collector Set.
Now select the Performance Counter check box. On the next page use the Add button to access the Add Counters dialog box, where you can individually select the four pertinent counters. These steps are condensed in Figure H.
Figure H
You’ll work through the next two steps in the wizard to add the pertinent counters to your ReadyBoost Monitor Data Collector Set.
Even though there are other settings, click the Finish at this point to complete the wizard. When you return to the Performance Monitor window, you’ll see your ReadyBoost Monitor Data Collector Set. When you are ready to begin logging ReadyBoost activity, just click the green Play icon, shown in Figure I.
Figure I
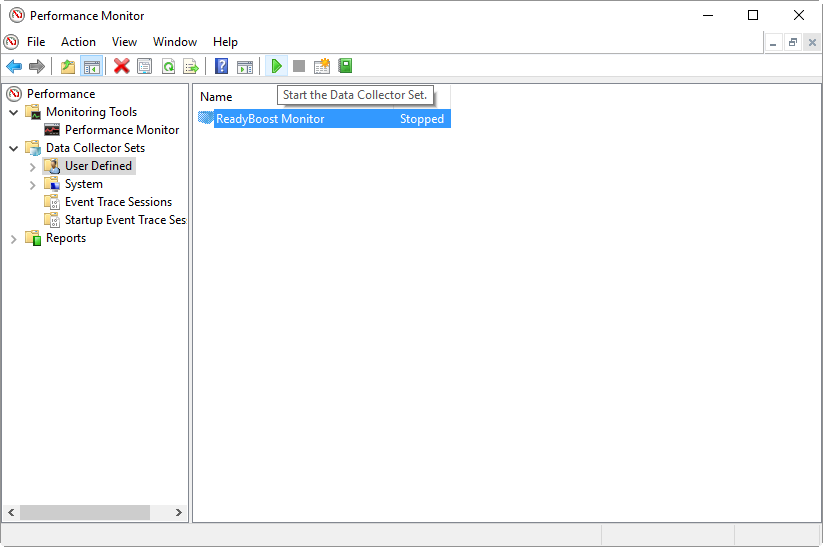
To begin logging ReadyBoost activity, just click the green Play icon.
When you have used your system for what you would consider a substantial amount of time, you can open you Data Collector Set and view the log. To do so, click the Stop icon and then select Performance Monitor in the navigation pane. Click the View Log Data icon to open the Performance Monitor Properties dialog box. Click the Add button, and you can locate and select your log file, as shown in Figure J.
Figure J
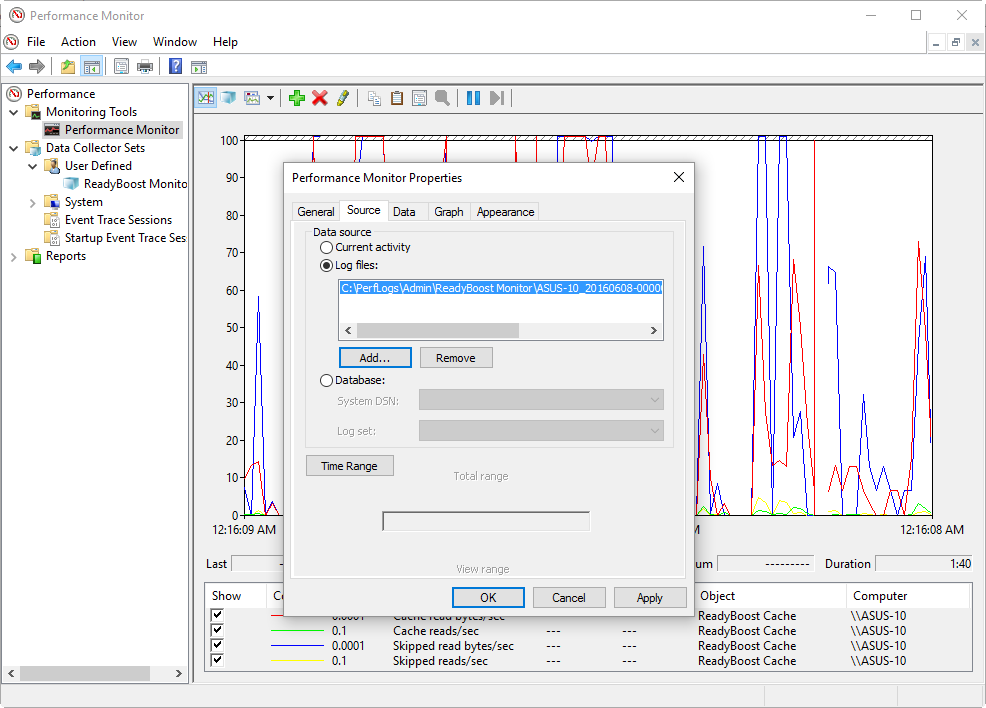
Click the Add button to locate and select your ReadyBoost Monitor log file.
When you click OK, you’ll see your log file and can check on how ReadyBoost behaved during your test period. In Figure K you can see that you can click on the timeline to see how ReadyBoost performed over time. As you do so, you can select any one of the counters and check out the values in the Average, Minimum, and Maximum boxes.
Figure K
You can click on the timeline to see how ReadyBoost performed over time.
You’ll most likely want to conduct multiple tests under various usage circumstances to get a real handle on how much ReadyBoost benefits your particular system. As always, keep in mind that your mileage may vary.
Помогает ли ReadyBoost в играх и программах?
Проверить самостоятельно влияние ReadyBoost на производительность у меня не получится (16 Гб RAM, SSD), однако все тесты уже проведены и без меня, а потому просто проанализирую их.
Наиболее полным и свежим тестом влияния на скорость работы ПК мне показался найденный на англоязычном сайте 7tutorials.com, в котором он проводился следующим образом:
- Использовался ноутбук с Windows 8.1 и компьютер с Windows 7, обе системы 64-бит.
- На ноутбуке тесты были проведены с использованием 2 Гб и 4 Гб оперативной памяти.
- Скорость вращения шпинделя жесткого диска ноутбука — 5400 rpm (оборотов в минуту), компьютера — 7200 rpm.
- В качестве устройства для кэша использовалась флешка USB 2.0 с 8 Гб свободного пространства, NTFS.
- Для тестов были использованы программы PCMark Vantage x64, 3DMark Vantage, BootRacer и AppTimer.
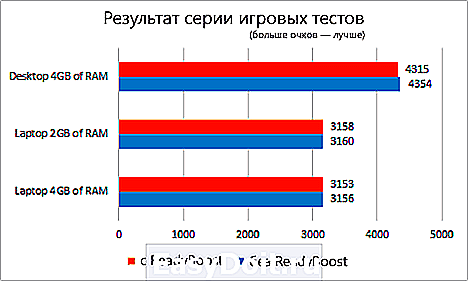
Результаты тестов показали незначительное влияние технологии на скорость работы в некоторых случаях, однако, на главный вопрос — помогает ли ReadyBoost в играх — ответ, скорее, нет. А теперь подробнее:
- В тестировании игровой производительности с помощью 3DMark Vantage компьютеры с включенным ReadyBoost показали меньший результат, чем без него. При этом, разница менее 1%.
- Странным образом оказалось, что в тестах памяти и производительности на ноутбуке с меньшим количеством оперативной памяти (2Гб) прирост от использования ReadyBoost оказался меньше, чем при использовании 4 Гб оперативной памяти, хотя технология направлена как раз на ускорение слабых компьютеров с малым количеством оперативной памяти и медленным жестким диском. Однако сам прирост незначительный (менее 1%).
- Время, необходимое для первого запуска программ увеличилось на 10-15% при включении ReadyBoost. Однако, повторный запуск в той же степени быстрее.
- Время загрузки Windows уменьшилось на 1-4 секунды.
Общие выводы по всем тестам сводятся к тому, что использование этой функции позволяет незначительно ускорить работу компьютера с малым количеством оперативной памяти при открытии медиа-файлов, веб-страниц и работе с офисными приложениями. Кроме этого, ускоряется запуск часто используемых программ и загрузка операционной системы. Однако, в большинстве случаев, эти изменения будут попросту незаметны (правда, на старом нетбуке с 512 Мб RAM можно будет и заметить).
remontka.pro
Минимальные требования к накопителю
Не каждый съемный накопитель можно использовать для ускорения дисковой подсистемы ПК. Есть следующие обязательные требования:
Кроме этого при активации ЮСБ-флешки для технологии может выдаваться сообщение «Это устройство невозможно использовать для ReadyBoost». Чтобы исправить эту ошибку, пробуйте следующие способы:
Если и после этого не пропадает сообщение о невозможности использования, то спасет только другой накопитель, а текущий слишком старый или просто неисправен.
Рекомендуемые требования
Первоочередно стоит использовать скоростную флешку, но не самую дешевую в своей ценовой категории
Следующее важное условие: пропускная способность интерфейса, к которому подключен носитель. Чаще всего это будет USB, поэтому очень желательно, чтобы он был не ниже версии 3.0
Дело в том, что у него более высокая скорость, чем в предыдущей версии интерфейса — 4,8 Гбит/с вместо 0,48 Гбит/с. Скоростной разъем всегда внутри окрашен в синий цвет, таким образом он просто отличается от более медленных «сородичей». Учтите, что для поддержки USB 3.0 может требоваться установка отдельного драйвера. Для этого следует обращаться к сайту производителя компьютера или оборудования.

Есть общие важные рекомендации:
ReadyBoost
Что такое ReadyBoost? В самой общей формулировке — это инструмент использования службы Super Fetch, когда в качестве носителя информации применяется съемный накопитель, чаще всего подключенный к USB-разъему. В свою очередь Super Fetch — это совокупность алгоритмов, которые анализируют какие файлы ОС чаще всего используются. Они вследствие хранятся в кэше. Кэш — это участок памяти к которому Windows быстро получает доступ. Чаще всего туда записываются данные ОС, приложений и пользовательские документы.
Что это за программа
Если излагаться на более понятном языке, то ReadyBoost — скоростная память, куда можно записать и быстро считать наиболее часто используемые файлы. В качестве накопителя технология использует USB-флешки или карты памяти (SD, microSD).
ReadyBoost скачивать не требуется, так как она уже содержится в ОС по умолчанию. Впрочем, возможны ситуации, когда нужно сделать дополнительные манипуляции для активации технологии, но об этом речь пойдет дальше. Также существует вероятность, что при установке пиратских версий ОС компонент ReadyBoost был намеренно «вырезан» создателем нелегального софта.
Using Performance Monitor
While Resource Monitor shows that ReadyBoost is actively writing and reading data from its cache, you can get more concrete data with Performance Monitor. Performance Monitor allows you to view performance data or counters, both in real time and from log files. You can view performance data in graph, histogram, and report form. To help you monitor ReadyBoost, Performance Monitor provides a special set of counters under the heading ReadyBoost Cache.
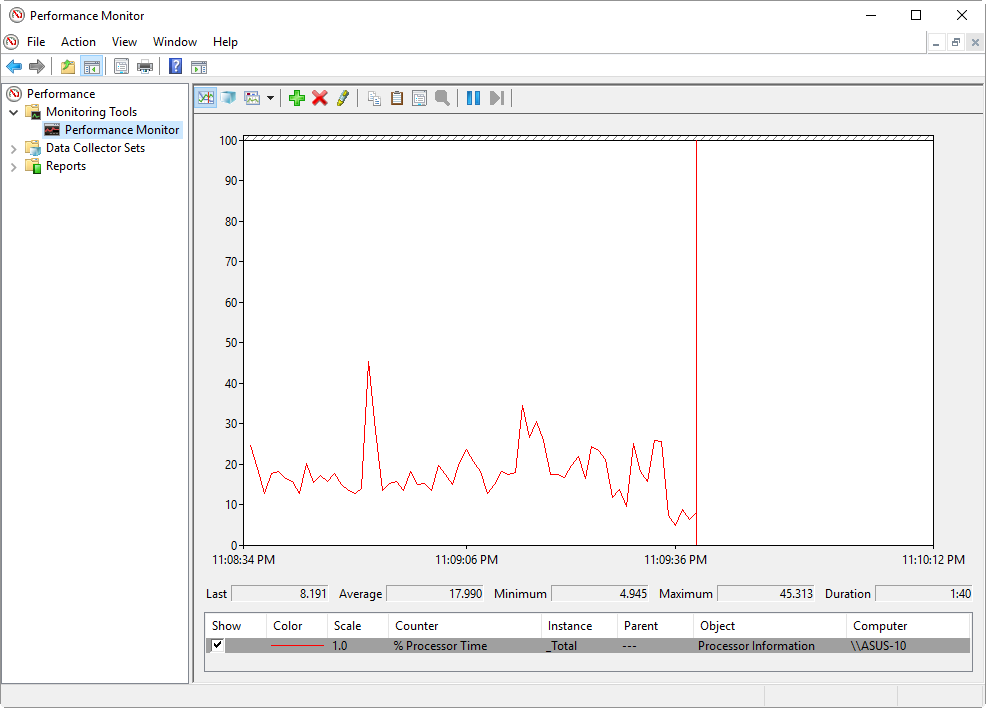
To launch Performance Monitor, press +R, type perfmon.exe in the Open text box, and press . Once the tool launches, expand the Monitoring Tools branch, if necessary, and click on Performance Monitor. When the graph appears, as shown in Figure B, you’ll see that in its default configuration, Performance Monitor is configured to monitor Processor Time. Since we won’t need this for the task at hand, the first order of business is to click the Red X or Delete Key icon.
Figure B
 By default, Performance Monitor is configured to monitor Processor Time.
 By default, Performance Monitor is configured to monitor Processor Time.
Now, click the Green + or Add icon. When you see the Add Counters dialog box, locate and select the ReadyBoost Cache header and click the Add button. When the ReadyBoost Cache header appears in the Added Counters section, as shown in Figure C, click OK.
Figure C
When the ReadyBoost Cache counter appears in the Added Counters section, click OK.
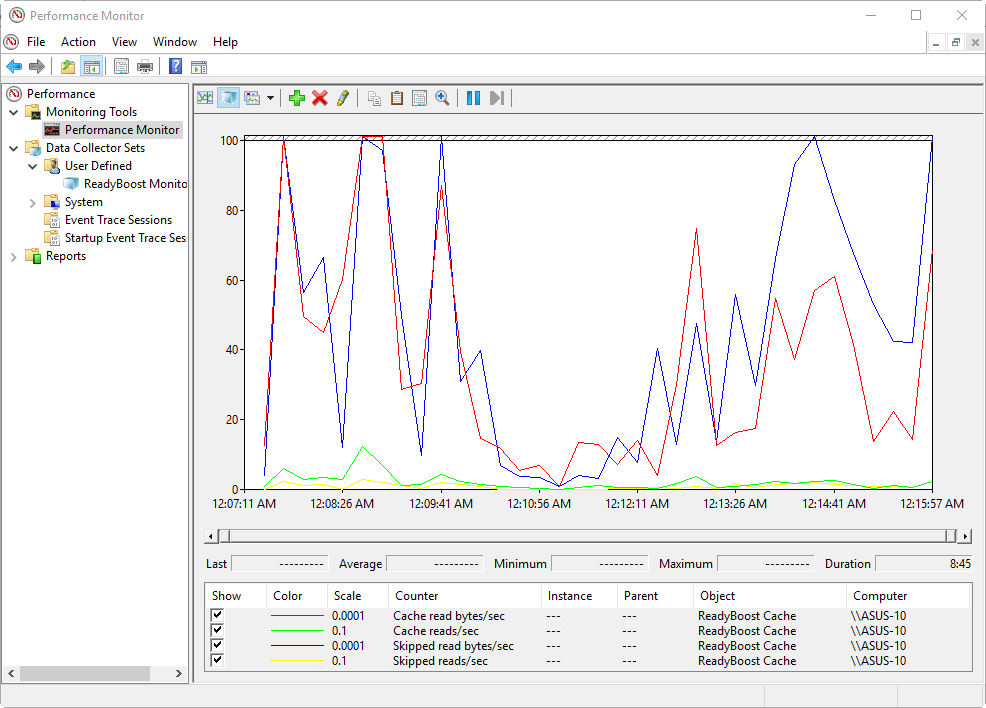
When you add the ReadyBoost Cache header to Performance Monitor, you are actually adding a set of 10 counters to the monitor, as shown in Figure D. These counters are listed and described in Table A.
When you add the ReadyBoost Cache header to Performance Monitor, you are adding a set of 10 counters.
Table A
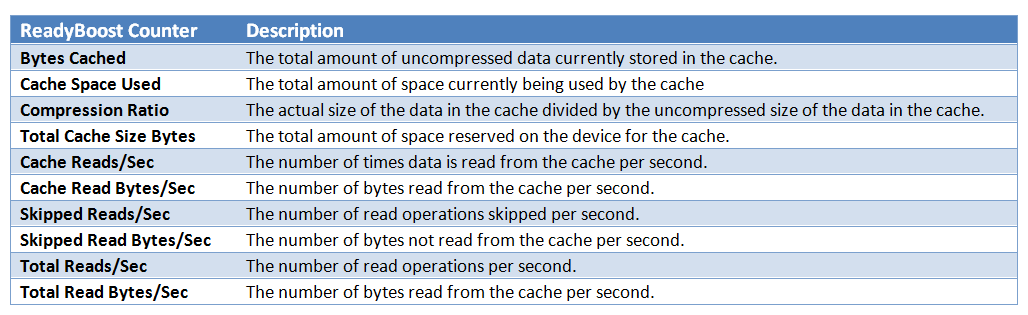
As you can see, having 10 counters on the monitor at one time can be a bit confusing. Furthermore, these counters monitor the full spectrum of ReadyBoost’s activities and not all of them are pertinent when measuring performance gains. As such, you will want to whittle down the counters to just the ones that give you a good view of what’s happening.
For example, what I really want to know is how much the ReadyBoost cache is being used to deliver data, so I chose Cache Reads Bytes/Sec, Cache Reads/Sec, Skipped Reads /Sec, and Skipped Reads Bytes/Sec. The first two counters will help you see how much data is being delivered from the cache. To balance this view I also want to know often ReadyBoost is deferring to the hard disk for reading data from the cache. So I also chose Skipped Reads /Sec and Skipped Read Bytes/Sec.
I then changed the Graph Type from Line to Histogram Bar, as shown in Figure E.
Figure E
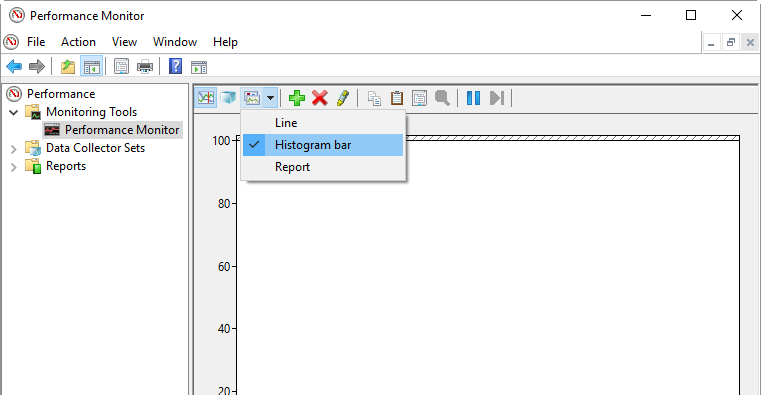
To best see how ReadyBoost performs in real time, change the Graph Type from Line to Histogram Bar.
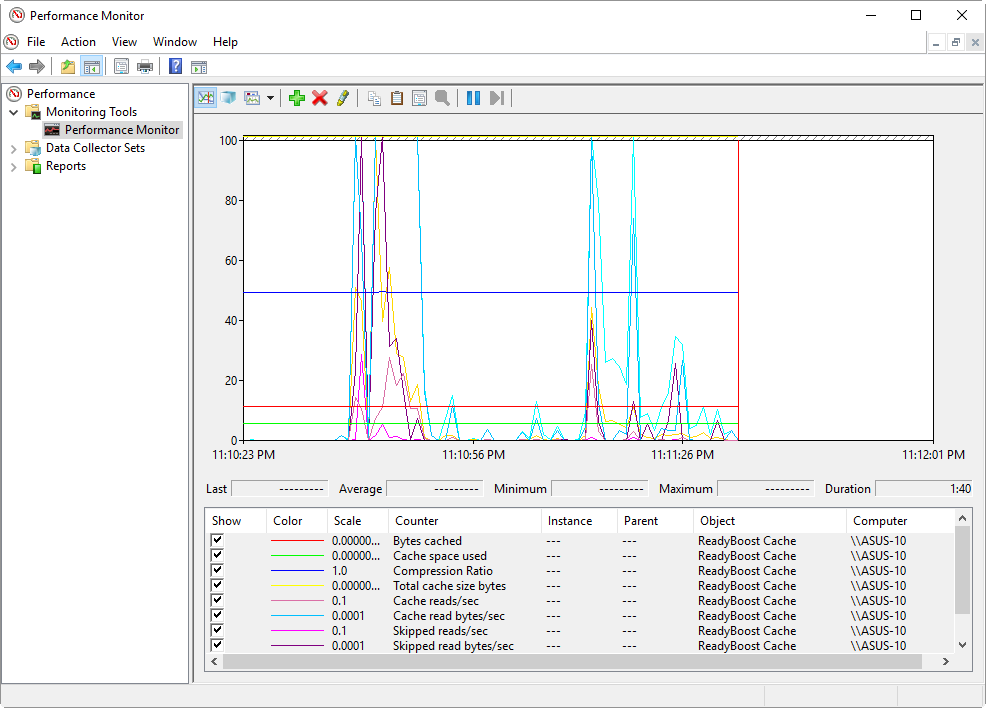
Now launch an application that will perform a lot of disk activity, reading and writing data to and from the hard disk. In my test, I again launched Microsoft Edge, which immediately began reading and writing data. When I returned to Performance Monitor, I discovered that there was a lot of activity displayed on the graph, as shown in Figure F.
Figure F
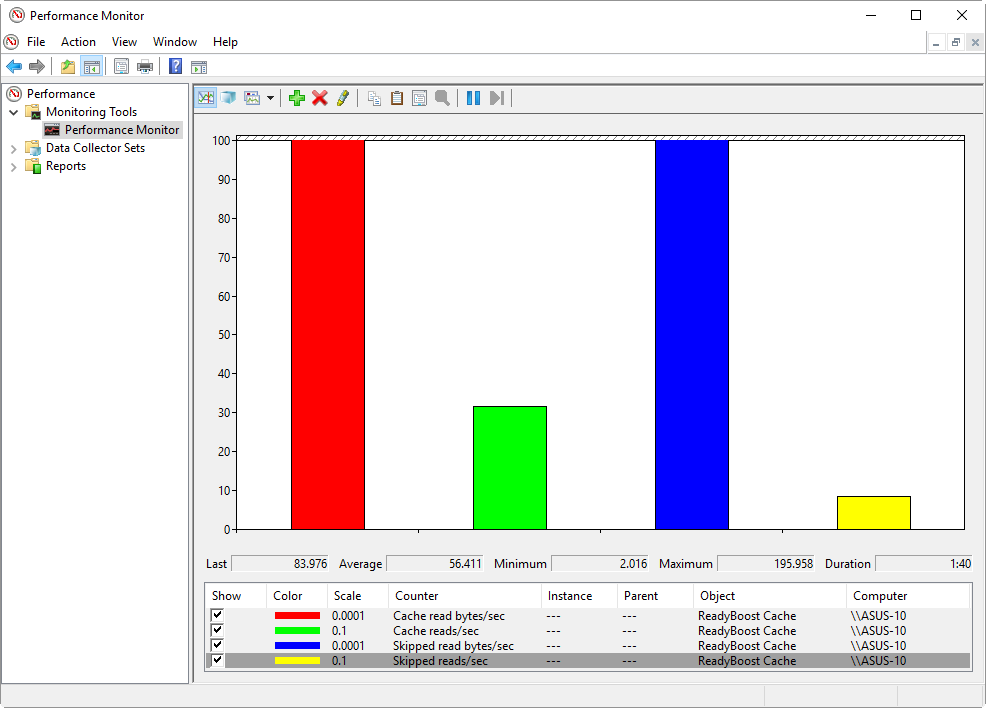
After launching an application that performs a lot of disk activity, you’ll be able to see how much ReadyBoost is contributing to the system.
If you look closely, you’ll see that the amount of data being read from the ReadyBoost cache is roughly equal to the amount of data being read from the hard disk cache. However, this is but a snapshot of ReadyBoost in action under a specific operation. To really gauge how much and under what circumstances ReadyBoost is benefiting your system, you’ll want to configure Performance Monitor to create a log file over a period of time. For instance, you might want to log ReadyBoost activity over a period of a couple of hours during which you perform the types of tasks that regularly use your system.
How Does ReadyBoost Work
Just to clarify what we touched on above, ReadyBoost does not speed up RAM or process but enhances hard drive access times for minor random reads. It is also important to remember that ReadyBoost is just a helper tool for SuperFetch. Therefore, its impact is most noticeable when starting huge disk-intensive applications, such as Microsoft Outlook, Adobe Photoshop, etc.
SuperFetch is a disk cache management system that enhances Window’s responsiveness when loading and switching between frequently used programs. The way it works is that SuperFetch constantly monitors system data for these programs and preloads them into the cache to be loaded faster into RAM. For instance, the Chrome browser is the first program I use every time I start my Windows computer, so SuperFetch loads Chrome files on the RAM to minimize the launch time.
The SuperFetch technology works perfectly while using the computer’s hard disk for the cache, but as you know, hard disks rely on physically moving parts. This often limits the speed at which data is transmitted between RAM and the cache. This is where ReadyBoost comes into play, storing application data and files as cache in removable devices.
ReadyBoost Requirements
We have discovered that you can use both USB 2.0 and USB 3.0 ports with this feature on your desktop, as long as you have a USB flash drive for ReadyBoost. But since the USB 3.0 port is much faster, we recommend using it. You can also use a memory card for laptops.
For it to work, you need to use a memory card or USB stick with at least 1 gigabyte of free space, depending on your RAM. So follow this rule of thumb: If your PC uses 1 gigabyte of built-in RAM, then your flash drive should have about 2 — 4 gigabytes of free space. The good thing is that you might not need to do any tests since Windows 10 automatically checks the performance of removable hardware.
If you are running a 32-bit version of Windows 10 and on FAT32 file system disks, you can only use up to 4 gigabytes of storage space for ReadyBoost, even if the disk is larger. You can also use the older FAT16 file system, but you can only use up to 2 gigabytes of cache size.
For 64-bit Windows, you can create up to 32 gigabytes of the cache, and it can be created on an NTFS-formatted removable device. Windows 10 can also support the exFAT file system for ReadyBoost.
Принцип действия
Данный функционал позволяет вместо внутренних накопителей использовать съемные флешки USB для кеширования ОЗУ. Но есть некоторые ограничения. Чтобы результат был существенным, подключаемые носители должны:
- иметь минимальный размер в три раза превышающий объем «оперативки»;
- обладать повышенными показателями скорости записи и считывания информации. В идеале, эксплуатировать для этой цели гаджеты поколения USB0.
Возникает логичный вопрос: а что будет, если флешка перестанет работать в результате извлечения? Дело в том, что все операции дублируются на жесткий диск. Поэтому, потерь и сбоев быть не должно. Кроме того, все данные шифруются особым образом и могут быть «раскрыты» только на Вашем ПК. Даже если флешка попадет в чужие руки, никто не сможет просмотреть информацию о системе.
Что дает ReadyBoost Windows 7 / 8 / 10? Самый главный эффект – это повышение производительности, как будто Вы увеличили объем оперативной памяти. Но не стоит ожидать многократного прироста.
Как только вы вставляете накопитель в разъем системного блока или ноутбука, операционная система начинает анализировать показатели быстродействия внешнего модуля. Если он подходит по всем параметрам, то следующая инструкция Вам пригодится.
Например, у меня есть три flesh-ки, и только одна из них прошла тест на пригодность!
ReadyBoost как включить на флешке?
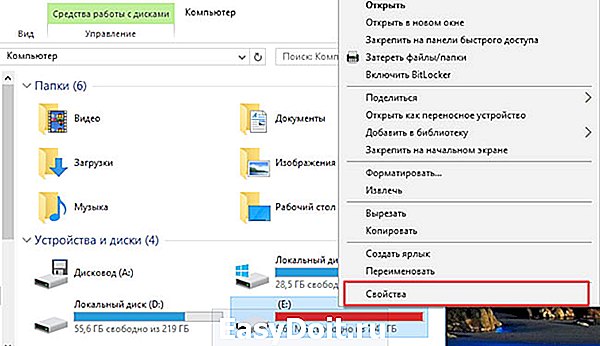
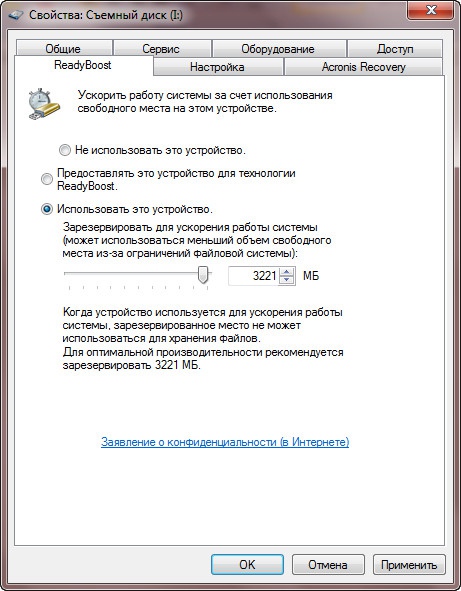
Заходим в папку «Компьютер» и открываем свойства флешки через контекстное меню:
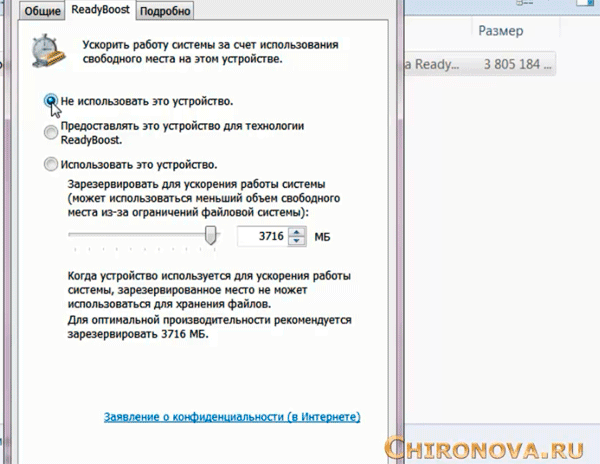
В новом окне переходим на вкладку «ReadyBoost» и видим следующую картину:
По умолчанию отметка стоит на пункте «Не использовать…», но вы можете выбрать один из двух вариантов: «Предоставлять…» (при этом резервируется всё доступное пространство на диске) или «Использовать…». В этом случае можно с помощью регулятора указать количество памяти для оптимизации.
Увы, если это не сработало, то накопитель не подходит. И никакие сторонние приложения, которые можно найти в поисковых системах по запросу «скачать ReadyBoost», не помогут. А вот вирусов нахвататься можете!
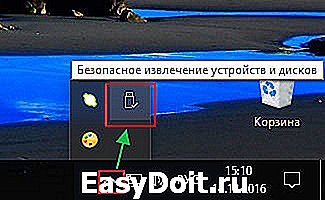
Также, рекомендую по окончанию использования не просто выдёргивать носитель из USB порта, а делать следующим образом:
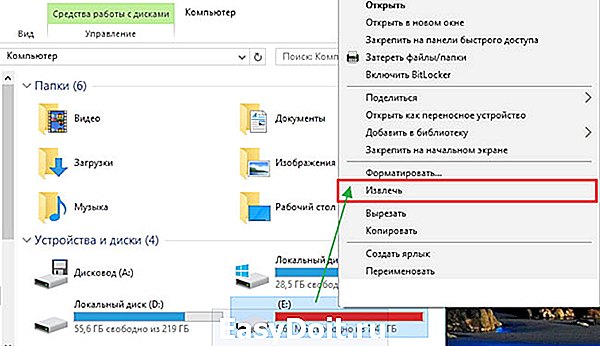
- Зайти в папку «Компьютер», где указаны все диски.
- Кликнуть правой кнопкой на внешнем накопителе и выбрать пункт «Извлечь»:
Другой способ: в области уведомлений находим значок с изображением флешки и кликаем по нему:
it-tehnik.ru
Как включить ReadyBoost
По умолчанию эта технология уже активирована и не нужно совершать лишних действий для ее активации. Лучше всего, чтобы в системе был включен автозапуск при подключении всех съемных накопителей. Чтобы узнать текущий статут функции вставьте в USB-разъем флешку. Если никакого окна не появится, то значит нужно включить автозапуск следующим образом:
Этих действий хватит в большинстве случаев, а более детальные сценарии будут рассмотрены ниже по тексту.
Windows XP
Пробовать как включить ReadyBoost можно только на Windows Vista и более поздних версиях, — технология дебютировала на этой ОС. Если учесть, что Windows XP выпустили в 2001 году, то практически нет смысла в ее использовании, она морально устарела.
Windows 7 и 8
Включать ReadyBoost Windows 7 и 8 по умолчанию стоит так же, как и в Vista, — выбором соответствующей опции в окне автозапуска носителя
Важное усовершенствование начиная с седьмой версии Виндовс: можно подключать не один (как в Vista), а до восьми накопителей одновременно
Windows 10
Активируется все так же, как и других ОС, но интересно, что ReadyBoost Windows 10 имеет следующие особенности касательно накопителя: