
Installing Ubuntu 24.04 on VirtualBox
Download Ubuntu 24.04 ISO
Navigate to Ubuntu CD/DVD images page and grab a daily build release version ISO file for your specific system arch.
We are using the amd version in this guide.
You can choose to download a minimal installation ISO file;
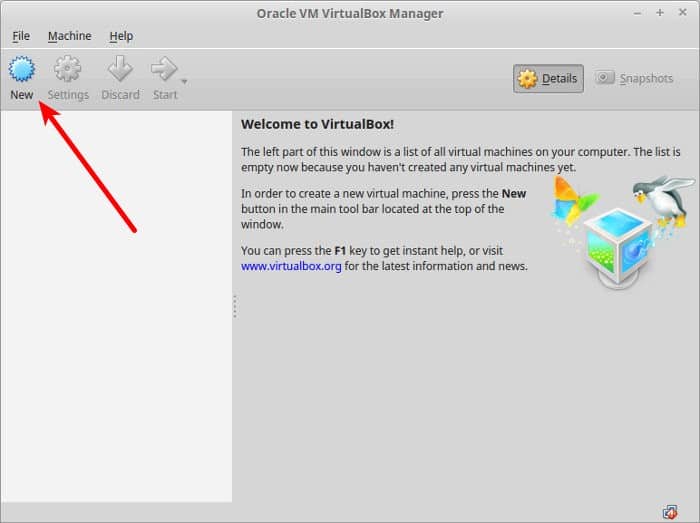
Create New Virtual Machine
Next, launch VirtualBox manager and create a new Virtual Machine with your preferred settings such as networking, disk size, system resources etc.
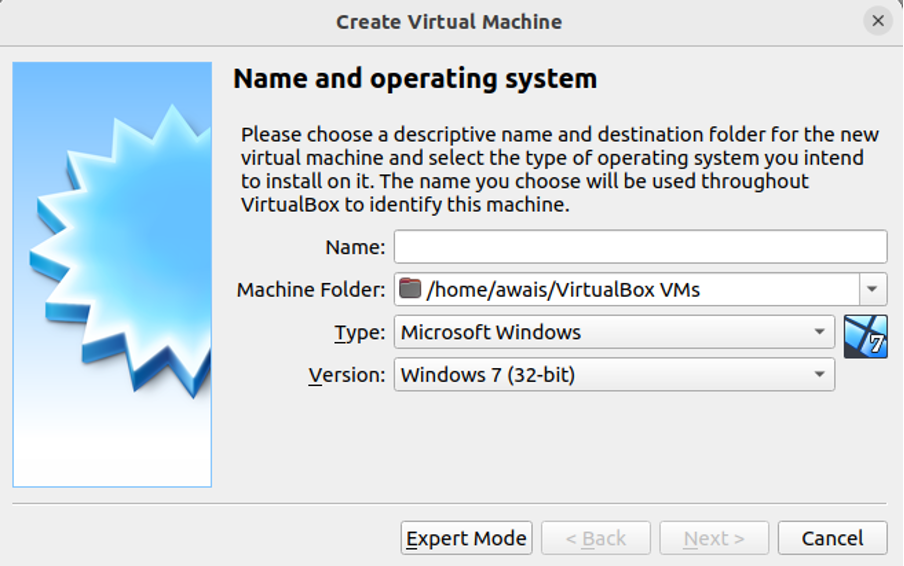
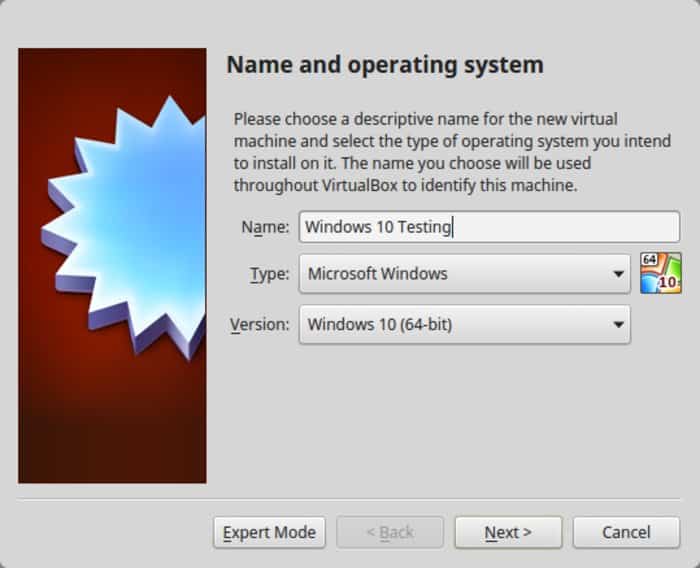
Name and Operating System of the VM
To begin with;
- define the name of the virtual machine and the Operating system.
- set the installation folder
- Select the ISO image that will be used to install your Ubuntu 24.04 vm on VirtualBox.
Note that we will be using VirtualBox 7, which supports unattended guest VM installation. Unfortunately, Ubuntu 24.04 desktop doesn’t support unattended installation as of this writing. So let’s skip unattended guest installation.
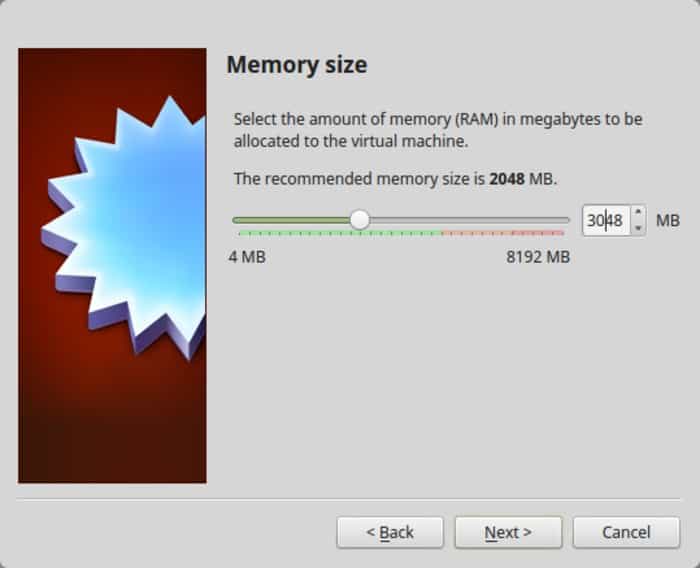
Next, assign the VM required RAM and vCPUs.
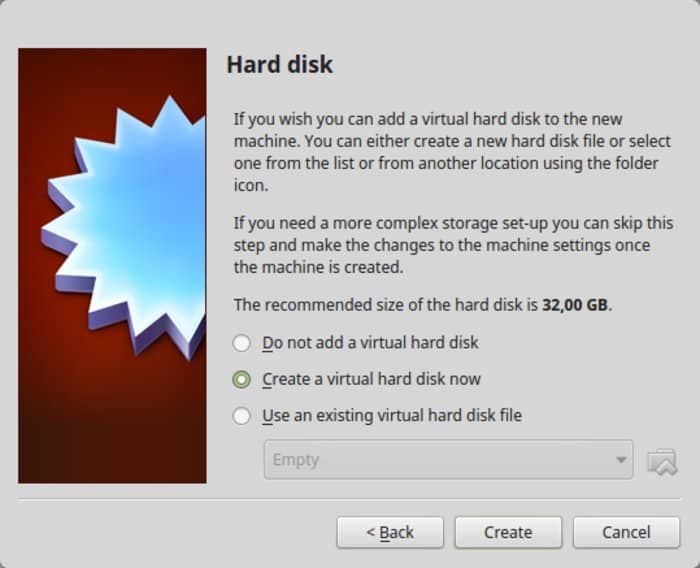
Create a Virtual hard disk for your Ubuntu 24.04 vm. Choose the disk size of your preference.
Virtual Machine Setup Summary
Go through the virtual machine setup summary and when you are happy with the configuration press Finish to create the virtual machine. Alternatively you can go back and modify the configuration.
Attach Network Interfaces to Ubuntu 24.04 VM
Open the virtual machines settings and navigate to the Network settings.
By default, first interface attached is NAT. This is required to give the VM Internet access.
Next, attach a host-only interface to allow you access the vm from the host!
You can create the networks from Network manager.
Install Ubuntu on VirtualBox
Click Ok after attaching network interfaces.
You can do more pre-install configs if you want! Otherwise, click Start to start the installation of Ubuntu 24.04 desktop on VirtualBox.
- When the VM starts, select Try or Install Ubuntu from the grub menu!
- Choose you installation language
- Choose, Install Ubuntu otherwise, if you want to boot live without actiually writing changes to disk, just select Try Ubuntu.
- Choose your keyboard layout
- Connect to a network to help install extra packages required as well determine your timezone (we use wired connection here)
- Application and Updates: Choose default installation with essential packages and utilities.
- Type of installation: We will use LVM hence, let’s choose Erase disk and install Ubuntu and choose LVM (no disk encryption here for now, if you like, proceed!)
- Ready to Install: Confirm that you want to write changes to the disk and install Ubuntu on VirtualBox.
- Select your Timezone
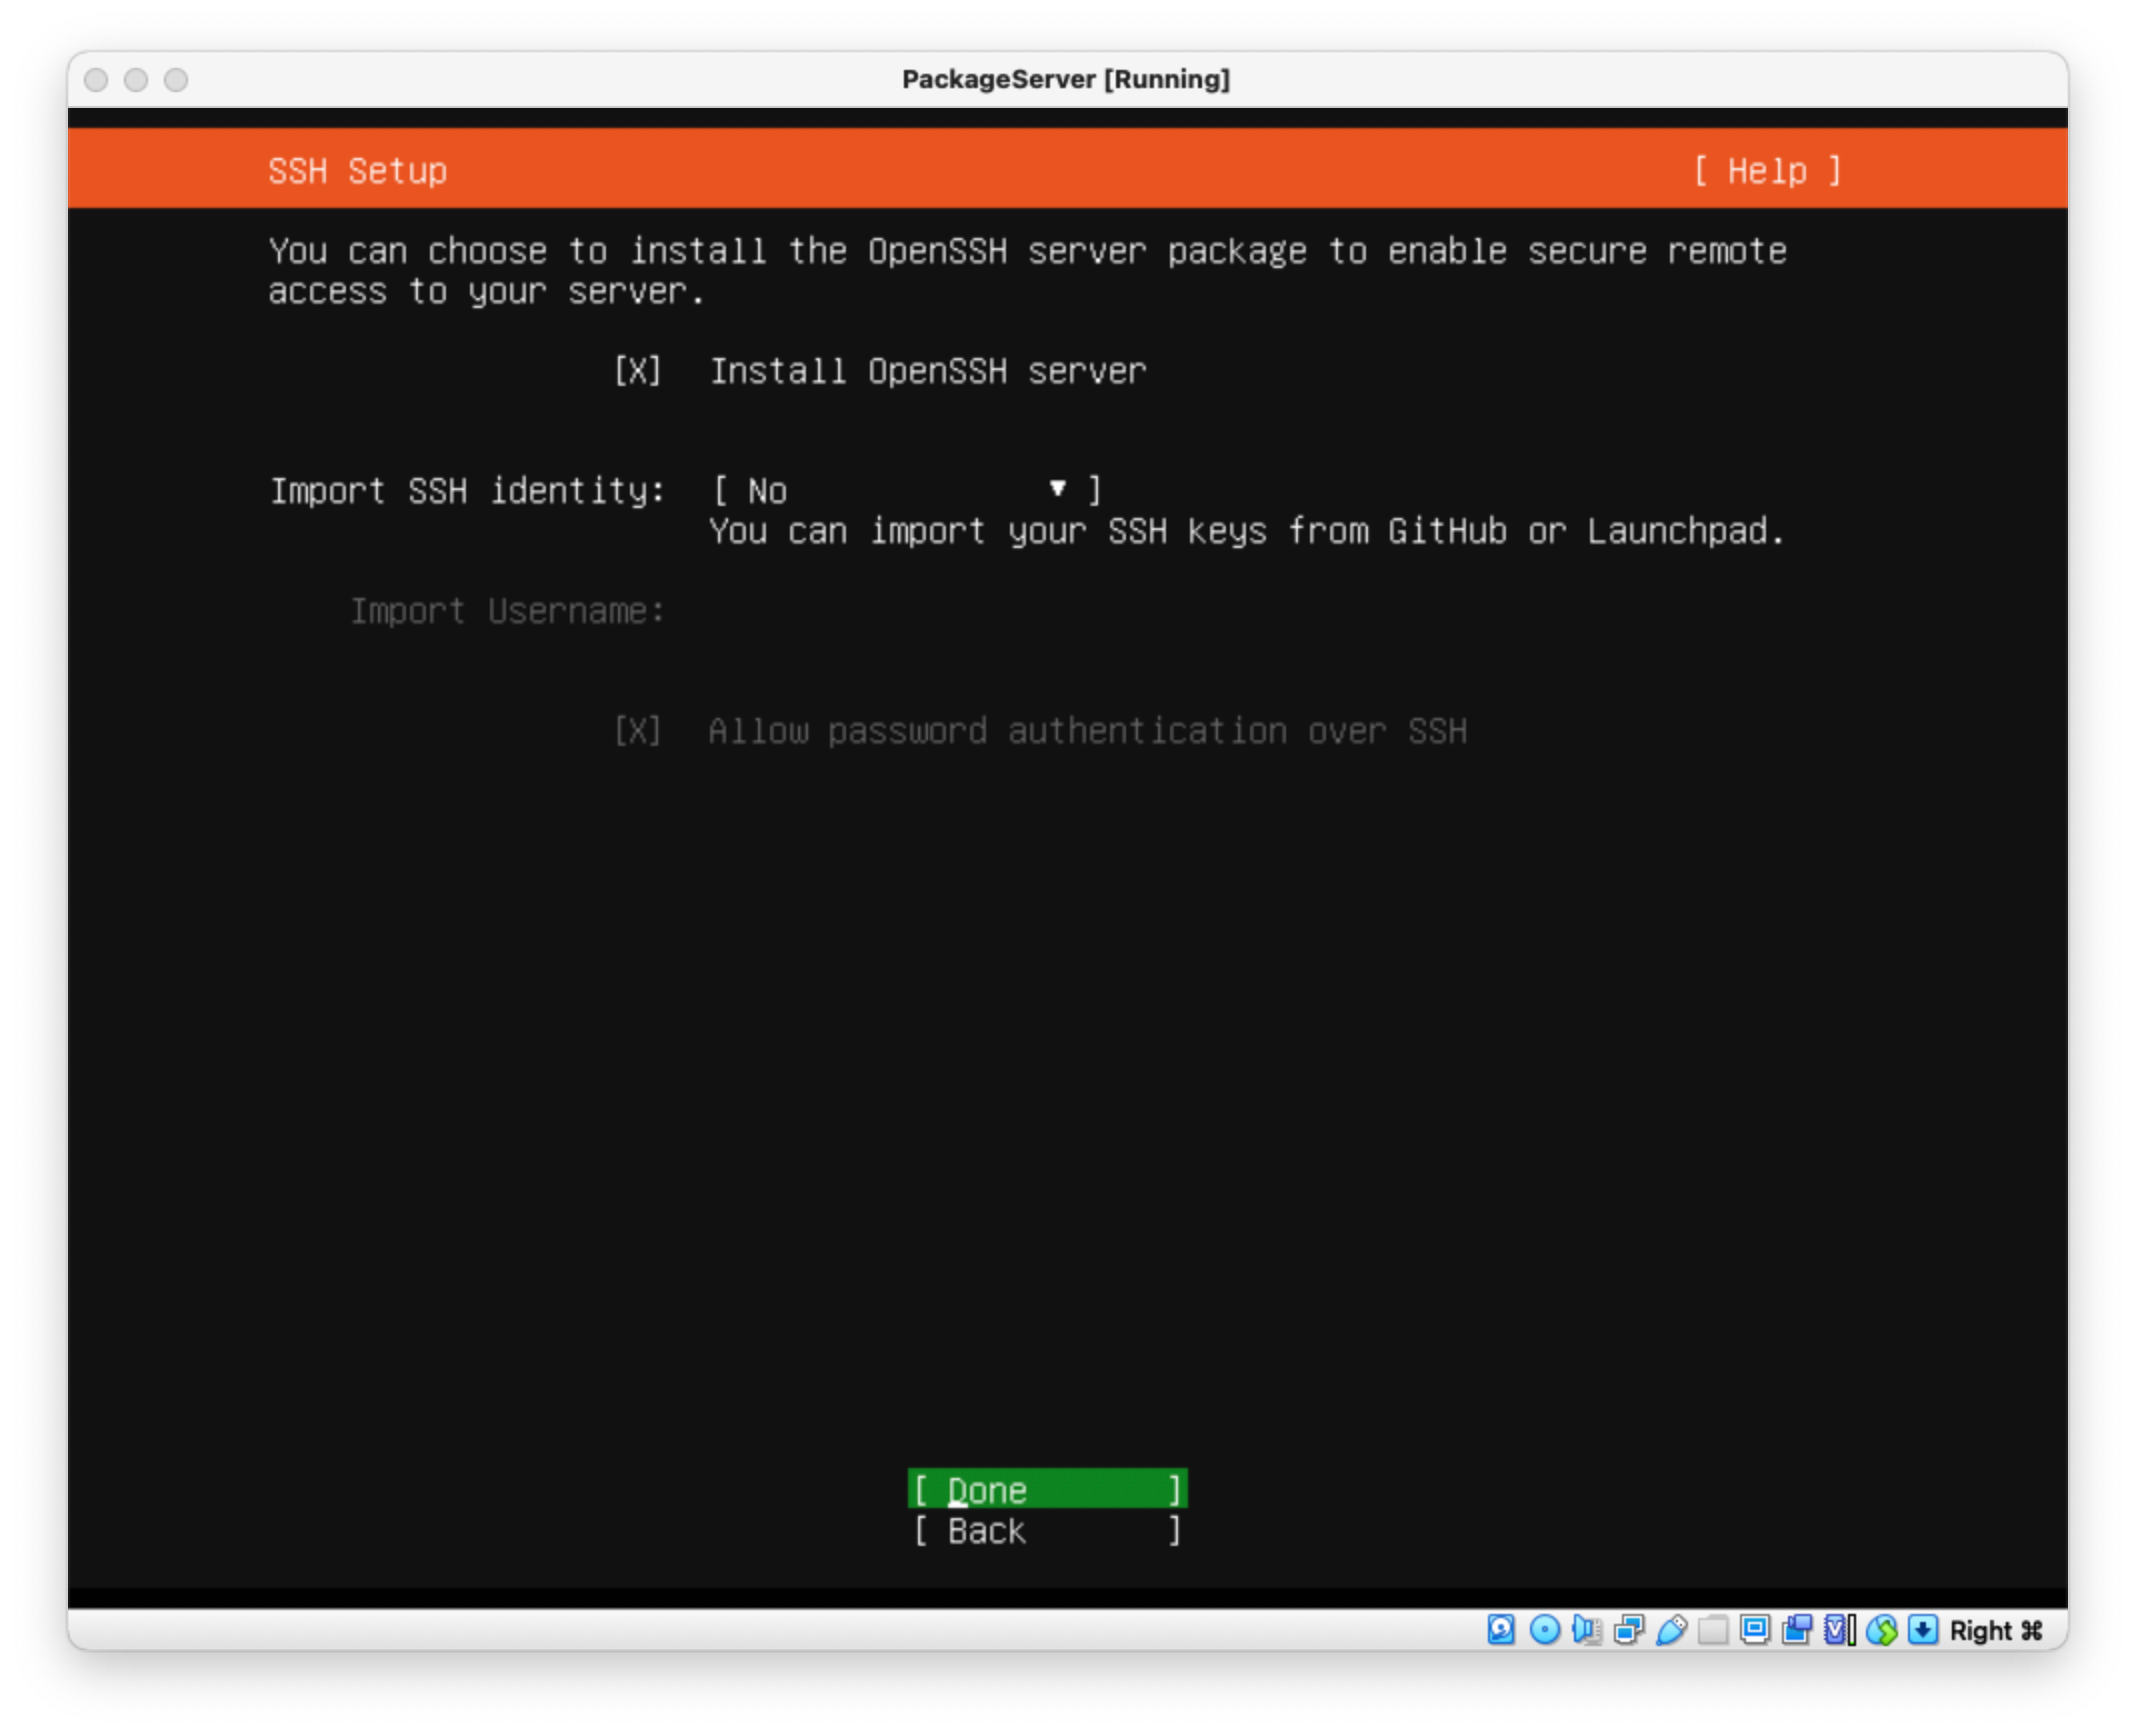
- Setup your account on Ubuntu 24.04 VM:
- Your Name
- Computer’s name
- Your username
- Password
- Choose whether or not to disable need for password during login!
- If you want, you can integrate with AD for authentication and authorization.
- Choose your Theme
- Install Ubuntu on VirtualBox
When installation is complete, restart the VM;
Press Enter to remove installation media when prompted.
Booting into Ubuntu 24.04 on VirtualBox
Once your VM reboots, login using the account details created.
Login interface
Go through initial setup and start using Ubuntu 24.04 on VirtualBox.
And that is it!
Your Ubuntu 24.04 is now installed on VirtualBox and ready for your use!
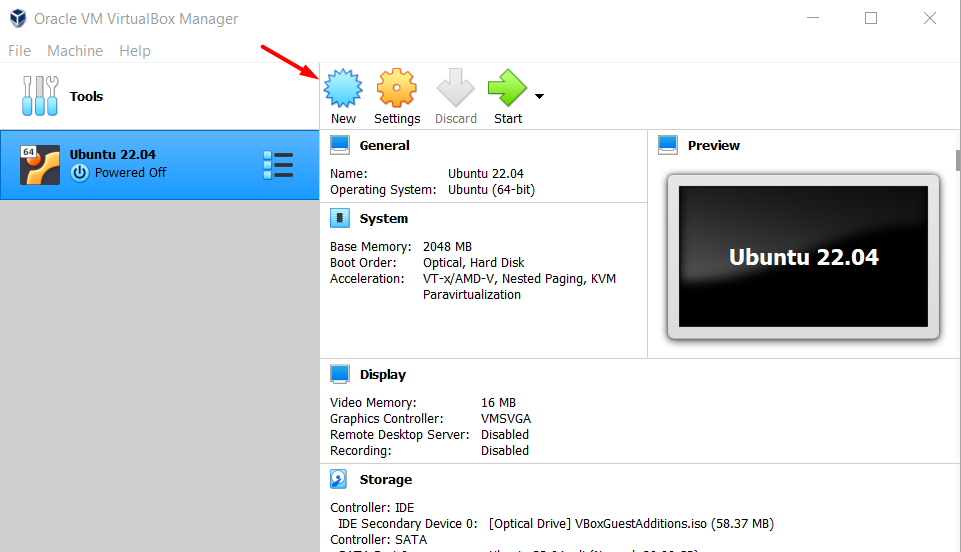
Fine-tune the virtual machine settings
We now created the framework for the virtual machine, in which we can momentarily install Ubuntu. Before starting the actual Ubuntu installation, I recommend fine-tuning a few more virtual machine settings. With the newly created Ubuntu virtual machine selected on the VirtualBox user interface, click the Settings button on the toolbar. Alternatively, you can select Machine → Settings… from the program menu.
Increase number of CPUs
On the newly appeared virtual machine Settings dialog, go to the System category and select the Processor tab. By default the virtual machine only makes use of one processor core of your PC’s physical CPU. Nowadays, most PCs offer at least a duo-core CPU. To give the virtual machine a bit more performance, I recommend increasing the CPU number to at least two. I recommend selecting no more than half of your PC’s physical CPU cores. So stay within the recommended green zone:
Improve graphics performance
By far the most limiting feature of a virtual machine is its graphics performance. Unlike the CPU and RAM, it cannot directly access your PC’s graphics card. Instead, your virtual machine runs on top of a software emulated graphics card. Consequently, virtual machines are not capable of running high-end games or doing intensive 3D modeling. Everything else works pretty much okay though.
Because of the graphics performance being a bottleneck, the least we can do is max out the display configuration. Go to the Display category on the Settings dialog. Next, select the maximum possible amount of Video Memory and activate the Enable 3D Acceleration check box:
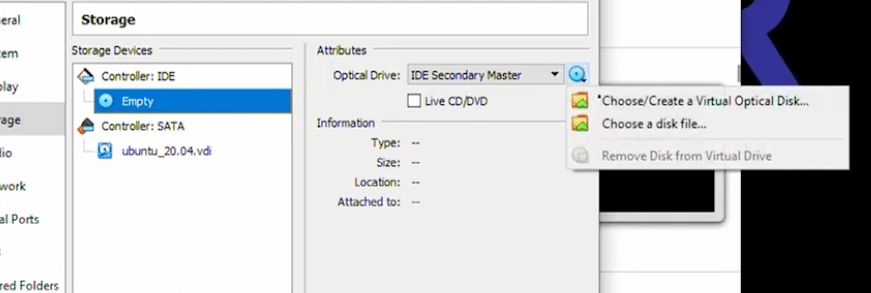
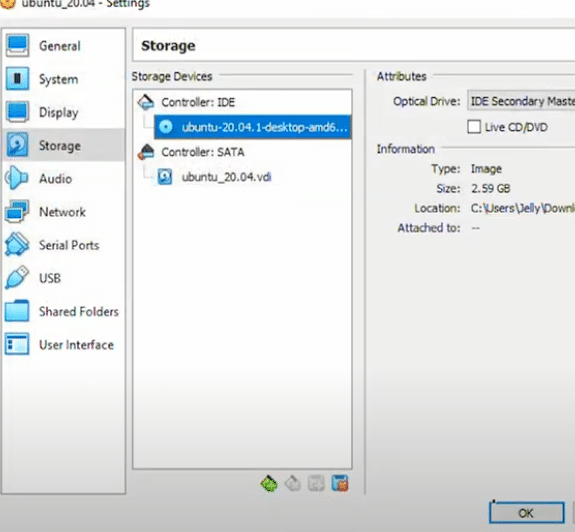
Insert the Ubuntu ISO image into the virtual optical disk drive
From a virtual machine configuration perspective, only one last step remains: We need to virtually insert the previously downloaded Ubuntu ISO image into its optical disk drive. Go to the Storage category on the Settings dialog. Select the Empty storage device to show the optical drive attributes. Click the small blue disk icon. A drop down menu appears. Select Choose a disk file… from this menu:
A file selection dialog shows up. Browse to the download directory of the Ubuntu ISO image and select this file:
This completes the final configuration of the virtual machine itself. Click OK at the bottom of the Settings dialog to save our changes.
Advanced Settings
Now you’ll have the basics configured, but you’ll want to go through some of the advanced options before you begin your installation.
Highlight your virtual machine and click the Settings button.
You don’t need to change anything in the General tab, so select the System tab.
Most of the default options on the Motherboard tab should be fine.
On the Processor tab, if you have a powerful enough processor, I would select 2 cores or more.
On the Acceleration tab, ensure all Hardware Virtualization options are checked.
Next, go to the Display Tab on the side.
You’ll see a Video Memory slider. I selected the largest amount available, which for me was 128MB.
Select the options for Enable 3D Acceleration. You can try selecting Enable 2D Video Acceleration, but on my machine it gave me an Invalid Setting error.
You can go through all of the other tabs, but the default options worked fine for me.
Начиная
В этом руководстве предполагается, что у вас уже установлен VirtualBox. Если нет, у нас есть руководство по как установить VirtualBox на Ubuntu 20.04 Focal Fossa за которым вы можете следить, прежде чем снова встретиться здесь. Пользователи Windows и другие пользователи, не использующие Ubuntu, могут перейти на VirtualBox.org и загрузите последнюю версию VirtualBox для своей системы.
Еще для начала вам понадобится установочный образ Ubuntu 20.04. Он представлен в виде файла ISO. Ознакомьтесь с нашим руководством по загрузка Ubuntu 20.04 ISO-образ Focal Fossa, чтобы получить нужную копию. В нем есть все официальные ссылки для загрузки Ubuntu 20.04 и различных доступных окружений рабочего стола. Если сомневаетесь, просто скачайте ванильную версию «Ubuntu 20.04 LTS Desktop».
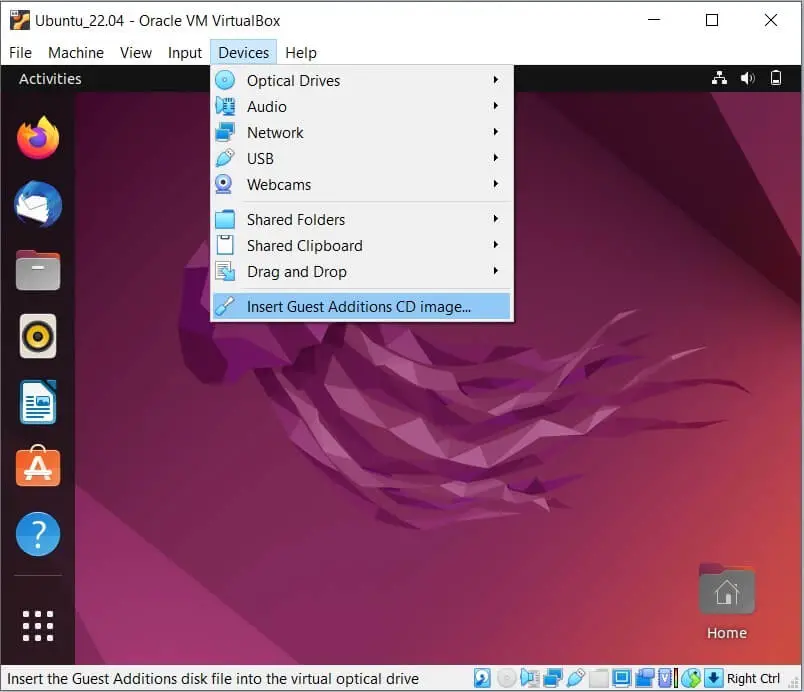
How To Get VirtualBox Guest Additions?
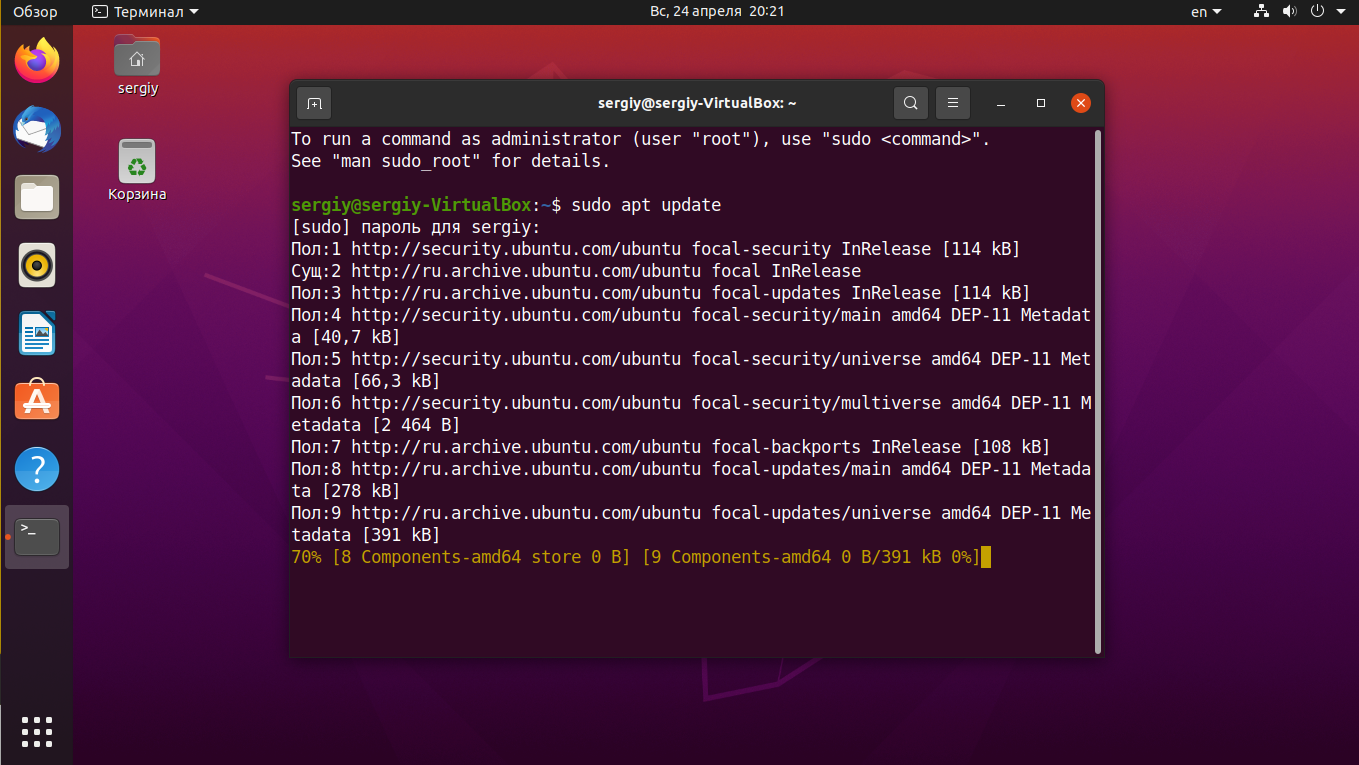
Step 1: Open the terminal window in Ubuntu which you can get from clicking on the nine dots at the bottom.
Step 2: Furthermore, type the command sudo apt install build-essential dkms Linux-headers $(uname -r) and tap enter. This command will install some additional packages before installing VirtualBox guest additions.
Step 3: Type your Ubuntu’s password and press Y. Once again, press enters, and you will see the installation steps are complete within some time.
Step 4: Furthermore, close the terminal and click on Devices. Under devices, choose Insert Guest Additions CD image. A window will appear asking for your permission to run the software. Tap on Run.
Step 5: It will ask you to provide your Ubuntu’s password, which you set before. Type your password to authenticate, and it will start running Guest additions.
Running VirtualBox Guest Additions
Step 6: Moreover, after the process is complete, it will display a message saying press Return to close this window. Don’t worry if you cannot see the return button or key on your keyboard. Click on enter, and it will close the terminal window.
Step 7: Now, you need to restart the Ubuntu operating system. Click on the down arrow from top-right and choose Power off.
Step 8: Another window will open with three options: Cancel, Restart, and Power Off. Tap on Power Off. The Ubuntu operating system will shut down immediately.
Step 9: On your VirtualBox Manager, click on Settings, go to Advanced Settings, and under the General tab, check if the shared clipboard and Drag n’ Drop are set to bi-directional. Then close the window.
Step 10: Furthermore, click on start once again, enter your Ubuntu’s password and click on enter.
Should Read: How to Install Free SSL for Nginx Web Server on Ubuntu 16.04 or Ubuntu 18.04
Как установить Linux на VirtualBox?
Установка Linux на VirtualBox начинается с установки самой виртуальной машины. Существует несколько программ для этой цели, но самой лучшей, считаю я, является VirtualBox.
Если вы используете MAC OS как основную систему, то нет ничего лучше, чем Parallels Desktop for Mac.
Эта программа идеально интегрируется в систему и Linux работает просто великолепно!
Где скачать VirtualBox?
Она бесплатна, имеет русский интерфейс и очень функциональна. Для того чтобы скачать программу VirtualBox, идём на сайт разработчиков (а это фирма Oracle — не шуры-муры) и загружаем нужную нам версию — Скачать VirtualBox. Думаю установка программы не создаст проблем, так как никаких хитростей там нет.


Теперь нам нужен образ Линукс, который мы будем устанавливать в нашу виртуальную машину.
Какой скачать Линукс для виртуальной машины?
Какой Linux выбрать? Это решать вам. Я бы посоветовал установить Linux Mint, так как интерфейс у этой сборки похож на интерфейс Windows. Скачать Linux Mint.
После того как вы установили VirtualBox и скачали линукс в формате .iso, можно приступать к установке его на виртуальную машину. Как установить Linux на VirtualBox? Как всегда, просто! Следите за моими руками, как сказал бы фокусник. Запускаем установленную виртуальную машину:
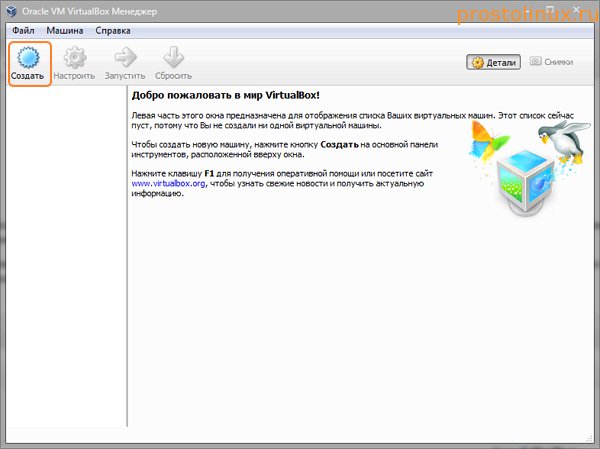
Нажимаем кнопку «Создать» новую виртуальную машину в левом верхнем углу. Далее следуем указаниям мастера настроек
Не буду заострять внимание на всех этапах, многие из них просты, заострю внимание только на самых сложных для новичков
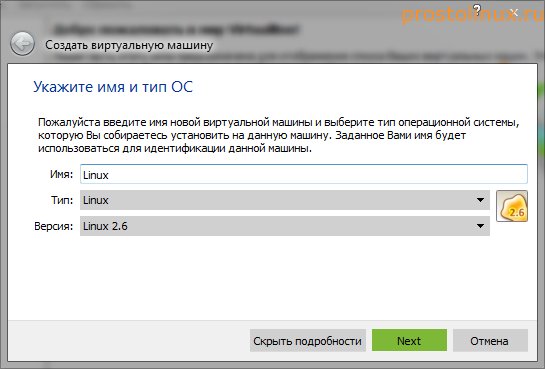
Выбираем название нашей новой виртуальной машины, я назвал просто «Linux» и задаём тип машины — тут тоже просто ставим Linux. Жмём далее.
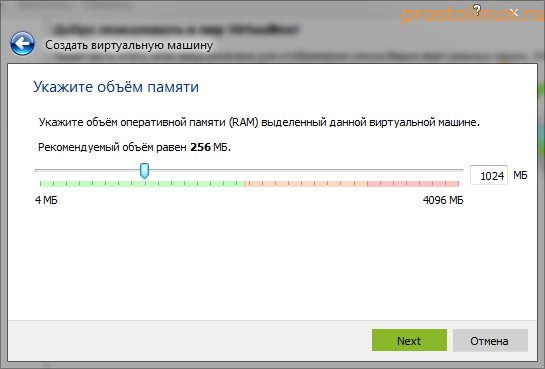
Выбираем размер оперативной памяти, в зависимости от того, сколько у вас стоит на основном компьютере. У меня стоит 4 Гб, поэтому я смело выделил 1 Гб. Идём дальше.
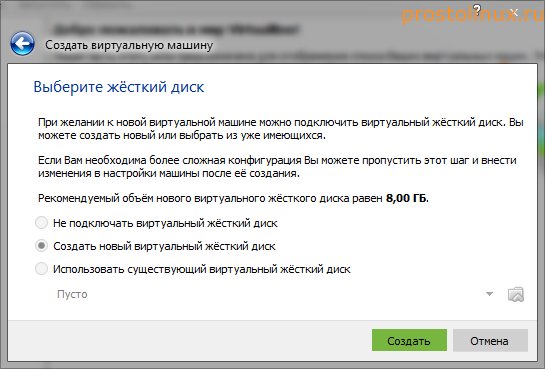
Выбираем пункт «Создать новый виртуальный жёсткий диск» и жмём «Создать».
Выбираем первый пункт, так как это проще всего. У вас создаться файл, который будет имитировать жёсткий диск вашей виртуальной машины. В случае надобности вы сможете перенести его на другой компьютер и там запустить. Жмём далее…
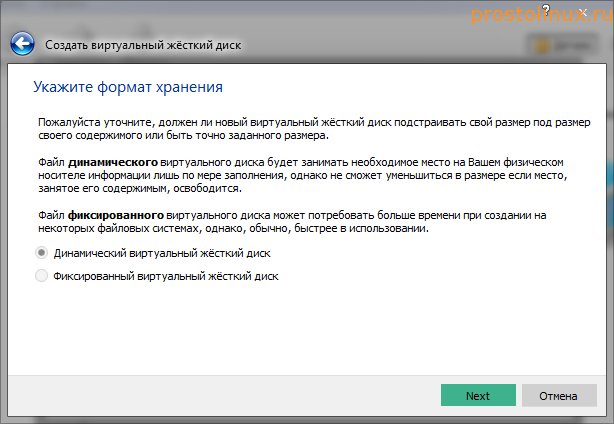
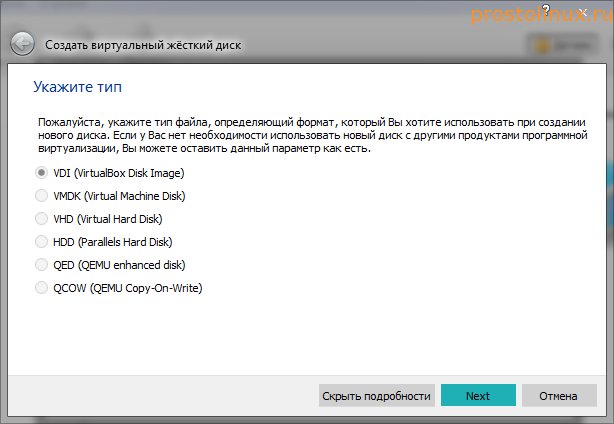
Выбираем пункт «Динамический…» Диск будет увеличиваться по мере заполнения, что очень удобно. Жмём далее…
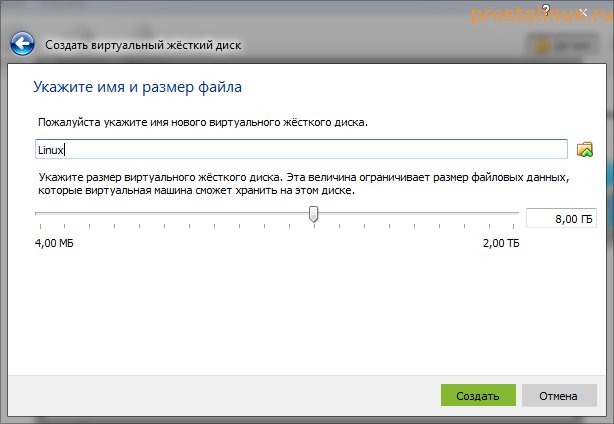
Тут мы выбираем максимальный размер виртуального жёсткого диска, 8-15 гигабайтов будет достаточно. Жмём создать…
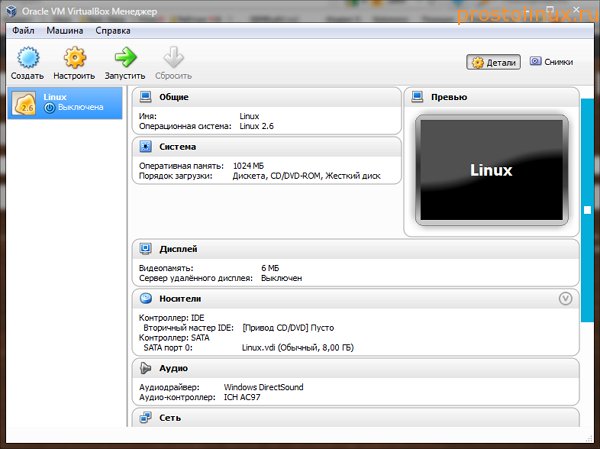
Всё, виртуальная машина готова к принятию на борт новой OS. Нажимаем кнопку «Настройка» вверху и у нас появляется новое небольшое окно.
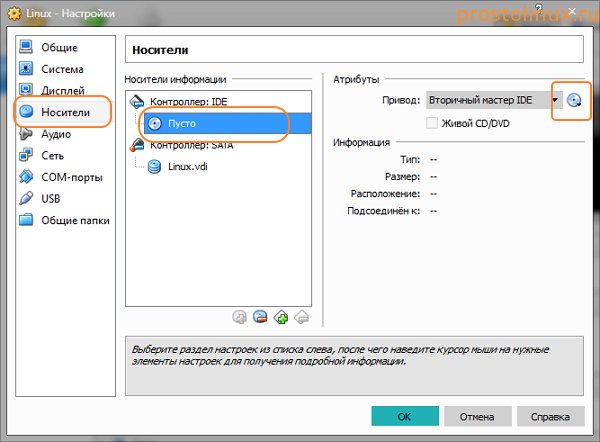
Переходим во вкладку «Носители» (слева), потом щёлкаем по значку CD-DVD и затем нажимаем значок диска (справа) и указываем путь к ISO образу линукс, который вы до этого скачали. После этого нажимаем ОК. Окно пропадёт, а в виртуальной машине появится созданная нами виртуальная машина. Нажимаем кнопку «Запустить» и устанавливаем выбранную вами OS.
Что если виртуальная машина выдала ошибку?
Решается эта проблема легко: нужно просто зайти в настройки виртуальной машины, перейти во вкладку Система — Процессор и поставить галочку в пункте Включить PAE/NX.
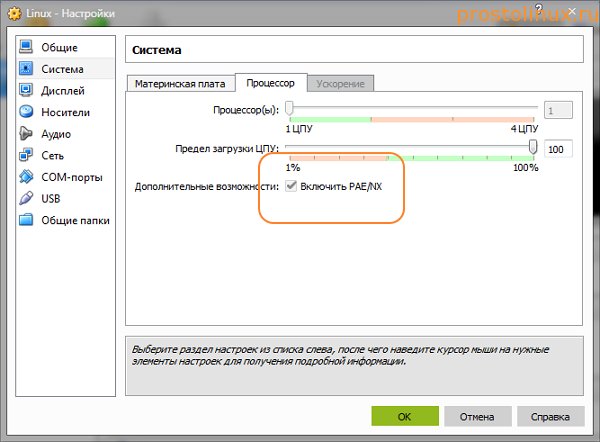
После этого установка системы проходит в штатном режиме и проблем нет.
Как настроить Линукс в виртуальной машине?
Как действовать дальше, читайте в статье «Как установить Linux?», так как принципы установки его на обычный компьютер и виртуальный полностью одинаковый. Тут даже ещё проще, так как можно выбрать автоматическую разметку диска.
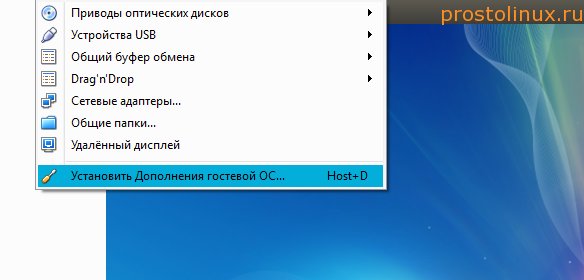
Но вот когда система уже установилась, это ещё не конец. Дело в том, что сам Linux не совсем понимает, где он оказался и у него не хватает нужных драйверов, для полной интеграции с виртуальной машиной. Решается проблема очень легко: нужно просто установить дополнения гостевой OS, которые уже есть в программе. Для этого запускаем нашу виртуальную машину и идём в меню. Там находим пункт Установить дополнения гостевой OS.
Нажимаем и образ диска при монтируется в ваш линукс. Если у вас стоит авто запуск дисков, то скрипт запустится сам и от вас только потребуется ввести пароль. Но этого может и не произойти. Тогда открываем в виртуальной машине CD rom и смотрим путь к диску, нажав Ctrl + L
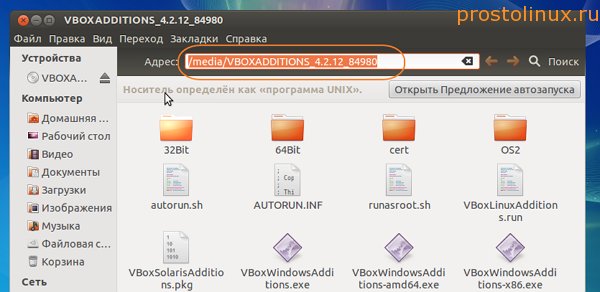
Теперь открываем терминал и выполняем такую команду:
sudo sh /media/VBOXADDONS_4.2/autorun.sh
| 1 | sudo shmediaVBOXADDONS_4.2autorun.sh |
У вас будет свой путь с CD, поэтому не буду писать точный свой путь, просто действуйте по этому принципу. После установки дополнений нужно обязательно перезагрузить виртуальную машину.
Install Ubuntu in the VirtualBox virtual machine
In the previous section we created a new virtual machine and prepared it for installing Ubuntu. In this section, we continue with the actual installation of Ubuntu in the VirtualBox virtual machine.
With our Ubuntu virtual machine selected on the VirtualBox user interface, click the Start button on the toolbar. It’s the one with the green arrow icon. Alternatively, you can select Machine → Start → Normal Start from the program menu. The virtual machine starts, detects our bootable Ubuntu ISO disk in its optical drive and starts booting from it. Upon completion of the boot process, it presents you with the Installer program, running inside a live Ubuntu environment. Start the installation by clicking the Install Ubuntu button:
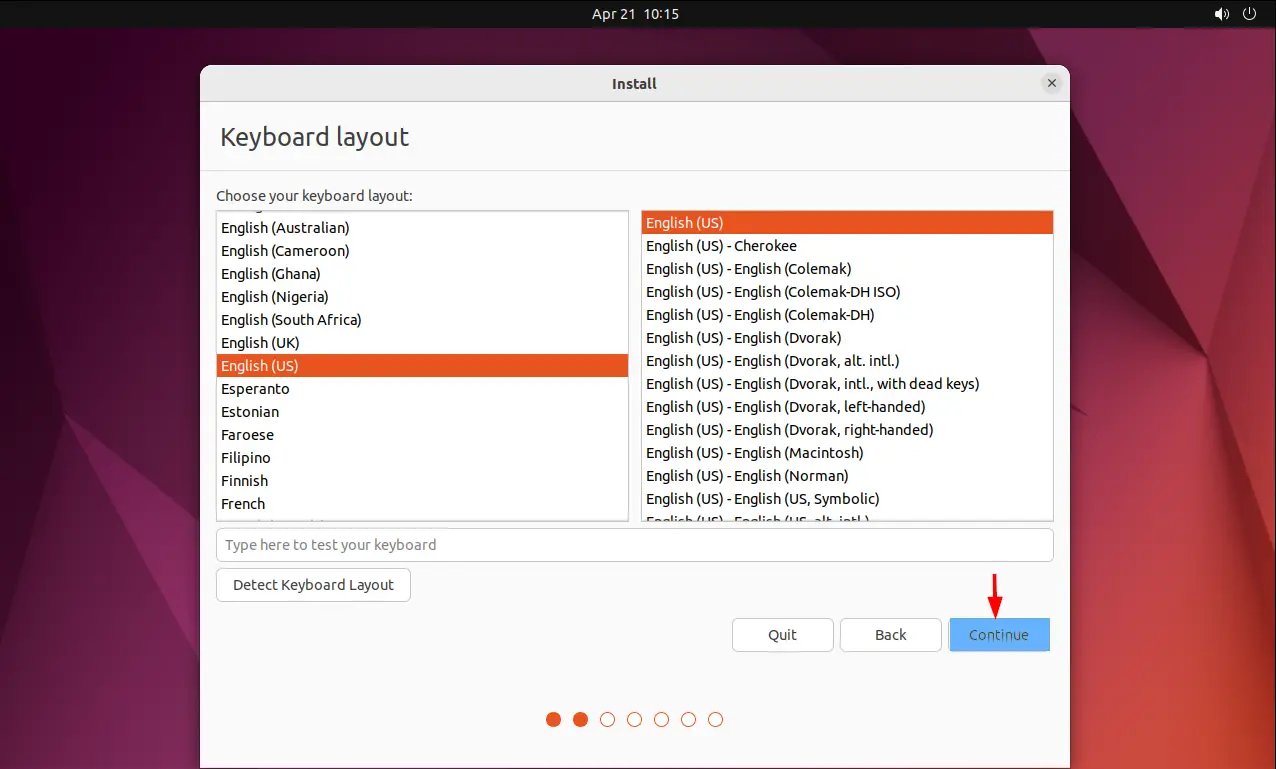
Keyboard layout
The installer first prompts you to select the keyboard layout. If you are not sure, you can click the Detect Keyboard Layout and a wizard with assist you with determining the layout of your keyboard. Once selected, click the Continue button.
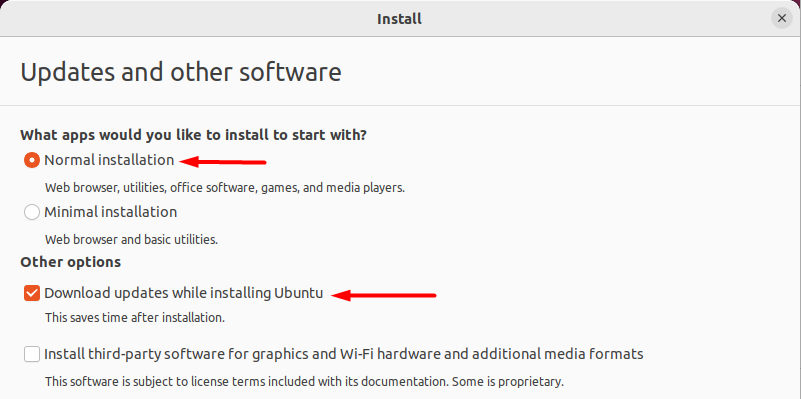
Updates and other software
On the Updates and other software screen you can select what you would like to install on your Ubuntu system. For your first Ubuntu installation inside a VirtualBox virtual machine, you can keep the defaults, so:
- Normal installation
- Download updates while installing Ubuntu
Click the Continue button to proceed.
If in the future you plan on installing Ubuntu on real PC hardware, I recommend selecting the check box for installing third party software. This includes proprietary software drivers that Ubuntu might need to run properly on your PC hardware.
Installation type
Now that we selected what to install, we continue with informing the installer where to install it. The installer automatically detected our hard disk. It’s the newly created VDI file. When installing Ubuntu for the first time, you can simply accept the default here: Erase disk and install Ubuntu. Under the hood this creates a Linux root () EXT4 partition, where it will install all the files. If you are coming from Windows, think of it as your drive.
In the future you might want to experiment with a different partition layout. For example, placing the home () directory on a separate EXT4 partition. In this case you would click the Advanced features and change the partitioning layout.
Kick off the actual installation process, by clicking the Install Now button.
A dialog appears asking you to confirm the changes to the hard disk. It does this because all current contents will be erased. There is nothing to worry about for us here, because the VDI hard disk is completely empty at this point. Simply click Continue and the installer will partition the hard disk and start copying the files of the Ubuntu operating system to it.
Where are you?
While the installer already copies the Ubuntu operating system in the background, it asks you for a few more things. Your present location for example. Since the virtual machine shares the Internet connection of your host operating system, the installer probably already detected your location. If incorrect, click on the world map to select the physical location of your PC. The Ubuntu installer uses this information to properly configure the timezone. Once done, click the Continue button.
Who are you?
The final pieces of information the Ubuntu installer requires, configures your user account and the hostname of your virtual machine. Feel free to adjust this to your personal preferences:
Click the Continue button to move on. The installer presents you with a slide show together with information about the installation progress.
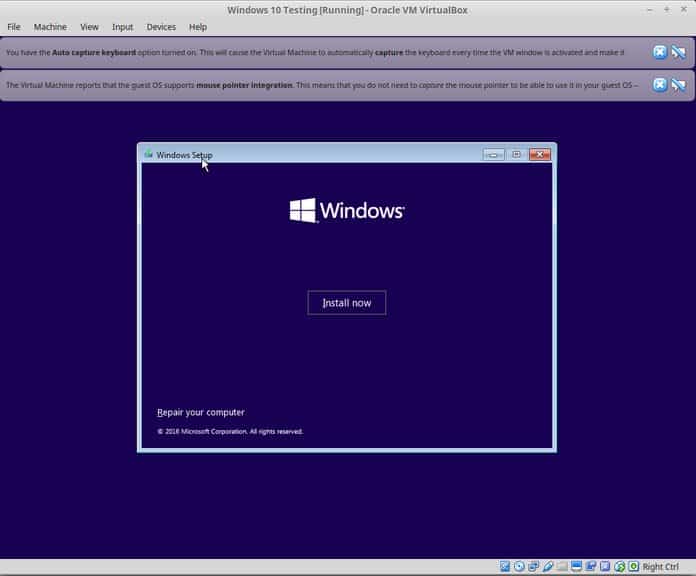
Шаг 3. Установка Windows 10 в VirtualBox
Сейчас мы расскажем вам наглядно, как пользоваться VirtualBox на Ubuntu или Linux Mint. Должен сказать, то, что установка Windows 10 в VirtualBox очень быстрая. Конечно все зависит от производительности вашего устройства, но если оно современное, то, это займет несколько минут. Давайте разберем все более подробно.
Запустите VirtualBox. Вы должны увидеть экран, подобный приведенному ниже. Нажмите на кнопку «Далее»:
Назовите VM все, что стоит запомнить. Также выберите операционную систему и версию, в этом случае для Windows 10 и 64 бит для меня.
Выберите размер ОЗУ. Рекомендуемый размер оперативной памяти для 64-битной Windows 10 составляет 2 ГБ, а для 32-битной Windows 10 — 1 ГБ. Но я предлагаю немного больше установить значение, чем нужно для более плавного опыта.
Следующее это размер места для виртуальной машины. Если вы хотите хорошей производительности то не скупитесь в пространстве, выберите рекомендуемый размер или больше, стандартное значение у вас будет немного больше рекомендуемого размера.
Для формата используйте формат VDI.
Смутно понимаете главную разницу в динамическом или фиксированном размере? Если вы выберете динамический, установленная VM позже вырастет из выделенного размера. Если вы не собираетесь широко использовать Windows, я предлагаю пойти с фиксированным размером.
Завершите работу вокруг установки. Вы можете выбрать, где создать виртуальный диск. Место по умолчанию (домашний каталог) также будет работать.


Вы должны вернуться к началу экрана. Но подождите, мы еще не использовали нашу Windows 10 ISO, не так ли? Сейчас настало время использовать ISO. Нажмите «Настройки».
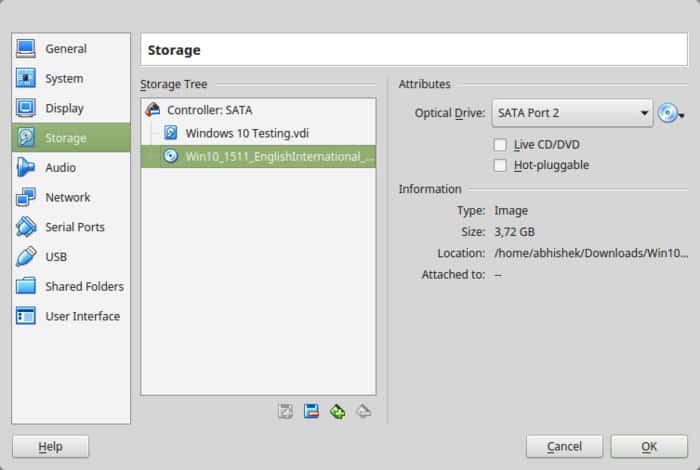
Здесь перейдите в Storage и добавьте новый оптический дисковод. Я добавил этот снимок экрана позже, потому что у нескольких читателей были трудности с его поиском.
Выберите «Диск» и укажите «Windows 10 ISO».
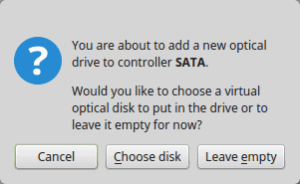
Теперь вы должны увидеть Windows 10 ISO, перечисленные в разделе «Хранение». Нажмите OK.
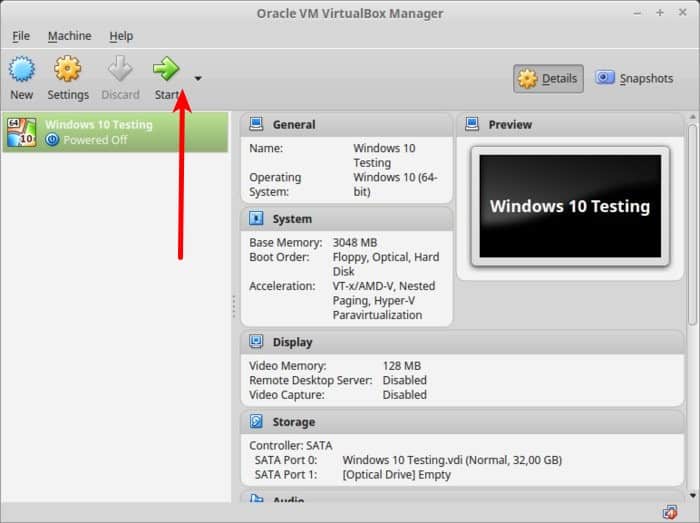
Вы должны вернуться к главному экрану Oracle VirtualBox. Теперь у вас все готово. Следующим шагом будет установка Windows 10. Нажмите «Пуск» на главном экране:
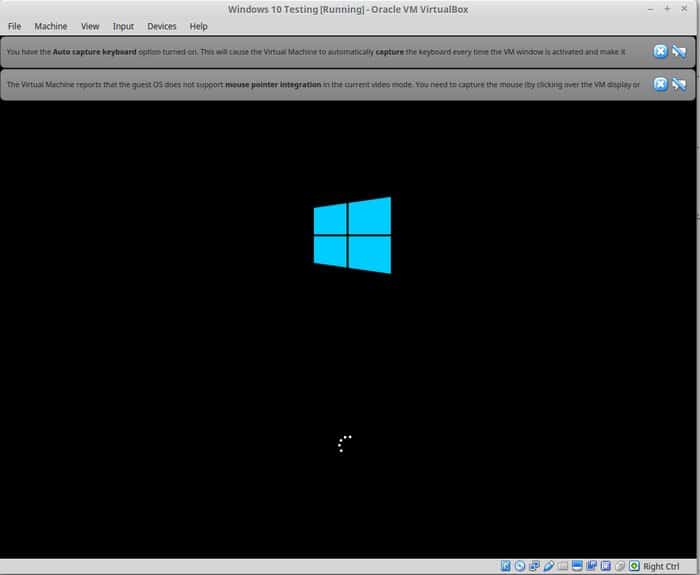
Вуаля !! Вы должны увидеть знакомый экран загрузки Windows:
Через пару секунд вы увидите возможность установки Windows:
Примечание. В это время, если вы видите логотип Windows с черным фоном и он не запускается, вам, возможно, придется немного подкорректировать настройки.
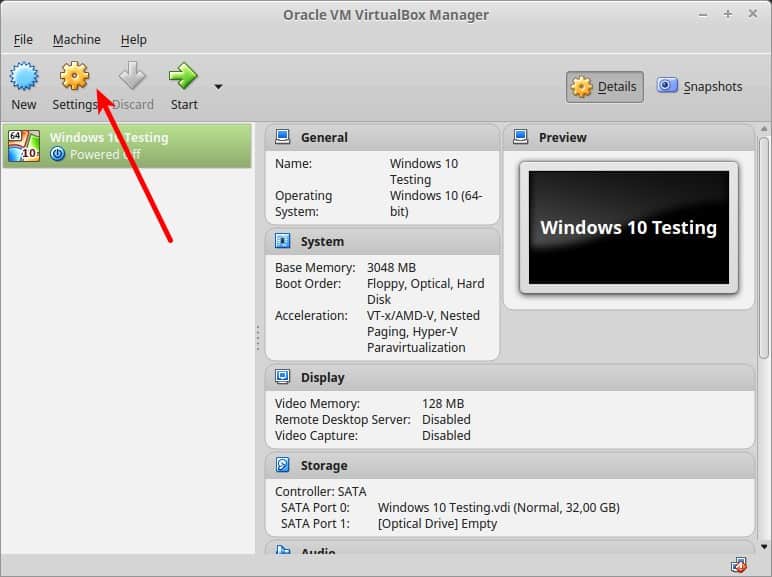
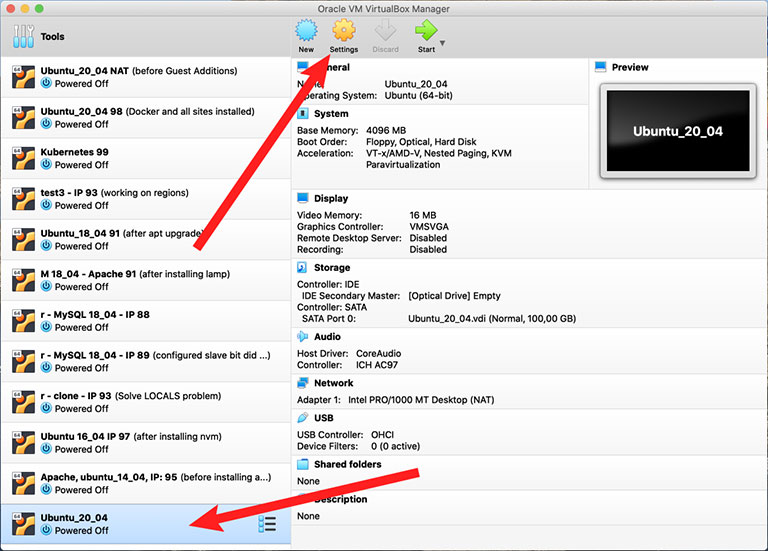
Create a new virtual machine
I created a new virtual machine, with the following details:
On the next screen, I selected the amount of RAM from my Windows laptop that the virtual machine will access, taking into account the recommended system requirements for Ubuntu Desktop.
After that, you can select how much of your hard disk your VM will use.
The type of hard disk depends on whether you use VirtualBox with other VM software. I kept this as a VDI.
Then you can choose whether the hard disk is dynamically allocated (up to the limit we will set on the next screen), filling up as the VM requires it. Otherwise, we can tell it to allocate the full amount of memory right from the start. This will improve performance but may take up unnecessary space. I kept it as dynamically allocated.
Finally, you can set the maximum amount of memory your VM can access.
I selected 25 GB, taking into account the recommended system requirements for Ubuntu Desktop.
After this I clicked the ‘Create’ button to initialize the machine.
Before starting the appliance, via Settings | System | Processor, I changed the number of CPUs to 2.
Configure a VirtualBox Virtual Machine for Ubuntu#
If you are installing Ubuntu manually, create and configure the Ubuntu virtual machine while downloading the ISO.
The Ubuntu 20.04 installation may fail if you do not properly rewrite the /etc/apt/sources.list file.
In the New VirtualBox window, click the Settings tab.
In the Settings tab, under System, click Memory.
In the Memory window, under Automatically manage paging files, select Enable paging file sharing and then click OK.
VirtualBox will create a new shared paging file in your computer’s memory. ..
Ubuntu 20.04 Virtual Machine
Linux: Ubuntu 14.04 LTS
Version: 14.04
Aim to set VM memory size at around 25 percent of your computer’s physical RAM. This will help improve performance and ensure that your VM remains responsive and responsive when you need it most.
To run a virtual machine, you will need to create a virtual hard drive. This is an area of data stored on a computer’s own storage that can only be accessed through the virtual machine. It can have a strict storage limit or it can grow “dynamically” as it is used. ..
To create a virtual disk, select “Create a virtual disk now.” ..
In the next screen, you will be asked to choose a virtualization technology. You can choose Default VDI, which is the most common virtualization technology. If you choose Default VDI, your computer will start up with Windows 10 and all of your applications will be installed in the same location.
Dynamically Allocated for Virtual Hard Disk Size
To check the default options for VDI storage location and minimum size, open the VMware vSphere Client and navigate to Settings > Storage. On the Storage page, under Location, select a datacenter and under Size, select a size. If you want to change any of these settings, click the Edit button next to them. ..
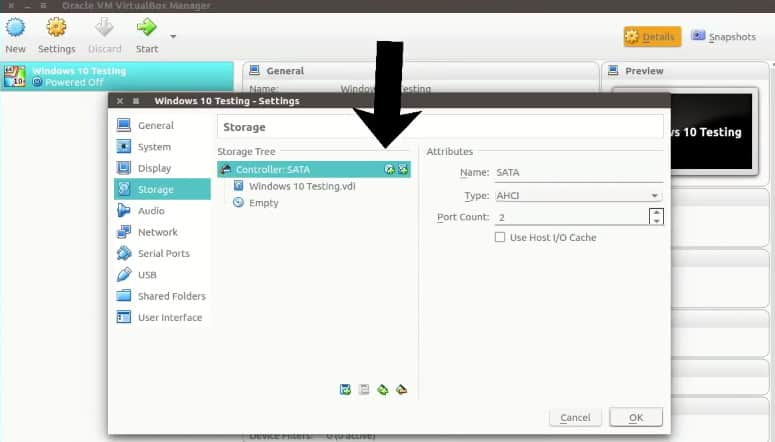
The virtual machine is almost ready to be started. All you need to do is attach the ISO as a virtual disk to the virtual CD/DVD drive. With Ubuntu 20.04 VM selected, click Settings to start it.
In the Attributes panel, click the disk icon next to Secondary IDE Master and select the drive you want to use as your primary IDE drive.
Ubuntu 20.04 ISO can be found on a disk file named Ubuntu 20.04.
The ISO is a standard for encoding information. The OK button completes the process.
The Settings screen is a useful tool for adjusting the settings of a virtual machine. For example, you can change the number of processors, increase RAM, and more. Keep in mind that the configuration of the virtual machine is limited by the physical specification of the host machine – your computer.
Другие статьи по VirtualBox
- Установка VirtualBox
- VirtualBox на Ubuntu Linux 10.04
Поделитесь этим сайтом с друзьями!
Если вам оказалась полезна или просто понравилась эта статья, тогда не стесняйтесь — поддержите материально автора. Это легко сделать закинув денежек на Yoomoney № 410011416229354.
Или на телефон +7(928)274-0281.
Даже небольшая сумма может помочь написанию новых статей ![]()
Или поделитесь ссылкой на эту статью со своими друзьями.
Сопутствующие статьи
|
|
Prerequisite
The basic requirements for following this guide are to have Oracle VirtualBox and Ubuntu 23.04 ISO images.
For any reason, if you do not have both of the following items, it is not an issue because we will show you how to get Oracle VirtualBox and the ISO image of Ubuntu 23.04.
More importantly, you should enable “Virtualization Technology” from the UEFI/BIOS settings to avoid interruptions during installation. If you are not sure about it, then you should check out the below article.
And those who already have VirtualBox, ISO Image, and Virtual Technology enabled in their UEFI/BIOS can directly jump into the .
Downloading the Installation Image
You need to download the Ubuntu distribution for installing Ubuntu on VirtualBox. Go to the official Ubuntu website and download the necessary version of the Ubuntu installer. Let’s download Ubuntu 18.04.2 LTS – this is the latest long term support (LTS) Ubuntu version available at this moment. You can find version numbers that are higher than 18.04.2, but they may not offer long term support yet. Five-year support is provided for Ubuntu LTS distributions (both Ubuntu Desktop and Ubuntu Server). Ubuntu LTS is more widely tested, enterprise-focused and compatible with new hardware.
Click the green Download button and save the ISO file to the custom location. In our case, the file name is ubuntu-18.04.2-desktop-amd64.iso. Ubuntu 18 is provided only as 64-bit editions.

VituralBox Configuration
Once at your desktop, open your web browser and head over to the Ubuntu website and download the current ISO file. Then when the download is complete, we will open up VirtualBox and begin.
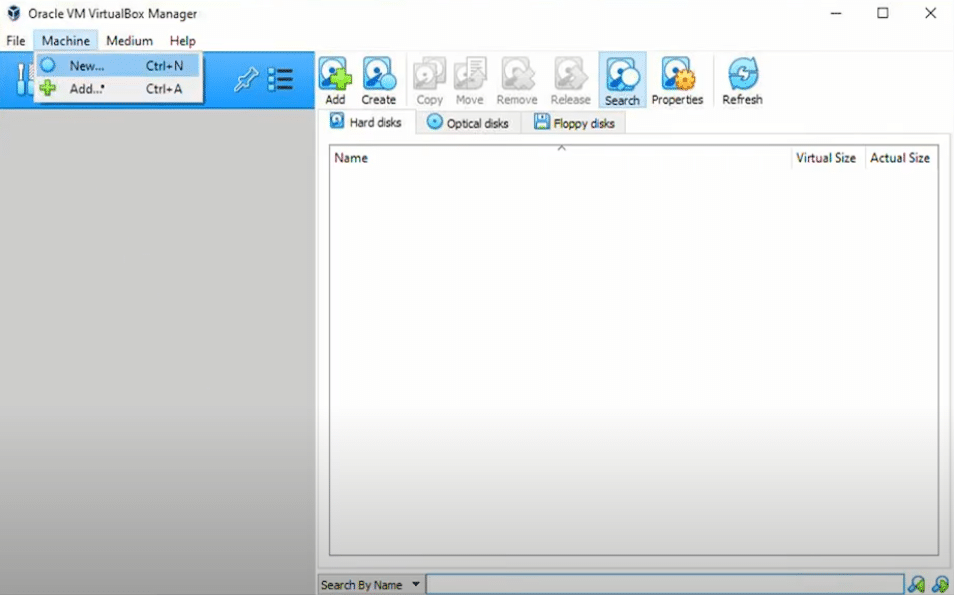
The first step in the VirtualBox Manager is to click on the ‘Machine’ menu and select ‘New.’
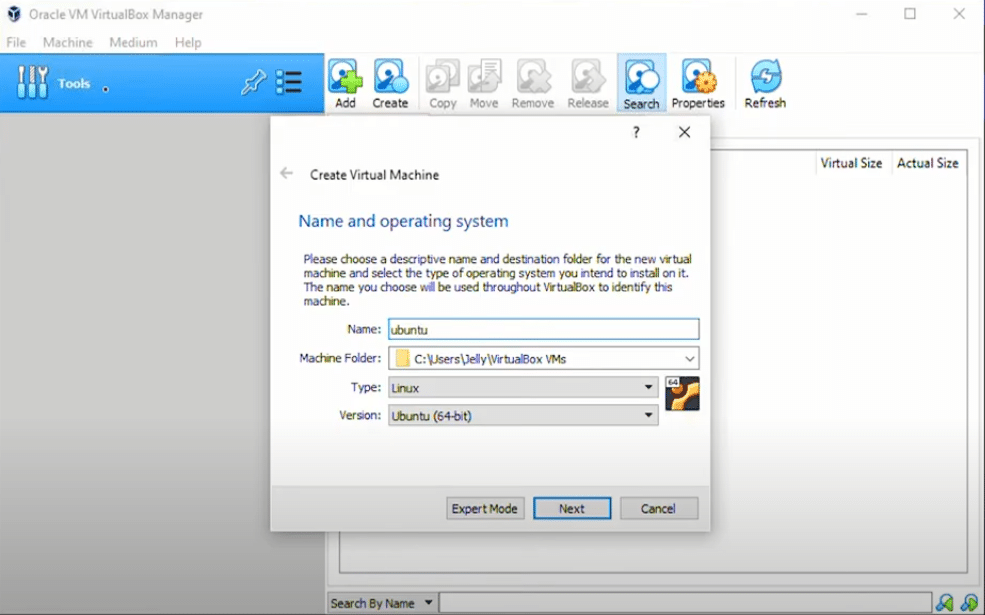
A configuration wizard will start, and you will be prompted to provide a name for this installation. You can give it any relevant name you’d like. The Machine Folder can be left in the default path unless you have a reason to change it. Type should auto fill to Linux and Verison to Ubuntu 64-bit, but you can manually select them in the list if it does not. Click ‘Next’
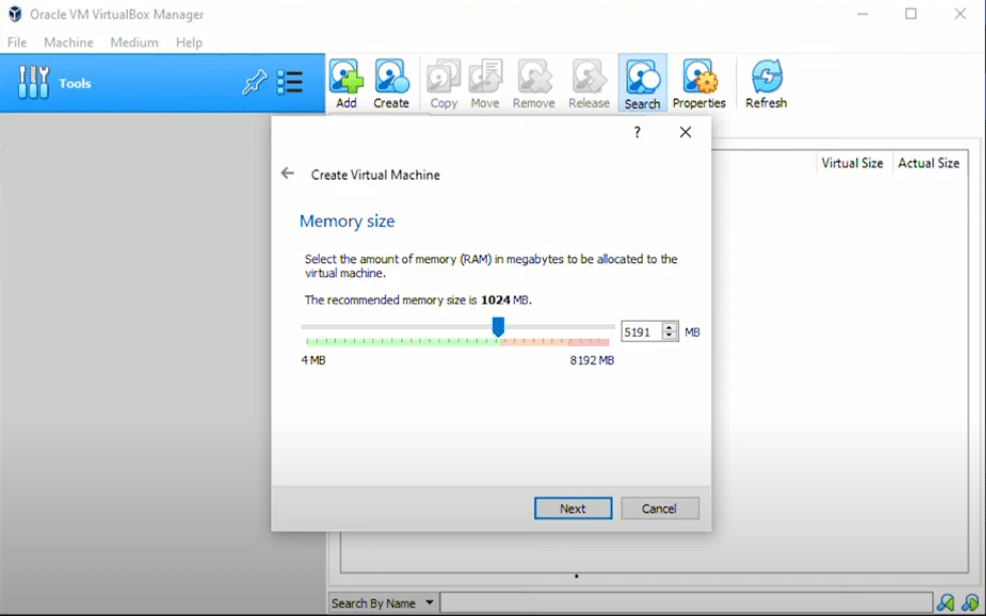
In Memory Size, select the maximum amount to allow in the green zone. We want to ensure that we’re giving as much memory as possible, so the VM runs smoothly. 4GB should be the lowest amount you allocate. Click ‘Next’
Hard Disk can be left at the default setting ‘Create a virtual hard disk now’. Click ‘Create’

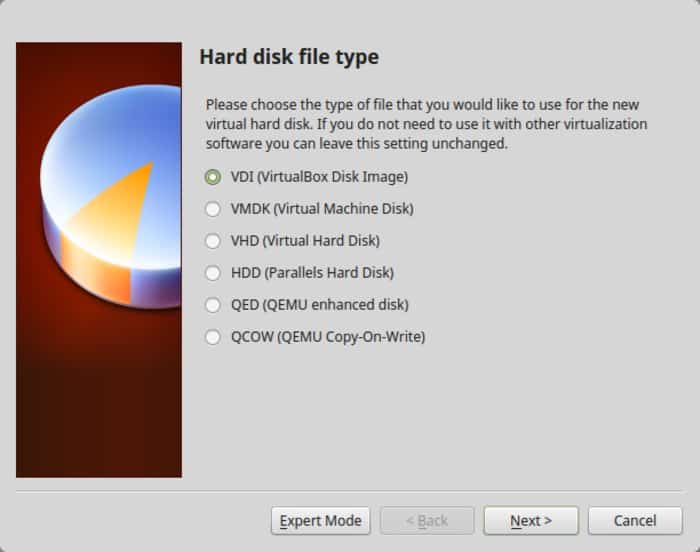
For the Hard disk file type, we are leaving VDI (VirtualBox Disk Image). Click ‘Next’
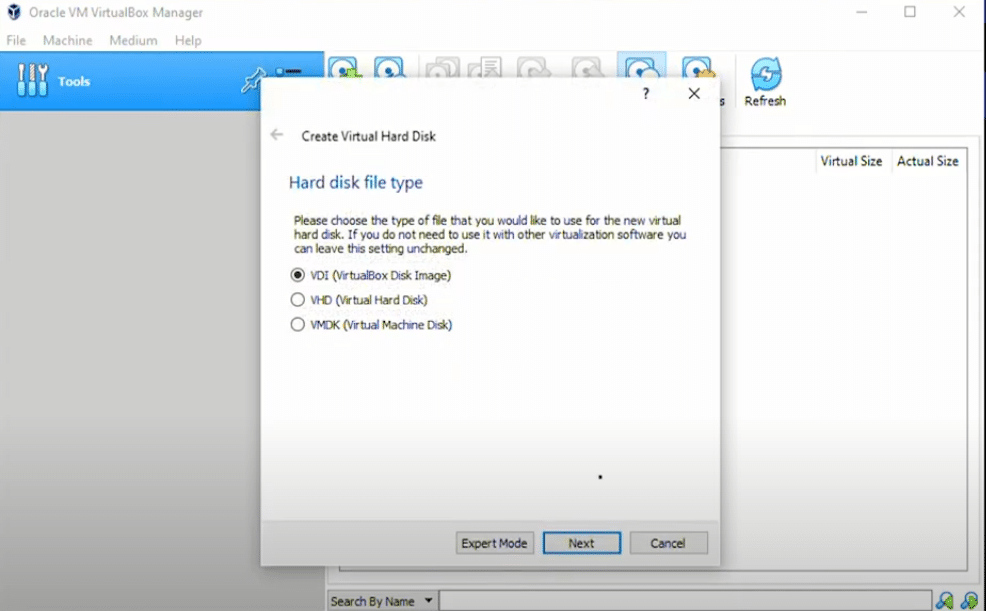
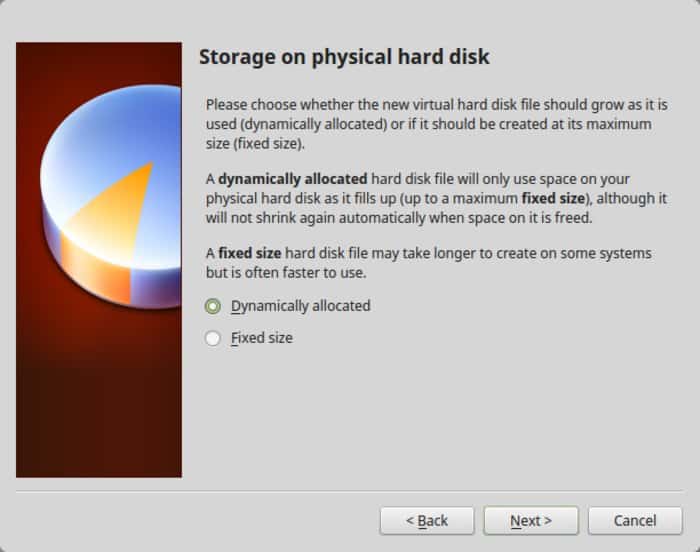
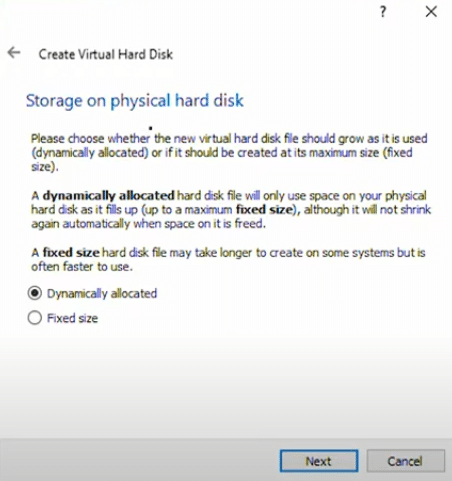
With ‘Storage on physical hard disk,’ we will leave the default selection of ‘Dynamically allocated.’ Using fixed size can run faster, but is a limitation and will lengthen the installation time.


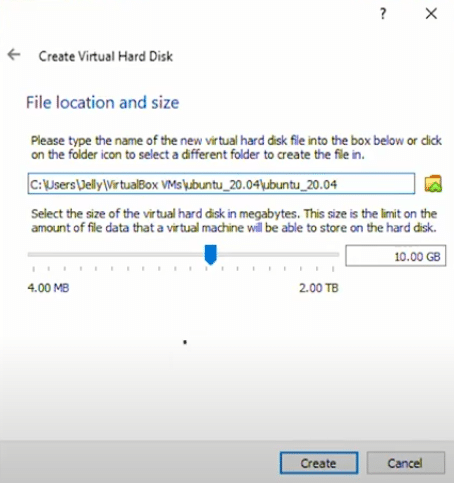
In File location and size, we are going to leave the default path as is. I recommend you do the same unless you have a specific reason to change this. 10GB will automatically be selected, but going with the recommend 25GB or larger will provide sufficient space for applications and tools. Click ‘Create,’ and that will close this configuration wizard.
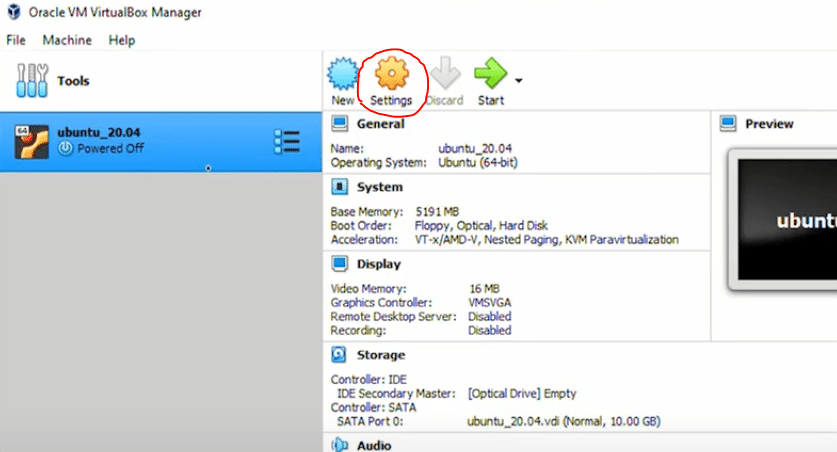
Before we run the virtual machine, we need to make a few more changes to the settings.
In the top middle of your VirtualBox Manager, click one the ‘Settings’ icon.
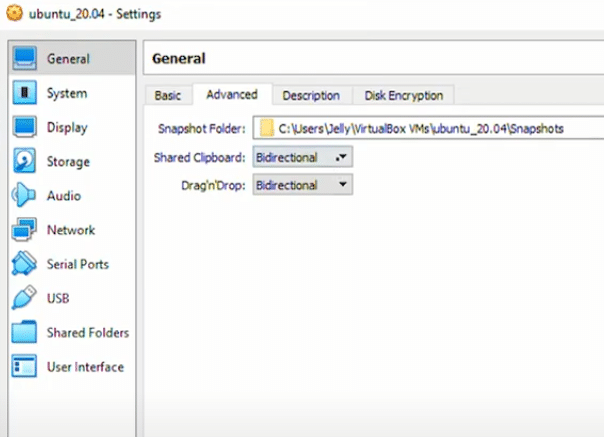
In the ‘Settings‘ window under the ‘General‘ category, select the ‘Advanced‘ tab. Here, we want to ensure that ‘bidirectional’ is selected in the drop-down list for both ‘Shared Clipboard’ and ‘Drag n’ Drop.’
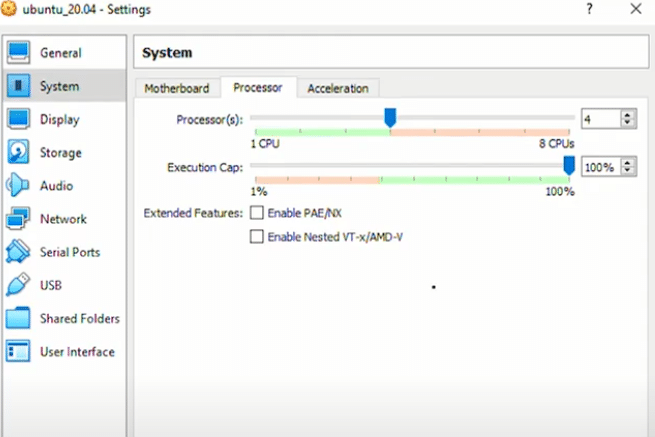
Next, under the ‘System’ category, select the ‘Processor’ tab, and increase the available CPUs to the maximum allowed in the green metered area.
In the ‘Storage’ category, under ‘Storage Devices’, select the ‘Empty’ sub-category under Controller IDE, then on the right-click the CD icon, and select ‘Choose a disk file…’
Here, you want to select the location where you have downloaded the ISO image of Ubuntu. Once you have located the file, you can click on ‘Open.’
The storage window should now show the ISO image loaded under ‘Controller: IDE’
We will then click ‘Ok’ to save our changes.
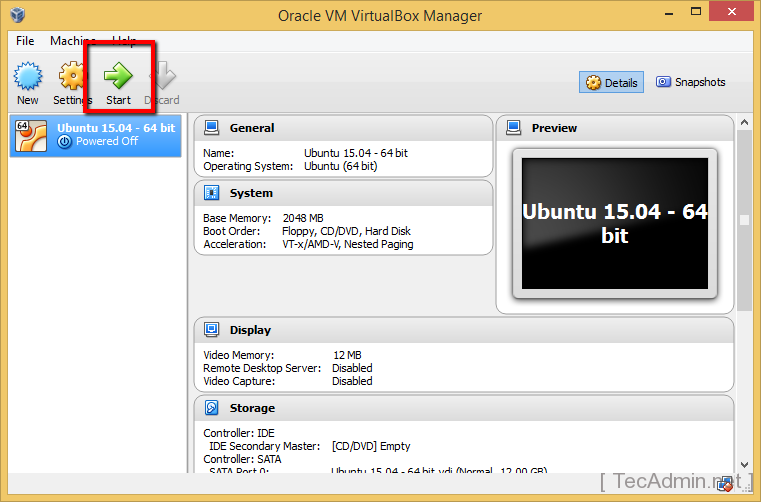
Back at the Oracle VM VirtualBox Manager, we will click on ‘Start’ to install the operating system.

As the process begins, you will be asked to ‘Select a start-up disk.’ The image file we had selected in the settings earlier will automatically populate in the field. From here, we can click ‘Start’ and allow it to continue.

Installing Virtual Box
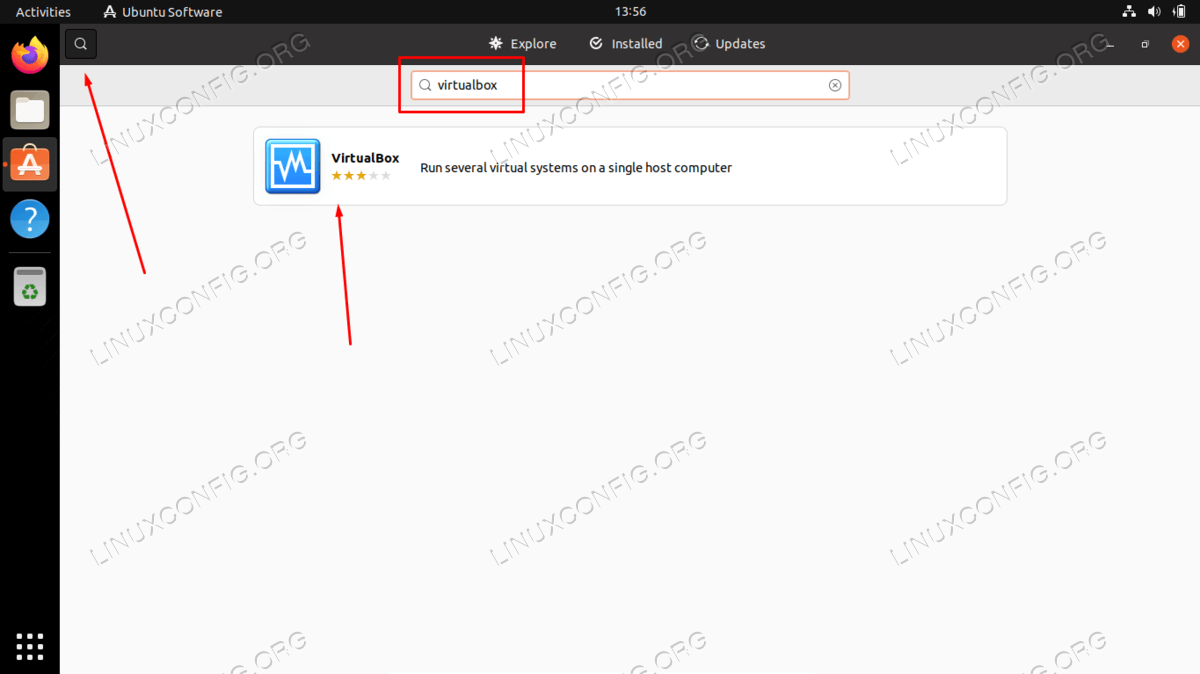
For Windows users, the installation is quite easy. Just visit the downloads page here and download the executable setup file for Windows Hosts. Simply run the installer to install the virtual box.
For Linux, launch the terminal and run the below commands with respect to your distribution –
For Debian (Ubuntu, Kali Linux, etc) –
❯ sudo apt-get install virtualbox
On Ubuntu, you can also install Virtual Box from the software centre.
For Arch users –
❯ sudo pacman -S virtualbox virtualbox-guest-iso

❯ sudo gpasswd -a $USER vboxusers

❯ sudo modprobe vboxdrv
You can refer to the official website for other distributions as well.
To launch the application either search it in the applications or hit the following command in a terminal –
❯ virtualbox
Getting Started
After installing VirtualBox and downloading your Ubuntu ISO image, you’ll want to click on the New button to create a new virtual machine.
While naming it, when you start typing Ubuntu, it’ll automatically select Linux and Ubuntu (64 bit).
Click Next to continue.
The next step will be selecting the memory size. If you have 8GB of RAM on your system, I would select 2GB as a minimum.
Just move the slider to 2048MB if you want to use 2GB.
Click Next.
The next step is creating the virtual disk. Leave the default option of Create A Virtual Disk Now and click Create.
Next, you’ll want to select a Hard Disk File Type. By default, it is VDI VirtualBox Disk Image. I opted for VMDK Virtual Machine Disk because it is a more well-known standard. Click Next.
For the Storage On Physical Hard Drive, leave the default option of Dynamically Allocated selected and click Next.
Under File Location and Size, you can select the folder where you want to save your virtual disk. You’ll also want to specify the disk size. The minimum should be 8GB, but if you have enough storage space, I would select 30GB or more, depending on how many apps you’ll be installing and how much you’ll be using the virtual machine. When you’re ready, click Create.