
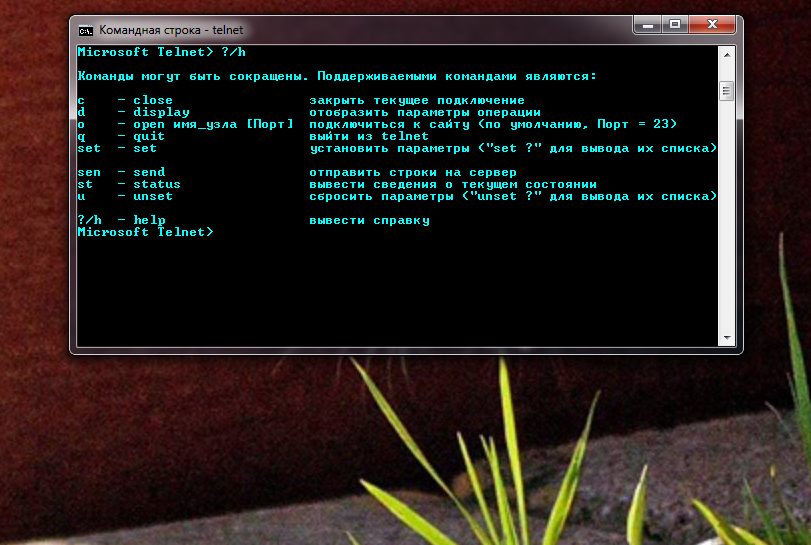
Команды Telnet:
c - close - закрыть текущее подключение
d - display - отобразить параметры операции. Доступные параметры:
- WILL AUTH (проверка подлинности NTLM)
- WONT AUTH
- WILL TERM TYPE
- WONT TERM TYPE
- LOCALECHO off
- LOCALECHO on
o - open имя_узла  - подключиться к сайту (по умолчанию, Порт = 23)
q - quit - выйти из telnet
set - set установить параметры ("set ?" для вывода их списка).
Доступные параметры:
- bsasdel     символ  будет отправляться как символ
- crlf        режим возврата каретки; приводит к отправке символов CR & LF
- delasbs     символ  будет отправляться как символ
- escape x    где x - символ переключения в режим telnet-терминала и обратно
- localecho   включение локального эха.
- logfile x   где x - файл входа текущего клиента в систему
- logging     выполнение входа в систему
- mode x      где x - консоль или поток
- ntlm        включение проверки подлинности NTLM.
- term x      где x - ansi, vt100, vt52, или vtnt
sen - send - отправить строки на сервер
st - status - вывести сведения о текущем состоянии
u - unset - сбросить параметры ("unset ?" для вывода их списка)
Доступные параметры:
- bsasdel     символ  будет отправляться как символ
- crlf        режим возврата каретки; приводит к отправке символов CR & LFbsasdel     символ  будет отправляться как символ
- crlf        режим перевода строки; приводит к отправке символа CR
- delasbs     символ  будет отправляться как символ
- escape      символ переключения в режим telnet-терминала и обратно не задан
- localecho   отключение локального эха
- logging     отключение выполнения входа в систему
- ntlm        отключение проверки подлинности NTLM.
?/h - help вывести справку
Enabling the Telnet Client
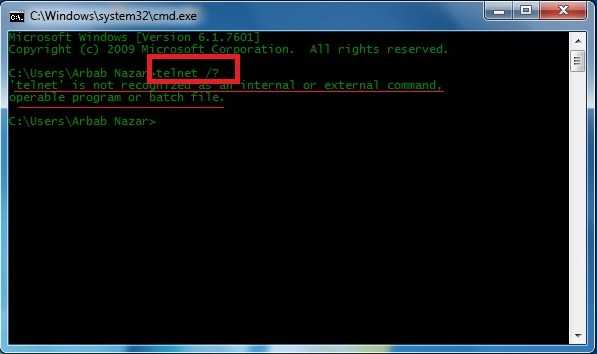
Firstly you need to enable the telnet client, if you don’t enable it you’ll get a result similar to the below message when trying to use it.
C:\>telnet google.com 80
'telnet' is not recognized as an internal or external command, operable program or batch file.
C:\>
You can enable the client either by command line or through the graphical interface.
Enabling the telnet client through command line
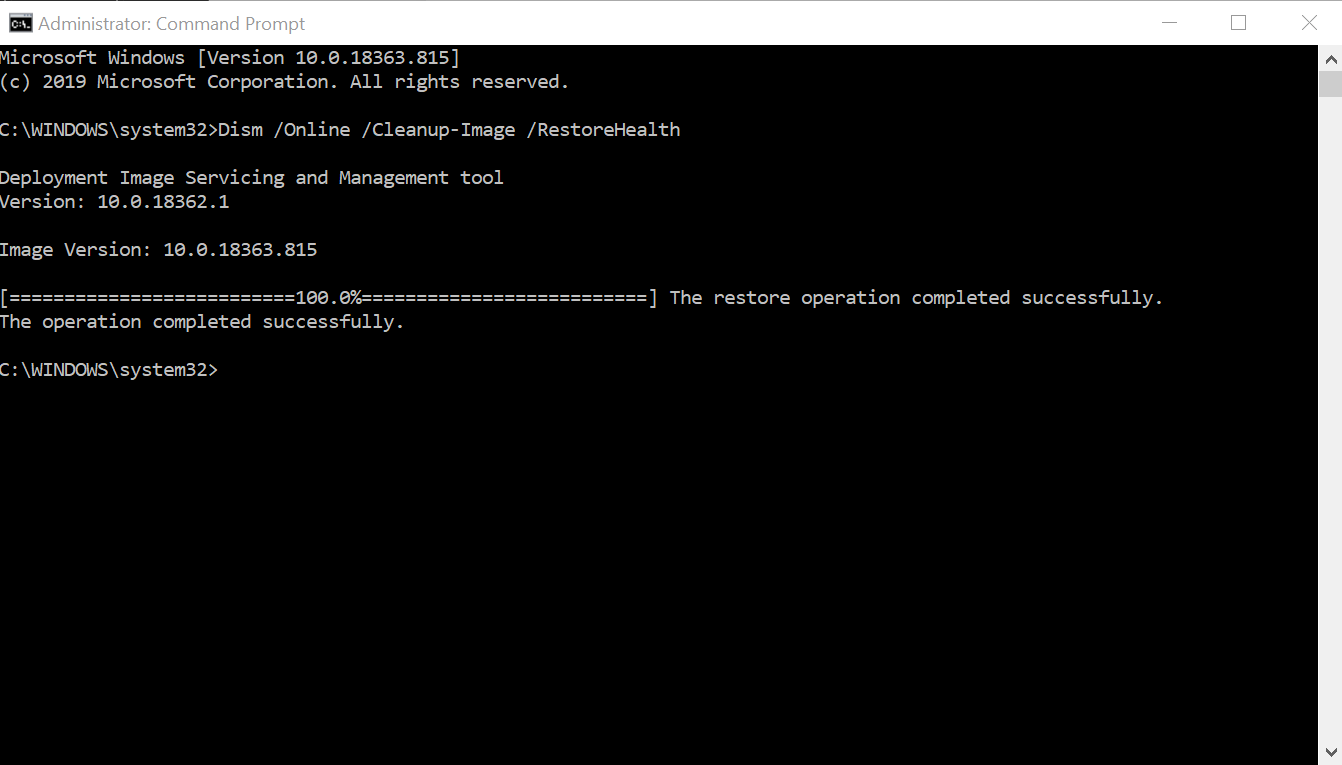
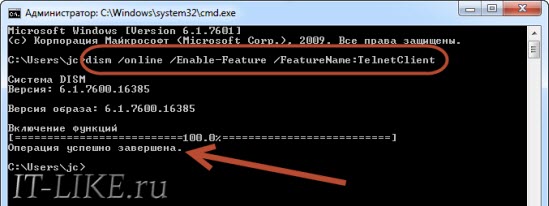
Run the below command in command prompt with administrator permissions.
dism /online /Enable-Feature /FeatureName:TelnetClient
That’s it, after a few seconds telnet should be ready to use.
Enabling the telnet client through the graphical user interface
- Click the start button, then start typing “Turn Windows features on or off”, and select this option, as shown below.
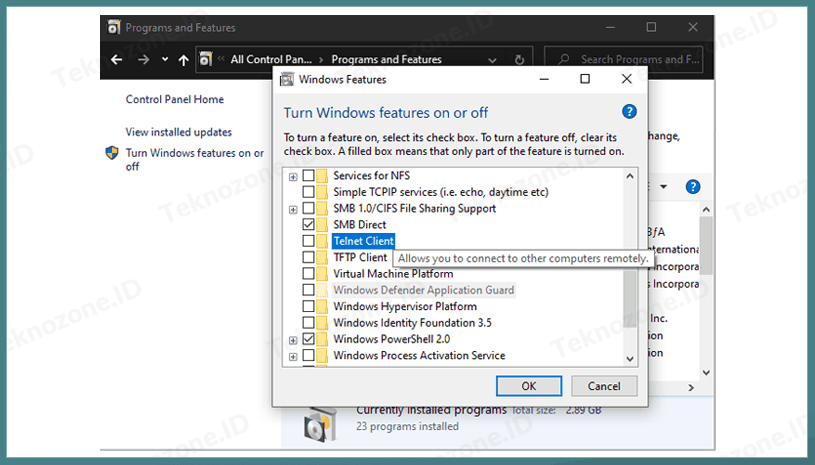
- The “Turn Windows Features on or off” window should open, scroll down and select “Telnet Client”.
- Click the OK button to proceed, this will display a screen while the changes apply.
- When complete it will display as below, you can now close the window.
Verifying that the telnet client is enabled
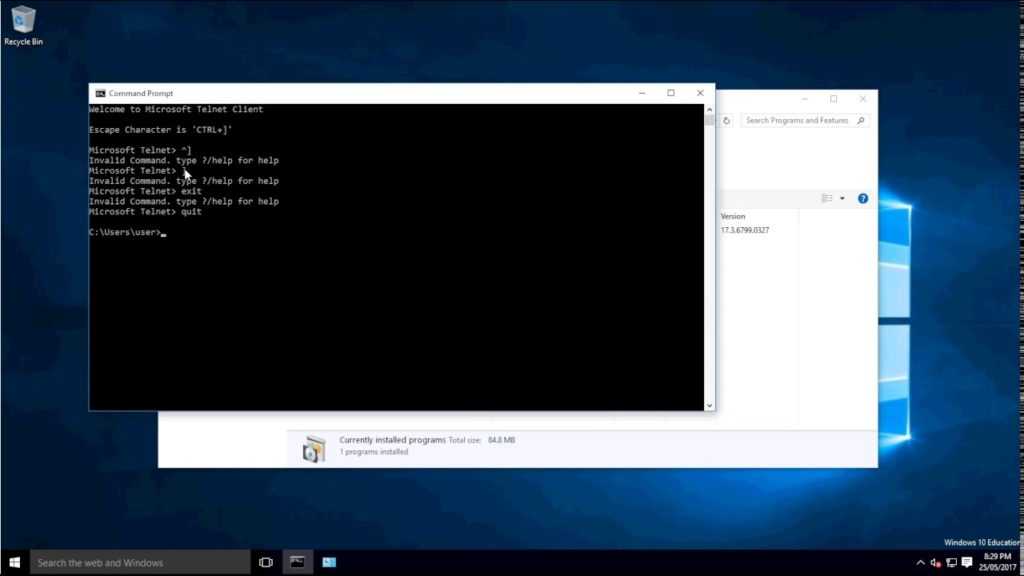
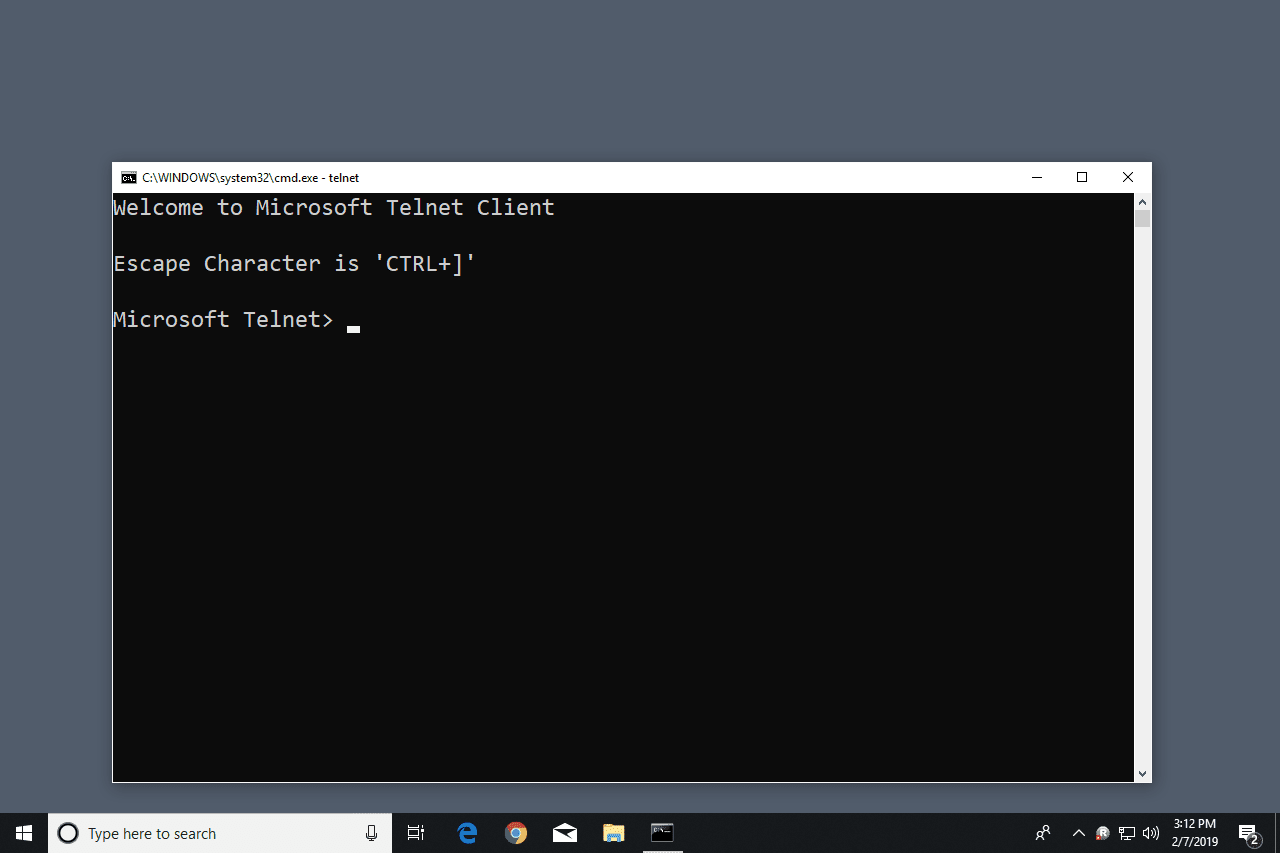
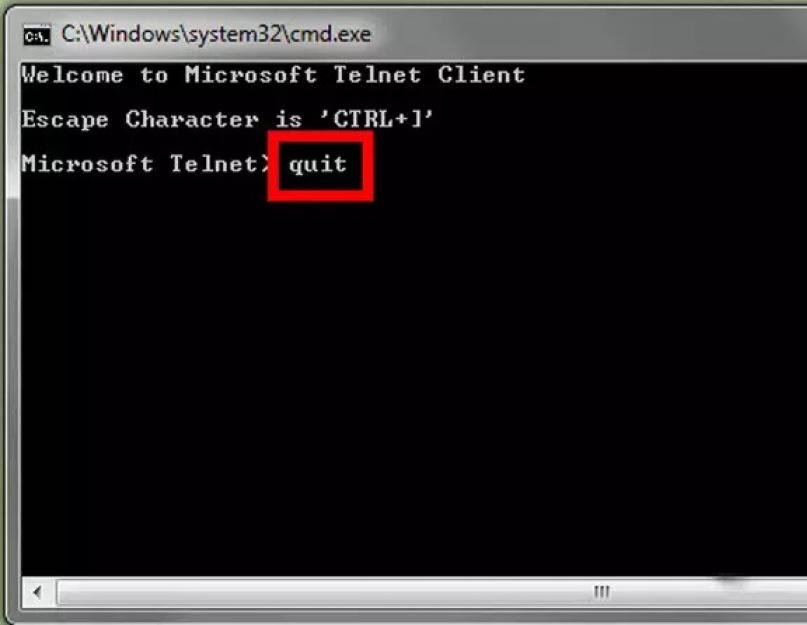
Simply open command prompt or powershell, type ‘telnet’ and press enter. If this was successful you should have a prompt similar to the below:
Welcome to Microsoft Telnet Client

Escape Character is 'CTRL+]'

Microsoft Telnet>
Already have telnet installed but still failing?
In some cases you must run command prompt or powershell as administrator in order to issue the telnet command, otherwise it will give the same error as if it was not enabled at all.
How to enable the Telnet Client in Windows 10
Posted by Jarrod Farncomb
on April 18, 2015
By default the telnet client in Microsoft’s Windows operating systems is disabled, this is unfortunate as it is an extremely useful tool which can be used for testing TCP connectivity to external hosts on a specified port.
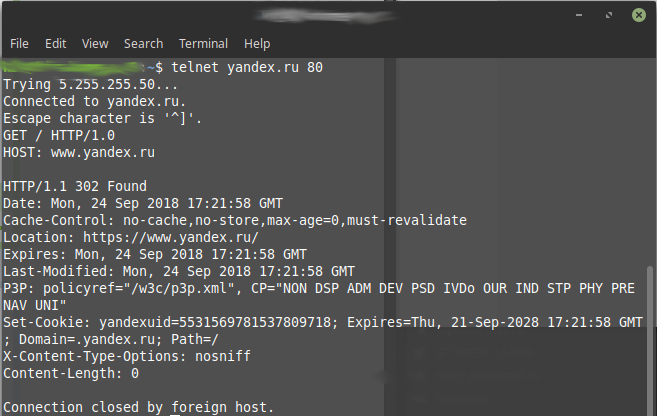
This is great when you’re trying to troubleshoot network connectivity problems, for example, say we have a web server which should be listening on port 80 to serve HTTP traffic but we are not able to load a web page, by using telnet to connect to the web server on port 80 we can verify the connectivity.
It may be that the connectivity is fine but there is a problem with the web server, or that the web server is stopped and the port is not listening at all, for instance. With telnet we can get a better understanding of what’s going on.
Update October 21st 2015: I have also created a video showing the process:
Enabling the Telnet Client
Firstly you need to enable the telnet client, if you don’t enable it you’ll get a result similar to the below message when trying to use it.
C:\>telnet google.com 80
'telnet' is not recognized as an internal or external command, operable program or batch file.
C:\>
You can enable the client either by command line or through the graphical interface.
Enabling the telnet client through command line
Run the below command in command prompt with administrator permissions.
dism /online /Enable-Feature /FeatureName:TelnetClient
That’s it, after a few seconds telnet should be ready to use.
Enabling the telnet client through the graphical user interface
- Click the start button, then start typing “Turn Windows features on or off”, and select this option, as shown below.
- The “Turn Windows Features on or off” window should open, scroll down and select “Telnet Client”.
- Click the OK button to proceed, this will display a screen while the changes apply.
- When complete it will display as below, you can now close the window.
Verifying that the telnet client is enabled
Simply open command prompt or powershell, type ‘telnet’ and press enter. If this was successful you should have a prompt similar to the below:
Welcome to Microsoft Telnet Client

Escape Character is 'CTRL+]'

Microsoft Telnet>
Already have telnet installed but still failing?
In some cases you must run command prompt or powershell as administrator in order to issue the telnet command, otherwise it will give the same error as if it was not enabled at all.
Summary
Now that you have enabled telnet you should be able to start issuing commands with it and using it to troubleshoot TCP connectivity problems.
What is Telnet
Telnet is a network protocol that is used to log into a remote computer on the same network using the command line interface.
To establish remote sessions, telnet adheres to a user command Transmission Control Protocol/Internet Protocol (TCP/IP) networking protocol. Using this, users can sign in with regular user accounts with the permissions they have been allowed to the particular programs and data on the target computer.
Please enable JavaScript
Create Copilot shortcut and add to context menu
Watch on
Telnet uses a client-server relationship to establish a connection. It is a text-based communication mechanism between a client machine and a server where an individual can run commands on a remote computer while being logged in as a local user.
Telnet can be used to perform any number of functions, like editing files, running applications, etc., on remote computers.
How to Enable Telnet on Windows
Enable Telnet from Optional Features
The files for the optional features on a Windows PC are always there, but the feature is not installed. Since telnet is an optional feature, here is how you can enable it:
-
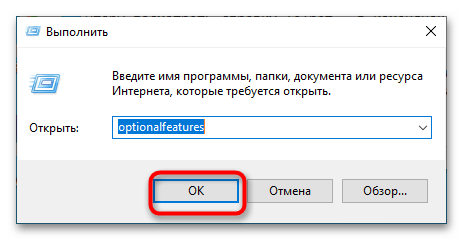
Open the Optional Features applet by typing in “optionalfeatures” in the Run Command box.
Open Optional Features
-
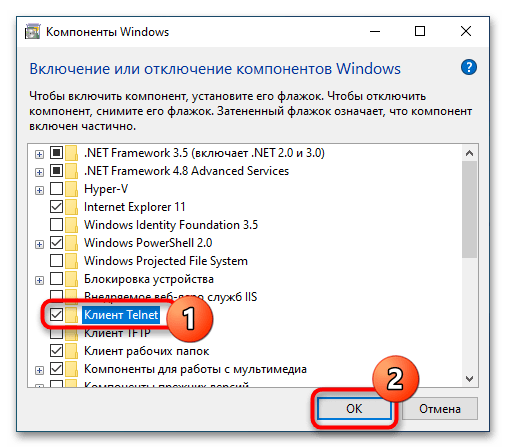
Check the box with “Telnet Client” and click Ok.Enable telnet from Optional Features
The feature will now begin to install.
-
Once installed, close the wizard.Close wizard
Telnet will now be enabled and you may continue to use the command line to connect to a remote computer.
To disable Telnet, simply uncheck the box next to “Telnet Client” in the Optional Features applet.
Enable Telnet from Command Prompt
You can also enable the telnet client directly from the Command Prompt. This method can come in handy if you are already inside the Command Prompt and trying to connect remotely using telnet.
-
Ensure you are running Command Prompt with elevated privileges.
-
Run this cmdlet:
Enable telnet from Command Prompt
The command will run silently and install telnet in the background. Alternatively, you can also use this command to enable Telnet:
Note: Elevated privileges are required to run the DISM command.
-
If prompted with a UAC, click Yes.
You can now begin connecting to a remote computer once the telnet is installed
To disable telnet from the Command Prompt, run the following cmdlet using :
Disable telnet from Command Prompt
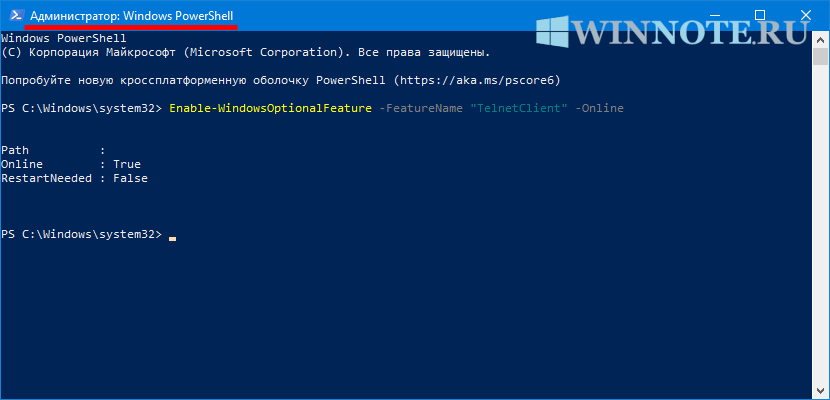
Enable Telnet from Windows PowerShell
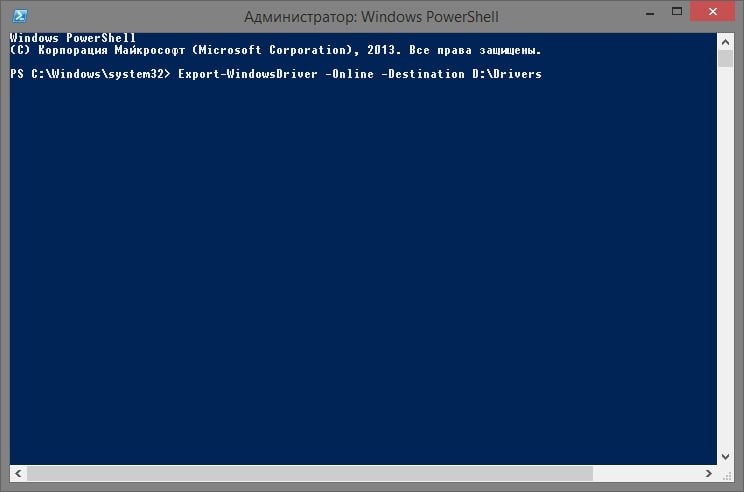
If you are using PowerShell, run the following command in an elevated PowerShell instance to enable the Telnet Client:
Enable telnet using PowerShell
Telnet will now be enabled. You may now continue to access a remote PC using telnet directly from PowerShell.
In case you wish to disable the feature in the future, run this cmdlet in Windows PowerShell:
Disable telnet using PowerShell
What is Telnet and how does it work?
Telnet is an Internet protocol that allows you to connect to a different computer on your local network or on the Internet.
Telnet was invented in 1969, and it’s often considered an ancestor of modern Internet.
Today most users use a graphical user interface, but when Telnet was invented there were no browsers or graphical operating systems. Therefore, users had to rely solely on command line interface.
It’s worth mentioning that Telnet still works like it did decades ago, and Telnet clients are available for almost any platform.
Telnet changed the way how people use Internet because in the time before Telnet users had to manually use the server in order to get certain data.
With Telnet, users could access the server remotely from the comfort of their home for the first time.
In addition to remote access, multiple users were able to connect to the server over Telnet. Therefore, it’s not hard to see how Telnet influenced the development of the Internet.
We have to mention that there are two different terms when it comes to Telnet: Telnet server and Telnet client. The former is a computer designed to run as a Telnet server.
You can easily turn your Windows PC into a Telnet server and you should be able to access it over Telnet.
Bear in mind that having a public IP address leaves your computer open for access by any computer on the Internet, so be sure to use a firewall in order to protect your PC from unauthorized remote access.
The same principles apply to running Telnet on Windows 11, so make sure to check it out if you’re running the latest OS from Microsoft.
READ ALSO: 7 best tabbed command line tools for Windows 10
Telnet client is a PC that uses a Telnet connection to connect to a Telnet server. In fact, you can use Telnet from Windows 10 by following these steps:
- Press Windows Key + S on your keyboard and enter features. Select Turn Windows Features on or off.
- When Windows Features opens, scroll down and check Telnet Client. Click OK to install Telnet.
- Wait until Windows installs the necessary components.
- Once the installation is completed click the Close button.
After you install Telnet, you can start it by doing the following:
- Press Windows Key + S and enter telnet. Select Telnet from the list of results.
- Command line will now open, and you should be able to use Telnet without any problems.
Why is Telnet obsolete?
Although running Telnet on Windows 10 is fairly simple, the question remains why would you use Telnet for? Telnet is an outdated protocol, and most people don’t use it anymore.
This protocol is great if you are a computer geek, and you want to access Internet by using command line. Unfortunately, there aren’t many Telnet servers available nowadays, so you might have to do some research before you find one.
One of the biggest flaws of Telnet is its lack of security. Telnet transmits all the data between the client and the server without any encryption which means that almost anyone can intercept your data.
This is especially important if you’re sending sensitive information over Telnet, such as your username or password. Due to lack of encryption, malicious users can easily steal your password and see all the data between the Telnet client and server.
Also, Telnet doesn’t have authentication, which means that malicious users can easily intercept your traffic. Lastly, Telnet has several additional security vulnerabilities which make it quite unsafe to use.
Even though Telnet in Windows 10 might not be the safest Internet protocol, newer protocols, such as SSH for example, were inspired by Telnet. They are designed to fix many flaws that original Telnet had.
Telnet might not be as popular as it was a few decades ago. Stll, it’s certain that Telnet changed the way how Internet works forever.
READ ALSO:
- How to protect your Windows 10 device on public Wi-Fi network
- Fix: Network Protocol Missing in Windows 10
- Fix: Error ‘Err_ssl_protocol_error’ in Windows 8.1, 10
- 4 best bandwidth monitors for Windows 10
- How to fix Ethernet problems in Windows 10
Telnet Client vs. Telnet Server
As mentioned earlier, Telnet uses the client-server configuration method to establish a connection to a remote computer. Telnet Client is a piece of software that you enable on client computers from which you access the remote computer. Whereas, the Telnet Server is the target computer that you connect with over the network.
In other words, on the Telnet Server, the Telnet port needs to be opened and allowed to let other computers connect to it.
That said, one common issue that many users face on the Windows command line is experiencing the error “telnet is not recognized as an internal or external command.”
Как включить Telnet Server для Windows 10
Клиенты Telnet позволяют подключаться к другим серверам Telnet. Вы не можете подключиться к своей собственной системе и запускать удаленные команды. Для этого вам понадобится Telnet-сервер, и, к сожалению, в Windows 10 нет собственного способа его включения. Чтобы начать обслуживание Telnet через порт 23, необходимо установить сторонние приложения.
Две мои любимые утилиты для этого: HK Telnet-сервер а также Сервер KpyM Telnet. Оба они обслуживают разную аудиторию.
Если все, что вам нужно, — это разрешить серверу telnet запускать удаленные команды на вашу машину, я бы предложил сервер Telnet HK. Настроить довольно просто. Просто скачайте приложение и запустите его. Это больше похоже на портативное приложение, чем на exe. Как только вы запустите приложение, у вас появится плавающее окно.
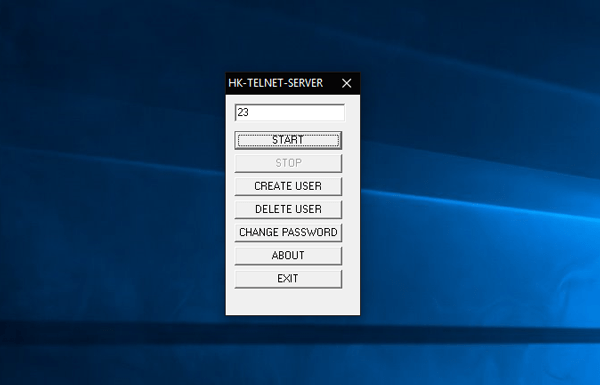
Здесь вы можете ввести номер порта, с которого Telnet будет принимать соединения. Пользовательский интерфейс довольно простой, с минимумом настроек. Вы можете установить ID пользователя и пароль для входа в telnet.
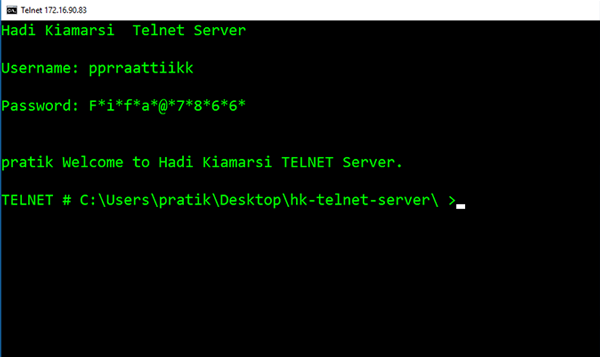
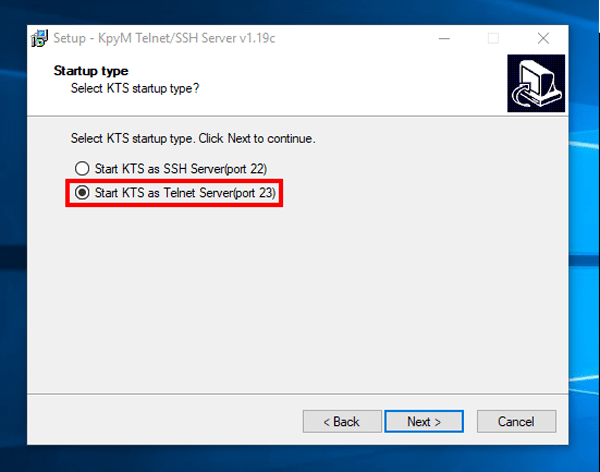
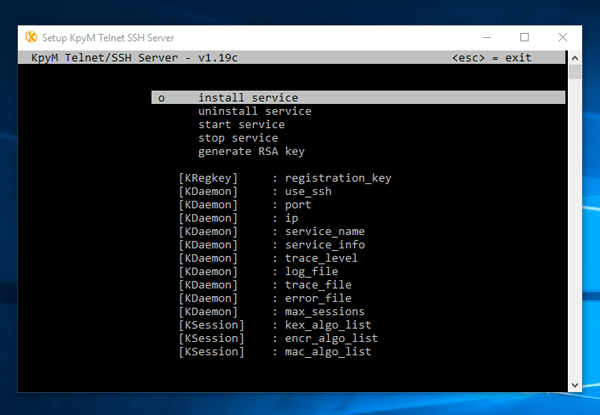
Приложение не предоставляет возможности принудительно использовать SSL или шифрование. Если вам нужно более крупное решение с SSH, такое как настраиваемое сообщение для входа в систему и блокировка IP, вам необходимо перейти на KpyM Telnet Server. Во время установки приложения вам будет предложено запустить сервер либо через порт 22 (SSH), либо через порт 23 (telnet). В случае, если вы собираетесь запустить telnet, выберите порт 23 сейчас, потому что это единственный раз, когда вы увидите графический интерфейс в этом приложении.
После того, как вы закончили его установку, вы можете продолжить настройку с помощью демона KTS. Перейдите в меню «Пуск» и введите «Настройка сервера kpyM Telnet SSH». Откроется черное диалоговое окно, в котором вы можете настроить такие параметры, как использование SSL, номер порта, сообщение_входа, пароль и т. Д. Тот же демон также предоставляет параметры для запуска или остановки сервера telnet.

Заключительные слова
Безопасность была одной из основных проблем, из-за которой Telnet Server был удален из Windows. Желательно не использовать telnet, когда вы имеете дело с конфиденциальными данными. Однако в случае общедоступных серверов ничего страшного, если вы не хотите настраивать сертификаты ключей шифрования и SSL.
Enable Telnet Remotely
The methods above show how you can enable the Telnet Client on the local computer. However, you can also enable it on a remote PC on your network. This is especially useful if Telnet has not been allowed through the target computer’s firewall.
To enable telnet on a remote Pc, we must use PsTools by SysInternals – which is a suite of command-line tools for the Windows operating system. Using the PsExec utility inside this suite, you can remote access the Command Prompt of the target PC and then run any command.
Use the following steps to enable Telnet on a remote PC:
-
Start by downloading and extracting PsTools.Extract PsTools
-
Launch an elevated Command Prompt and use the cmdlet to change the directory to the extracted folder:
Change directory to PsTools
-
Now use the following command syntax to connect to the remote computer:
Note: If you see an “Access is denied” error at this point, a solution for it is provided at the end of these steps.
Replace with the name of the PC you want to connect to, with the account name, and with the account password. Make sure that the account you are logging in with has administrative rights.Connect to remote computer using PsTools PsExec
You will now be connected to the remote PC.
-
-
Now, use the following command to enable telnet on the remote PC:
Enable Telnet remotely


That’s it! Telnet has been successfully enabled on the remote computer, and you can now close the Command Prompt window.
If you faced the “Access is denied” error while attempting to access the remote computer with PsExec, it is probably because UAC is running on the remote machine. You must perform the following steps on the remote computer physically to disable UAC:
Note: This process involves making changes to the Windows Registry manually. Misconfiguration of critical values in the system’s registry could be fatal for your operating system. Therefore, we insist that you create a system restore point or a complete system image backup before proceeding forward with the process.
You can also use our top selection of disk imaging and backup software so you never lose your data or operating system again.
-
Open the Registry Editor by typing in “regedit” in the Run Command box.Open the Registry Editor
-
Paste the following in the address bar for quick navigation:
Navigate to the System key
-
Right-click the “System” key, expand New, and then click “DWORD (32-bit) Value.” Name this DWORD “LocalAccountTokenFilterPolicy“.
Create the DWORD LocalAccountTokenFilterPolicy
-
Double-click the DWORD “LocalAccountTokenFilterPolicy” and change its Value Data to 1.Change Value Data to 1
-
Now restart the computer for the changes to take effect.
Once these steps are performed, you should be able to access the remote computer using PsExec.
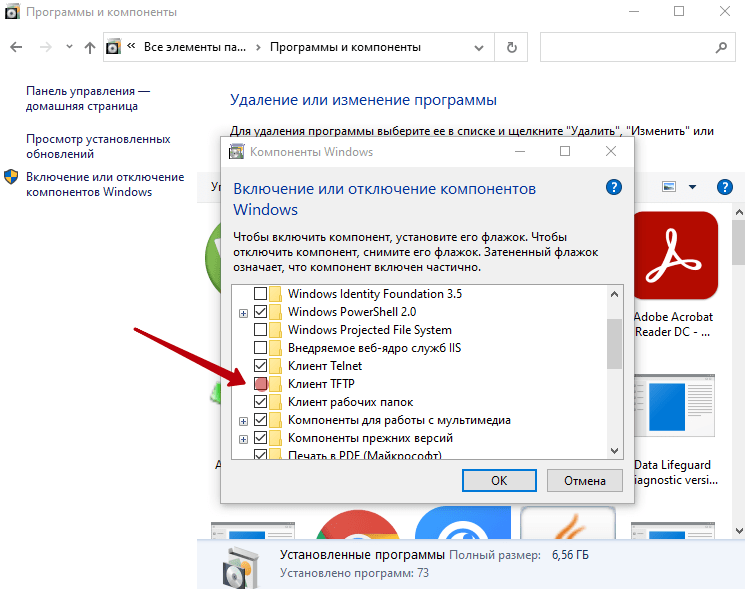
Способ 1: «Программы и компоненты»
Это самый простой и очевидный способ задействовать компонент «Telnet», предназначенный для удаленного управления компьютером. Чтобы открыть оснастку «Программы и компоненты», сделайте следующее:
- Вызовите нажатием Win + R окошко быстрого выполнения команд, вставьте в него команду и нажмите клавишу ввода. Также открыть оснастку можно через приложение «Параметры», перейдя в раздел «Приложения и возможности» → «Дополнительные компоненты» → «Другие компоненты Windows».
Отыщите в открывшемся окне оснастки пункт «Клиент Telnet», отметьте его флажком и нажмите кнопку «OK».
Windows 10 выполнит поиск необходимых файлов и установит их.
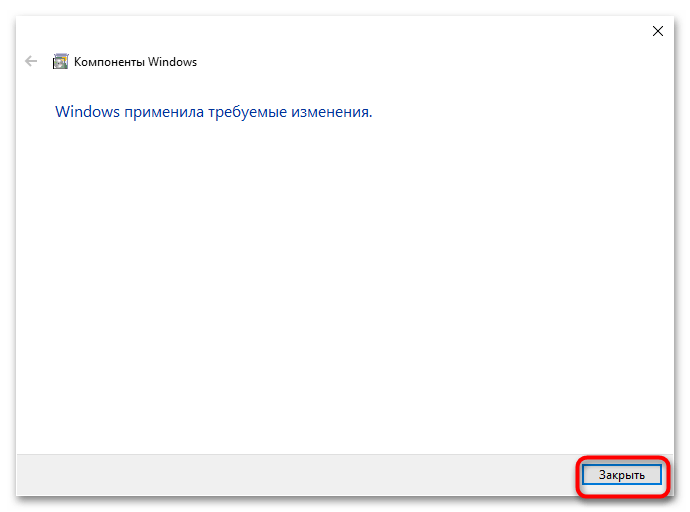
Если Windows попросит перезагрузить компьютер, дайте согласие на перезагрузку.
Что такое клиент Телнет?
- Как настроить OpenVPN на Windows 10
- Пропал звук на Windows 10 — испраляем ошибку
- Для чего нужен журнал событий в Windows 10
- Как установить несколько ОС Windows 7 8 10 на одну флешку
- Устраняем критическую ошибку меню «Пуск» на Windows 10
Telnet — достаточно распространённый сетевой протокол, который используется для реализации всего текстового интерфейса по сети при помощи транспорта TCP. Одна из его самых главных задач — это создание идеального взаимодействия между терминальными процессами и терминальными устройствами.
Если говорить простым языком, то данный клиент являет собой простую программу, которая имеет текстовый интерфейс и даёт возможность выполнить быстрое подключение одного компьютера к другому при помощи интернета. Как правило, такой процесс осуществляется при помощи обычной командной строки. Месторасположения программы — диск C, папка Windows System32. А работает клиент примерно таким способом:
Администратор одного из компьютеров даёт разрешение на подключение к нему другого. При включении службы Telnet, она даёт возможность вводить все необходимые команды, использующиеся для доступа к программам и разнообразным службам на удалённом компьютере. Такой софт можно использовать для очень широкого круга процессов: для открытия доступа к электронной почте, баз данных, файлов или других заданий. За умолчанием данный сетевой протокол отключён, но провести его активацию можно быстро и достаточно легко.
Как включить и начать пользоваться программой?
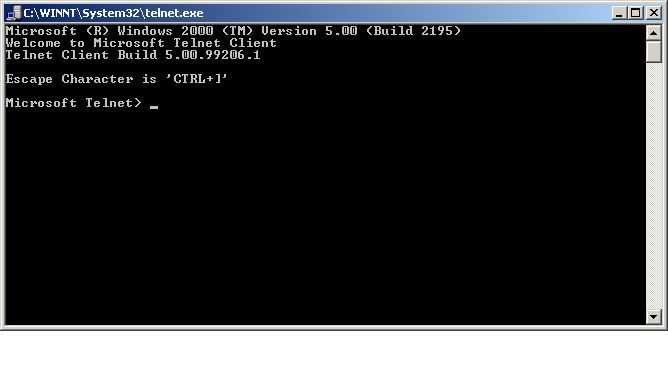
Для начала откройте командную строку. Не стоит забывать, что сетевой протокол Telnet теперь запускается через командную строку. Чтобы совершить действие просто нажмите на клавишу «Win» и введите команду «Cmd» в поле «Выполнить». Далее наберите фразу «Telnet» и нажмите «Enter». Если всё было сделано верно, командная строка должна исчезнуть, вместо неё запустится линия Telnet, которая должна иметь примерно такой вид — «Microsoft Telnet».
Следующий этап — подключение к серверу. Как включить Telnet Windows 10?
В командной строке без ошибок введите команду:
При успешном завершении операции перед вами откроется окно запроса имени пользователя и пароля. После удачного подключение и пользования сервисом, всё, что осталось сделать — это правильно завершить сессию: откройте командную строку, пропишите в ней слово «quit» и нажмите «Enter».
Клиент запущен и доступен для пользования абсолютно бесплатно. Практически все доступные команды для пользования данным сетевым протокол можно скачать в интернете (close, display, set, st и другие).
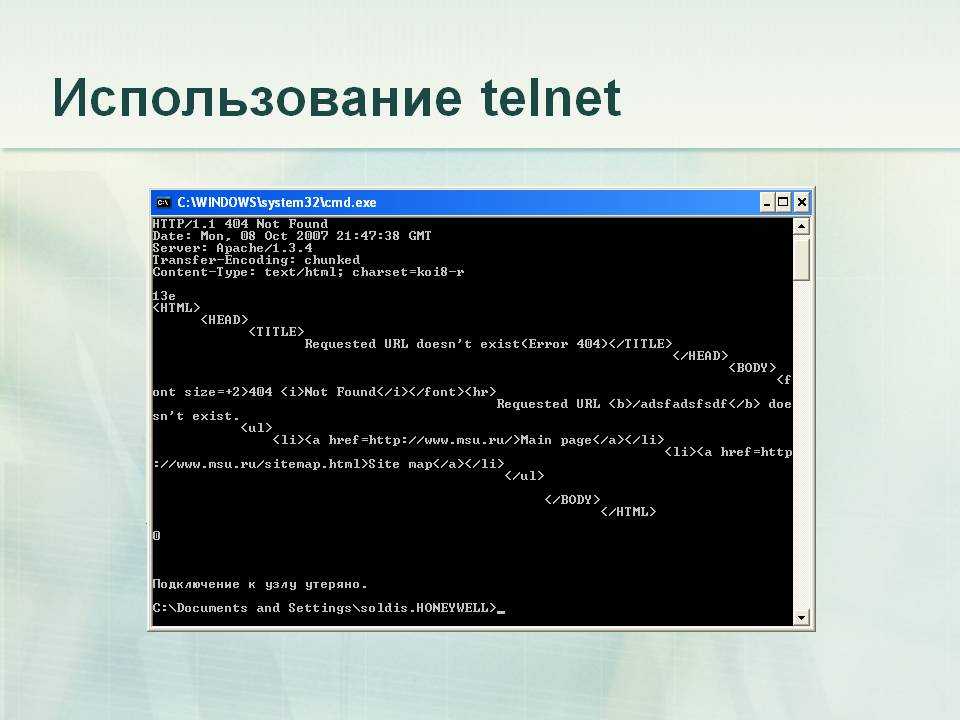
Отправка письма из командной строки с помощью telnet
Например, при мы можем отправить письмо по SMTP протоколу из командной строки. Для этого введем команду
telnet smtp.mailserver.com 25
Если порт открыт, то получим приглашение от сервера на отправку команд. Нам интересно проверить отправку писем. Будьте внимательны при вводе последовательно следующих команд. Так как опечатки будут приводить к ошибкам, а команды удаления некорректных символов не работают.
- helo имя_вашего_хоста
- mail from: pochta@myhost.ru
- rcpt to: pochta@host.com (если не настроен почтовый relay, будьте внимательны при использовании домена, отличного от поддерживаемого на данном почтовом сервере)
- data
- subject: тема письма
- содержание письма
- . (точка с новой строки означает завершение ввода сообщения)
- quit (выход из сеанса связи)
Таким образом мы использовали telnet для проверки работы сетевых сервисов HTTP и SMTP. Также не забывайте использовать инструмент для устранения неполадок TCP-подключений.
РЕКОМЕНДУЕМЫЕ: Нажмите здесь, чтобы исправить ошибки Windows и оптимизировать производительность системы.
По умолчанию клиент Telnet отключен в операционных системах Microsoft Windows, что, к сожалению, является чрезвычайно полезным инструментом для проверки соединения TCP с внешними хостами на определенном порту.
Хорошо, если вы пытаетесь решить проблемы с сетевым подключением, например, если вы говорите, что у нас есть веб-сервер, который должен прослушивать порт 80 для обслуживания HTTP-трафика, но мы не можем загрузить веб-страницу, используя Telnet для подключения к сети. Сервер на порт 80, мы можем проверить соединение.
Возможно, соединение установлено правильно, но есть проблема с веб-сервером или веб-сервер остановлен, а порт вообще не слышит. С TelnetМы можем лучше понять, что происходит.
Что такое Telnet и как он работает?
Telnet — это интернет-протокол, который позволяет вам подключаться к другому компьютеру в локальной сети или в Интернете.
Telnet был изобретен в 1969 и часто считается предшественником современного Интернета.
Сегодня большинство пользователей используют графический пользовательский интерфейс, но когда был изобретен Telnet, не было браузера или графической операционной системы. В результате пользователям приходилось полагаться исключительно на интерфейс командной строки.
Следует отметить, что Telnet по-прежнему работает так же, как и десятилетия назад, и что клиенты Telnet доступны практически для всех платформ.
Исправление обновления января 2020 года:
Мы рекомендуем вам попробовать этот новый инструмент. Он исправляет множество компьютерных ошибок, а также защищает от таких вещей, как потеря файлов, вредоносное ПО, сбои оборудования и оптимизирует ваш компьютер для максимальной производительности. Это исправило наш компьютер быстрее, чем делать это вручную:
- Шаг 1: Скачать PC Repair & Optimizer Tool (Windows 10, 8, 7, XP, Vista — Microsoft Gold Certified).
- Шаг 2: Нажмите «Начать сканирование”, Чтобы найти проблемы реестра Windows, которые могут вызывать проблемы с ПК.
- Шаг 3: Нажмите «Починить все», Чтобы исправить все проблемы.
(дополнительное предложение для Advanced System Repair Pro -> Cайт | Лицензионное соглашение | Политика Kонфиденциальности | Удалить)
На самом деле, клиент Telnet все еще существует, но он больше не является частью интегрированных инструментов стандартной версии Windows: если вы хотите использовать его в своей системе, вы должны явно выбрать его. К счастью, это можно сделать и после установки Windows: все, что вам нужно сделать, это выполнить следующие простые шаги:
Включить Telnet с панели управления
- Откройте панель управления.
- Навигация по программам и функциям.
- Выберите Включить или отключить функции Windows в левом меню.
- Найдите клиента Telnet в списке и установите флажок слева.
- Нажмите кнопку ОК, чтобы начать установку клиента Telnet.
В командной строке выберите Telnet
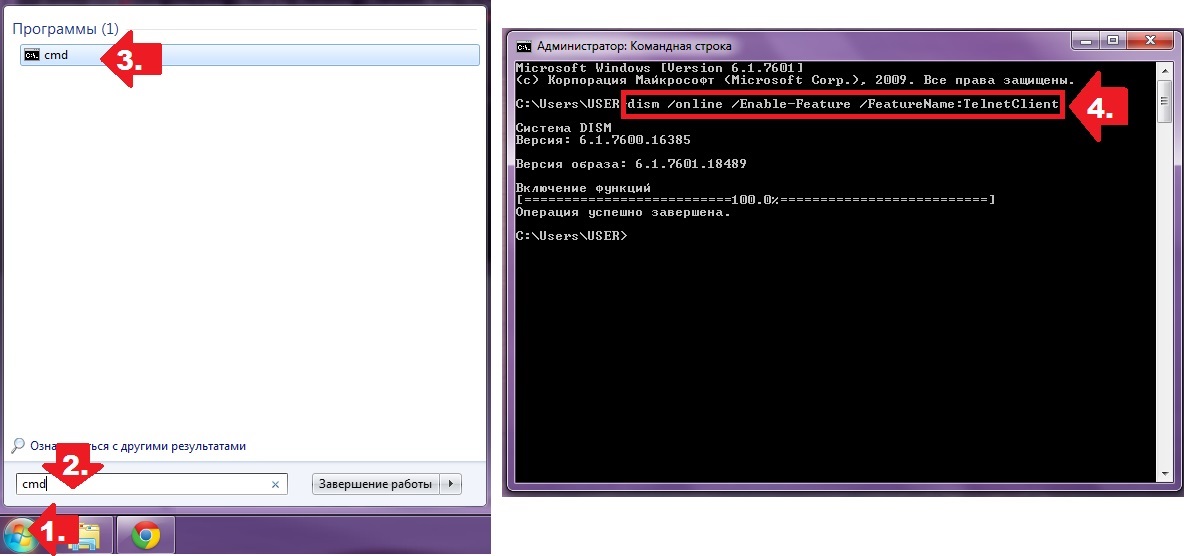
- Нажмите на Пуск и в разделе «Тип поиска» в CMD.
- Щелкните правой кнопкой мыши CMD и выберите Запуск от имени администратора.
- Введите пароль администратора при появлении запроса.
- Затем введите pkgmgr / iu: «TelnetClient» ИЛИ dism / online / Включить функцию / FeatureName: TelnetClient и нажмите Enter, чтобы активировать клиент Telnet.
- Используйте команду pkgmgr / iu: «TelnetServer» для активации сервера Telnet.
Проверка установки Telnet
После завершения установки мы можем использовать клиент Telnet.
- Запустите командную строку, введя Командная строка в поле поиска строки меню и нажав на возвращенное приложение.
- Вы также можете ввести Windows Key + R, чтобы открыть диалоговое окно порядка выполнения. Введите cmd и нажмите Enter.
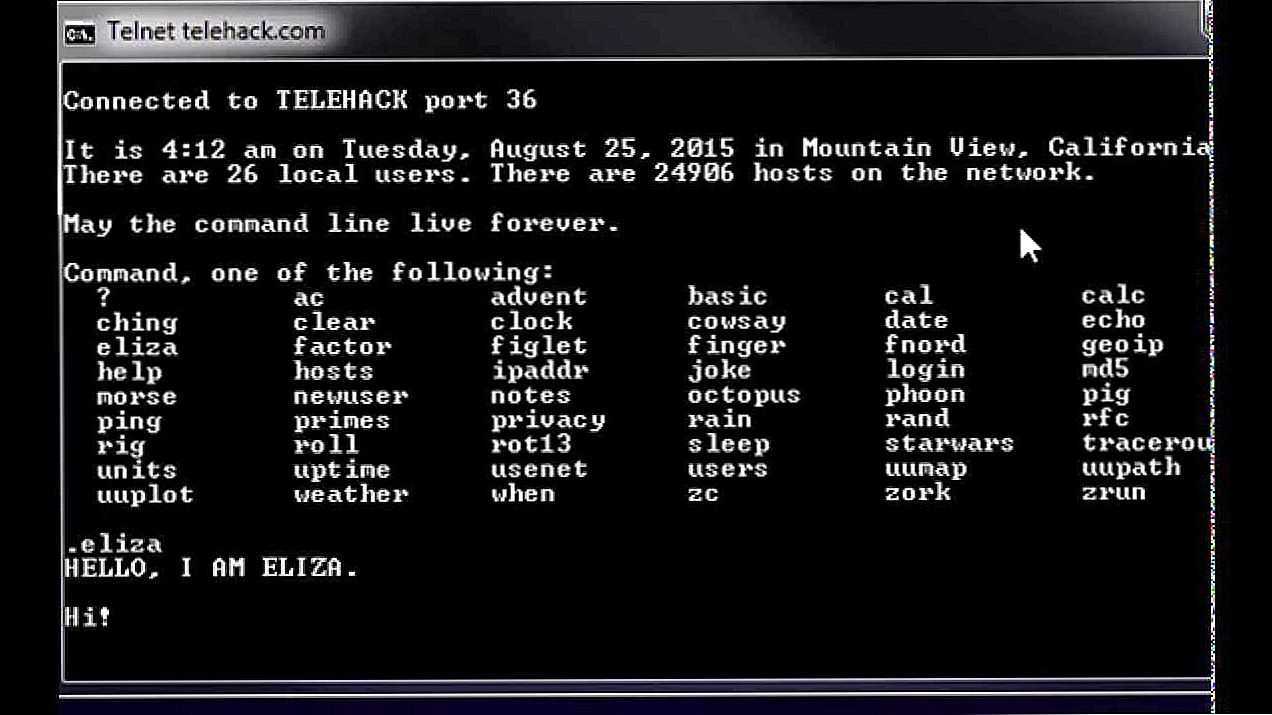
- Введите telnet и нажмите Enter, чтобы получить доступ к клиенту Telnet.
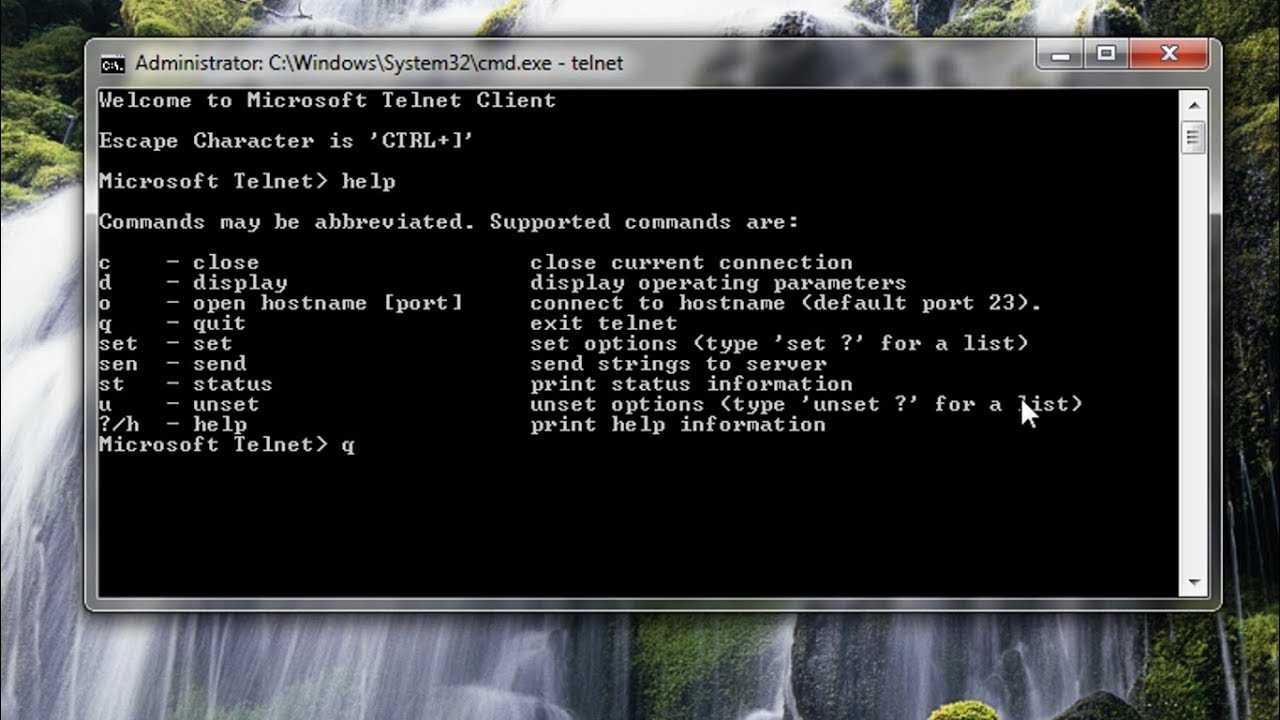
- Введите help, чтобы увидеть поддерживаемые команды Telnet.
- Введите q или выход для выхода из Telnet.
- Введите telnet google.com 80 для Telnet в Google через порт 80.
https://social.technet.microsoft.com/wiki/contents/articles/38433.windows-10-enabling-telnet-client.aspx

РЕКОМЕНДУЕМЫЕ: Нажмите здесь, чтобы устранить ошибки Windows и оптимизировать производительность системы
CCNA, веб-разработчик, ПК для устранения неполадок
Я компьютерный энтузиаст и практикующий ИТ-специалист. У меня за плечами многолетний опыт работы в области компьютерного программирования, устранения неисправностей и ремонта оборудования. Я специализируюсь на веб-разработке и дизайне баз данных. У меня также есть сертификат CCNA для проектирования сетей и устранения неполадок.
В Windows 10,8, 7 Telnet клиент и сервер по умолчанию отключены. Включить их вы можете используя командную строку или с помощью панели управления.
Включить Telnet с помощью командной строки:
1.Запускаем командную строку от имени администратора: один из способов в любой версии Windows в строке поиска введите cmd => на предложенный вариант нажимаем правой клавишей мыши => запустить от имени администратора;
2. Чтобы включить Telnet клиент введите команду pkgmgr /iu:”TelnetClient” или dism /online /Enable-Feature /FeatureName:TelnetClientand и нажмите Enter;
3.Чтобы включить Telnet сервер введите команду pkgmgr /iu:”TelnetServer” и нажмите Enter.
Включить Telnet с помощью панели управления:
1.Нужно зайти в панель управления => программы и компоненты: можно в строке поиска написать appwiz.cpl и нажать Enter;
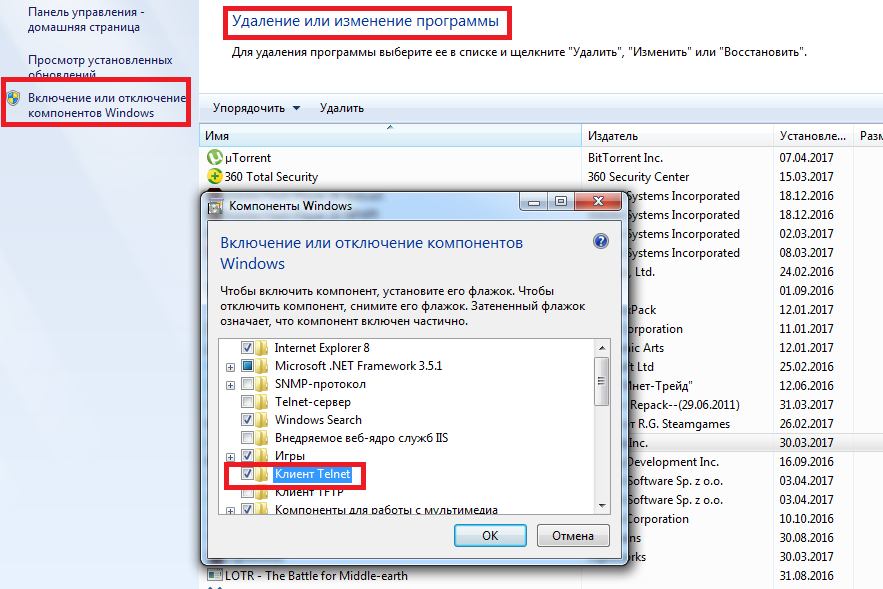
2.На левой панели открываем «Включение или отключение компонентов Windows»;
3.Ищем в списке Telnet клиент и сервер, ставим галочки перед ними и нажимаем «ОК». Компоненты будут добавлены, перезагрузите компьютер если попросит.
Чтобы посмотреть справку Telnet — в командной строке введите сначала команду telnet и нажмите Enter, потом введите help и нажмите Enter.
Отключить Telnet можно через компоненты Windows, просто сняв галочки и нажав «ОК». На сегодня всё, если есть дополнения — пишите комментарии! Удачи Вам
- https://14bytes.ru/kak-vkljuchit-telnet-klient-v-windows-10/
- http://windowsbulletin.com/ru/как-включить-telnet-на-windows-10/
- https://vynesimozg.com/vklyuchit-telnet-v-windows-10-8-i-7/